Introduction

The shot above can be found in higher resolution here.
With the increased High ISO capabilities of even entry level cameras astrophotography has become available to almost anyone. But if you want your files to show low noise and high dynamic range – or you want to print big – it might be worthwhile using some of the techniques I am going to show you in this article.
1. Exposure stacking
With this technique we make use of the light’s wave-particle duality. When just taking one shot it is easily possible not all of your 12 to 42 million pixels caught light and those who didn’t lack useful information which will lead to noise and false colors.
When taking several shots of the same scene without moving your camera you can use Adobe Photoshop to filter out these pixels with “false information”.
What difference does it make?
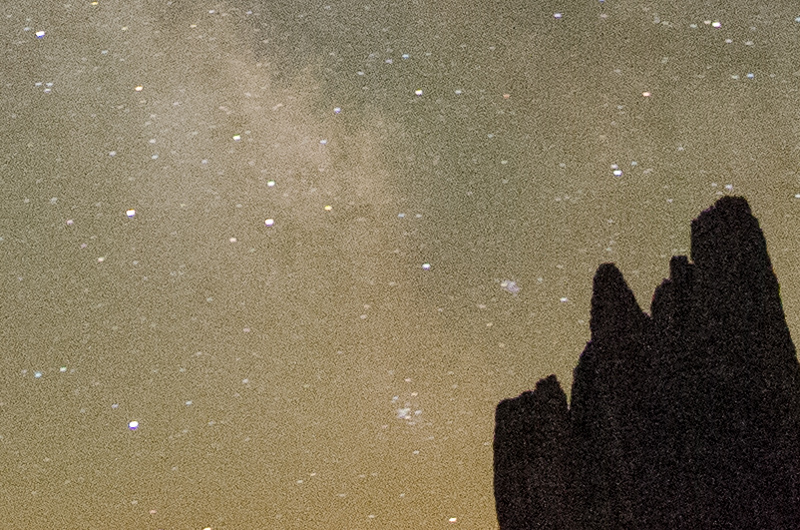

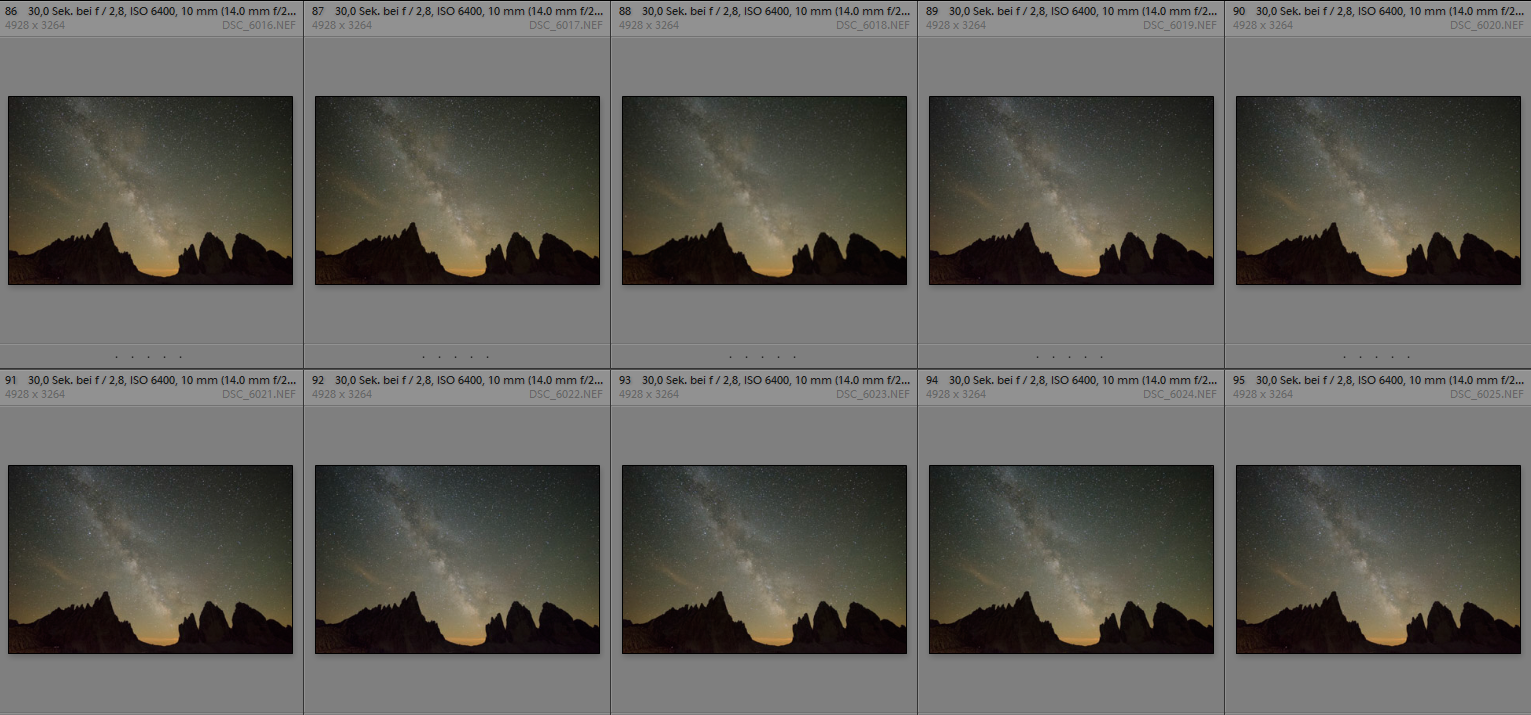
Before: single image | After: stacked image (12 images) | 100% crops
The difference is quite obvious, especially in the dark foreground which is pretty much unusable in the single exposure. But there are some caveats to this method: aligning the files before stacking isn’t always easy (Ian Norman from lonelyspeck.com has some nice videos explaining how to do it here and here).
Furthermore when having something sticking into the sky (as I do here) combining the stacked foreground and background may pose a problem:


Before: stacked “sky” frame | After: final combined image | 100% crops
In the stacked “sky” frame the foreground will be blurred and all the spires of the mountain overlap so there are neither stars in these areas between the spires in the stack nor later in the combined image. One would have to use parts of a single “non-stacked” frame as a third layer with more noise to reintroduce these “lost” stars.
To make a long story short: if you want really good results you will be spending quite some time in front of your computer when using this method.
2. Astrotracker
The are several portable astrotrackers available today. I was using the Sightron Nanotracker (affiliate link) which is to my knowledge the cheapest and smallest.
What does an astrotracker do? It rotates the camera at the same speed the earth rotates but in the opposite direction. Therefore you can take longer exposures of the sky and may even use a lower ISO or a slower lens.
Before: 2 min exposure without tracker | After: 2 min exposure with tracker | 100% crops
In theory this sounds like a great option, but there are a few things to be aware of:
- You need the tracker and a second ballhead (and a second quick release clamp), this will be at least around 1 kg with batteries.
- Calibration is not exactly easy and quite crucial for longer exposures. I heartily recommend getting a polar finder, but it will only work when you can see the polar star (in the northern hemisphere).
- When changing your position you will have to calibrate the tracker again.
- You need a second exposure for the foreground (as it will be blurred otherwise) and you will encounter the same issues described in the section “Exposure stacking”
- With longer exposure times (several minutes) you might want to use the long exposure noise reduction (“dark frames”) which will slow your shooting further down and significantly so.
In case you are looking for a small and portable tracking device I would now rather recommend the Vixen Polarie (affiliate link) with the corresponding polar finder (affiliate link), as a polar finder cannot be easily attached to the Nanotracker I was using.
I had high hopes for an astrotracker and expected it would bring my astrophotography to a new level, but in fact I wasn’t overly happy with it. It slowed me down considerably and extended post processing is necessary.
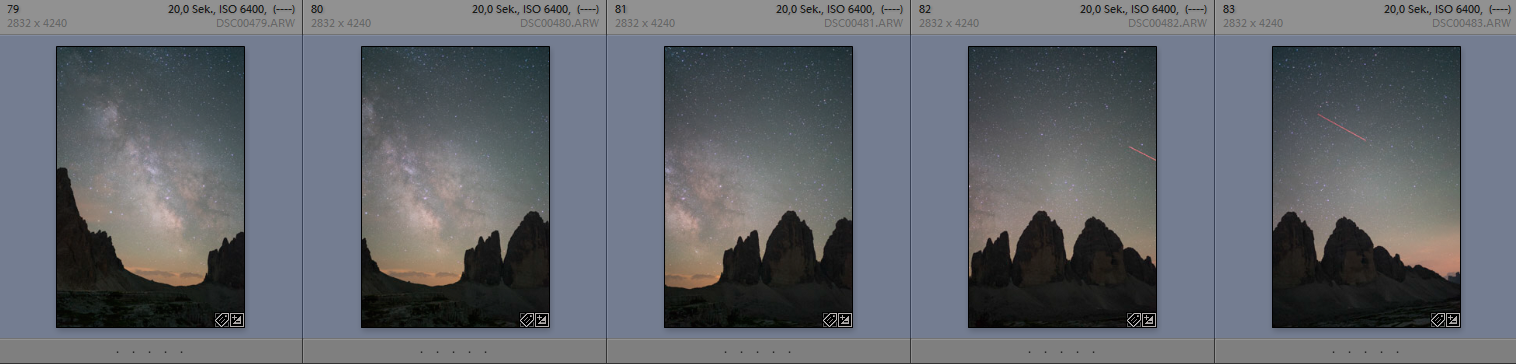
3. Panoramas
You might already came across this post where I describe the post processing of one of my Milkyway shots and the use of panoramas for increased image quality. But how does it work?
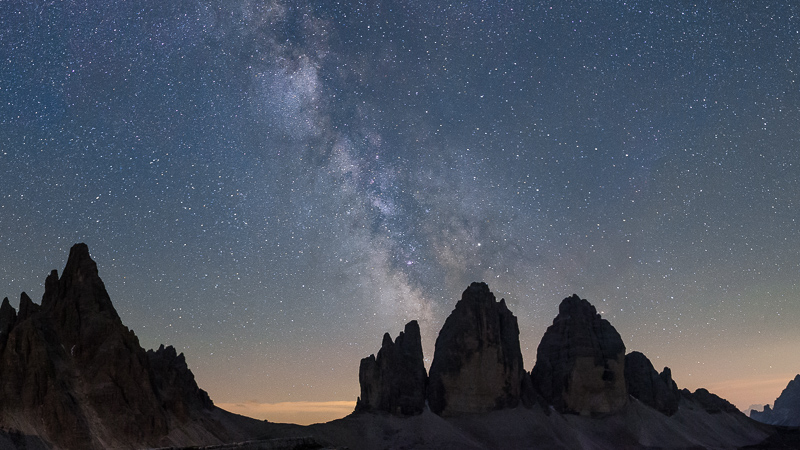
As an example: instead of taking one single horizontal frame with a 24mm lens you take 4-5 vertical frames with a 35mm lens. These can easily be aligned in Lightroom and the final panorama image will show the same as the single image, but with much better quality as you have effectively shot the image with a 54×36 instead of a 36×24 mm sensor now.


Before: 21mm 2.8 single frame, 100% crop | After: scaled down part from 35mm 1.7 panorama
In the example above you can easily see how much better image quality you can get when taking panoramas with a longer lens. And this is the difference from just 5 shots instead of 1. You can use even longer lenses (like the FE 55mm 1.8) and take a two row panorama to further improve the quality.
I recommend a rotating quick release clamp (affiliate link) and an L-bracket (affiliate link) for panoramas, but this is not a necessity.
A fast 28mm lens like the FE 28mm 2.0 or a fast 35mm lens like the Voigtlander 35mm 1.7 with 5m PCX filter is a good starting point, as you will only need one row of shots in portrait orientation, which can be easily done.
I take my shots with about ~30% overlap: on the camera screen I can still see the brighter stars, I chose one, look at the grid and turn the rotating quick release clamp (affiliate link) with camera until the star has moved about one third across the frame.
You will probably tilt your camera a bit upwards to have more of the sky in the frame. Decide where the center of the final image should be, for this center frame level the camera. Take a look at the 5 shots at the beginning of this chapter, the center frame is the one perfectly leveled.
Some more information on the post processing I usually apply can be found in this article.
This sounds much more complicated than it actually is. My mate I travelled with had neither an L-bracket nor a rotating quick release clamp and has never taken a panorama before. This is what he came up with:
4. Didymium filter
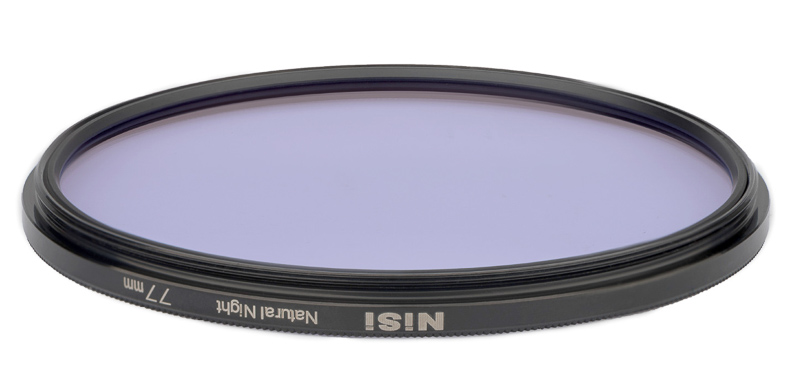
These filters are made from a special type of glass (see this article in case you are curious) which will filter a specific band of orange color which is emitted by sodium vapor lamps. These are often used as street lamps and one of the main reasons for light pollution.
What difference this filter makes depends on the amount of light pollution in your images. In this example the difference is very obvious:


Before: no filter | After: NiSi Natural Night Didymium filter
But if there is less light pollution visible the effect is of course also a little less pronounced. Nevertheless the amout of orange is still vastly reduced on closer examination:


Before: no filter | After: NiSi Natural Night didymium filter
At first sight many people think this effect can be replicated by merely adjusting the white balance, which is not the case. I tried 🙂
There is one downside though: the filter absorbs around 2/3 of a stop of light which can be a noticeable disadvantage if you are struggling to collect enough light in the first place.
Didymium filters are available from quite a few manufacturers today, I was using the NiSi Natural Night filter (affiliate link) in the 77mm screw-in version, which was given to me free of charge by the manufacturer.
Conclusion
Of the first three methods mentioned here to improve the quality in astrophotography taking panoramas is definetly my preferred one.
There is no additional and costly equipment necessary and no special calibration before taking the shot. You might even be able to use a fast standard lens you already have (instead of having to buy a fast wide-angle lens only for this purpose) and post processing is easy and not very time consuming. For the header shot I was only using Lightroom, for the other methods you will need Photoshop.
Especially if you are a beginner I would recommend using this method instead of buying a tracker or getting your head down to deep into Photoshop with exposure stacking.
Of course these methods can be combined. You can take a panorama where you use a tracker for all the shots. You can make a panorama from several stacked shots. But the effort necessary will grow exponentially…
Didymium filters can also make quite the difference if you have to shoot near light polluted areas, but I need some further testing before giving a final conclusion on them.
Other Articles
- Tripods for mirrorless cameras
- Overview: Lens Reviews
- User-Guide to ultra-wide-angle lenses for Sony a7 a7II a7rII
Support Us
Did you find this article useful or just liked reading it? Treat us to a coffee!
![]()
![]()
![]() via Paypal
via Paypal
Latest posts by BastianK (see all)
- Lens & Accessory Spring Sale - April 11, 2024
- Analogue Adventures – Part 30: Kodak Portra 800 C-41 - April 11, 2024
- Review: Nikon Nikkor 55mm 1.2 Ai – The first f/1.2 F-mount lens - April 6, 2024
Cool ideas thanks !
Great job using the nanotracker for successful 2 minutes tracking! I seldom managed that long for a sharp single exposure lol
I have also had some experience with didymium filters from different manufacturers. Although cutting some light pollution I think they made the colors somewhat nasty to correct. Due to the lack of certain range of spectrum I find that my pictures usually have a red-cyan tone, instead of the normal neutral or slight yellowish color for Milky Way center, which can cost me some time in editing.
Now unless shooting in close suburbs that are quite seriously affected by city lights, I would like to try not using them for more natural colors.
I had to adapt my presets and my workflow to the didymium filter and after having done that I think the effort for editing is pretty much the same.
But nevertheless I have to test it under more and different circumstances to make up my mind.
Didymium filters, so called redhancers work quite well, but color balance around the galactic core is a bit difficult. If you look for a really dark location, have a look in the Pyreneees, about 30 km south of Lourdes, the sweet spot is around the very spectacular canyons of Parc Nacional Ordesa. between Gavarnie, Cauterets, Torla (Spain), Bielsa. It’s also part of a dark sky reserve. I did quite some astro time lapses over there. If you like you can look at some my Youtube channel.
Thanks for sharing, really nice timelapse videos!
This is one of the things I want to try out in the near future as well 🙂
good article by the way.
Absolutely great and beginner-friendly article, even in a rather complex matter. Congratulations and multiple thanks =)
Thank you for your feedback, highly appreciated!
Myself I am using panorama tecnique in milky way capturing, too. I do not see it as a method for improving image quality and do support your explaination concerning this issue.
As long as you own a fast wide quality lens, you’d better capture a scene of terrestrial foreground and part of the milky way in one shot. Point is, that just the foreground in the single shot is static and in all photos sharp. Different the stars: they apperently are moving. Therefore you limit exposure time, as you have explained. What happens, when you are stitching single images of the sky: foreground will be nicely sharp, but the stars are in each exposure at a different position. The stitiching software always will put something together, as long as there are enough clear features from the foreground. What happens in the sky is strechting here, compressing there and making it fit somehow. The result is always is by the logic of the method full of matching errors either in sky or in Foreground (or both).
So you can use panaorama method for Astro Images. But is to avoid that, if your equipment allows that, respectively if you want to show the milky way complete and include terrestrial elements.
Som figures: to capture the full visible milky way arc, you would need around 8-10 portrait exposuers @21mm. There is no other way except fish eye, to get the full arc on screen.
The panorama you are showing would be easily possible with a lens in the range of around 20mm, f2.8. If you are not just occasionaly taking Milky Way photos, you should consider buying an appropriate lens for Astro-Photos as Loxia 2.8/21, Batis 2.8/18 or Firin 2/20. With such a lens you would avoid to split up the shown section of the milky way in sub-sections during capturing, Clear, sharp expuseres, free from stitching errors and compromises would be easily possible.
Hi Bastian,
Have you already tested the Nisi in a light polluted area? I’m from the Netherlands so there is plenty light pollution here. If the filter helps a lot it might be a handy tool for me to reduce the orange light in the pictures. Thank you in advance!
Hi Juriaan,
it won’t help you seeing more stars in light polluted areas, it will just help with blown out highlights caused by certain street lamps.
Hi Bastian,
Thank you for your reply! I understand that I will not see more stars. If it helps with the blown out highlights it is already a nice thing 🙂
Hi Bastian, Stunning photos in this and your link. I’m just trying to get into this in a small way. Am I right that Lightroom doesn’t do exposure stacking? Or is there a plug-in? I’ve tried using its “Photomerge HDR” feature, but that’s producing “donut” stars with black centres.
Thanks.
Thank you very much!
As far as I know exposure stacking is currently not possible directly in Lightroom and I also don’t know of a plug in.
Thanks Bastian, I’ll experiment with the “Enfuse” Lr plug-in and see if that helps.
I now have a very good, even copy of the TS-E 17/4 L, I’m wondering if using shift with that might be good for stitching together star shots, rather than pursuing a Laowa 15mm 2.0, the only problem is it’s only F/4!
This is an excellent primer in astrophotography. Apart from the lens and a tripod, however, it sounds as though you would require quite a few to invest to be properly kitted out. What items would you recommend as must-have for a starter?
Ah not really. If you have a decent tripod, a suitable lens and a somewhat modern camera you are good to go.
When you figured out how to find a good spot and come up with a good composition you can start improving the quality of your work with the tips described here.
Thanks for the nice article. What second ballhead and second quick release clamp are you using with the tracker?
Ah those were just leftovers I had lying around, definitely not something you should buy 🙂