Introduction

A panorama adapter can be a great addition to your kit, as it allows you to create shots with a wider field of view (up to 360° panoramas) and also vastly improves the image quality in any of your shots (e.g. in astrophotography). Unfortunately most pano adapters are either bulky and heavy, very expensive or cheaply made junk. A compact yet affordable and at the same time sturdy pano adapter was missing so far and pocketPANO tries to fill this gap. Let us find out if they managed to succeed!
How does it work?
The idea behind a panorama adapter is to make it easier for you to take a panorama and also rotate around the nodal point of your lens.
Thanks to click stops (more on that later) you will have pictures with the same overlap in every row which will not only make taking the panorama much easier but also simplify the stitching afterwards.
Why would you want to take panoramas?
There are several reasons why you might want to use a panorama adapter:
1. You are only using primes
If you are only using primes but don’t carry a bag full of these you may sometimes not have the perfect focal length for the scene at hand. You will usually have two options: you crop from a wider lens or you take a panorama with a longer lens.
Personally I usually have a spacing of roughly factor 2 between the focal lengths of my primes (e.g. 21mm, 35mm and 85mm).
With just taking a 3 shots single row panorama I will also have the equivalents of 14mm, 24mm and 58mm at hand.
Why I rather take a panorama with a longer lens than crop from a wider brings us to the next reason:
2. Incease the image quality of your shots
If you want to print really large or you are using a camera with lower megapixel count you may also want to use panorama technique to get better image quality.
The 100% crop from the Voigtlander 35mm 1.7 does not look bad, but the crop from the panorama taken with the 85mm 1.4 looks much better (you can find the full panorama later).
3. To get a wider field of view
Maybe you only rarely need an ultrawideangle lens so you don’t want to spend big money on it.
With a panorama adapter you can mimic any wider lens you can think of. Let’s say your widest lens is the Zeiss Loxia 21mm 2.8. With a 2 row panorama with 5 shots each (10 shots in total, 30% overlap) you will get the equivalent field of view of a fictional 8mm lens.
4. To use a different projection
Most lenses you can buy are rectilinear. Apart from these there are a few fish-eye lenses. Sometimes another projection might fit the scene better. Personally I found that for a wide landscape scene a cylindrical projection often works better than the rectilinear one.
When using good stitching software like Microsoft Image Composite Editor you can choose the projection yourself.
Specifications/Versions
The Adapter comes in different versions.
First we have to differentiate between pocketPANO Vario and Compact. The pocketPANO Compact line is meant for compact cameras and these are also all camera specific. Good thing about these: you don’t have to adjust for the nodal point or anything, just mount your camera and be done.
The pocketPANO Vario is meant to be used with all sorts of mirrorless and/or interchangeable lens cameras. This one can be adjusted to your camera and lens.
The Vario also comes in different versions, you either have:
K = Arca Swiss clamp (see picture above) or
S = screw (for directly screwing your camera on the adapter, see picture below)
And then you have to decide between :
XL = a little longer (recommended for A7 series if you are using L-bracket or Arca Swiss plate)
non XL = normal one for smaller cameras or A7 without plates and brackets
As you can see the difference between XL and non-XL isn’t as big as it sounds:
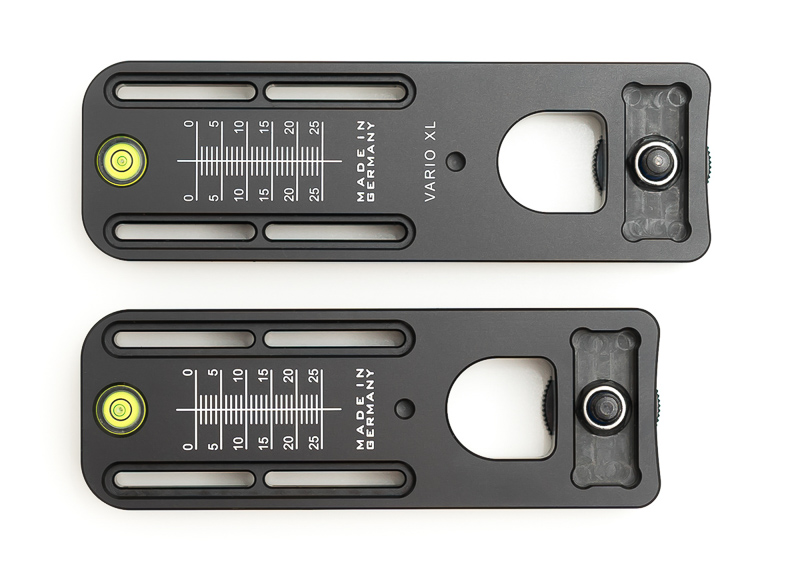
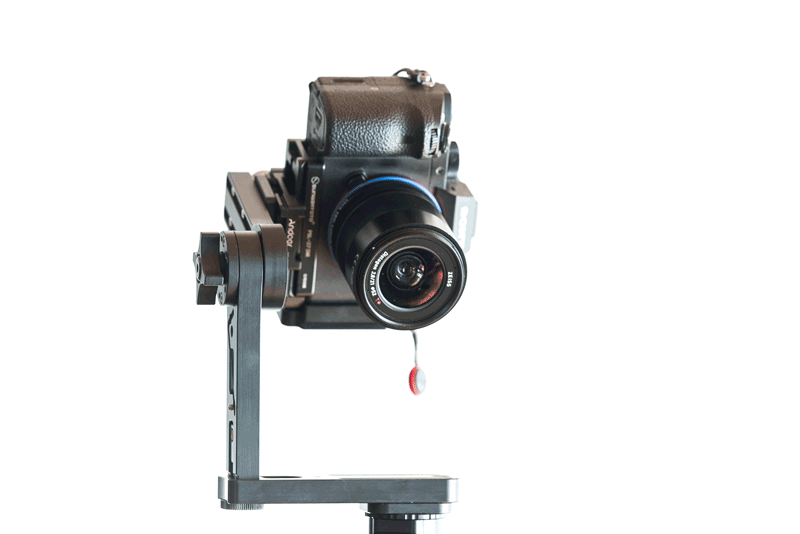
As I am always having an L-bracket attached to my camera I got myself the pocketPANO Vario XL K version which has the following specifications:
- Weight: 430g
- Length: 165mm (folded)
- Width: 45mm (folded)
- Height: 83mm (folded)
I am pretty sure this is also the version most of you will be interested in.
You can get this for 199€ on amazon.de (affiliate link) or directly at the manufacturer’s homepage.
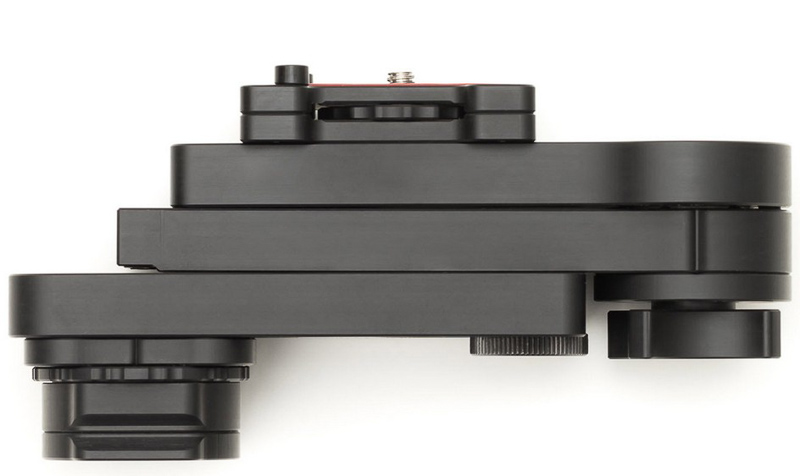
Handling / Build quality
The material is quite special, it feels like aluminium but is in fact high pressure laminate which is lighter than aluminium yet apparently more sturdy.
The pano adapter consists of 2 parts, which are connected with just one big screw, setting it up is very easy and straightforwared.
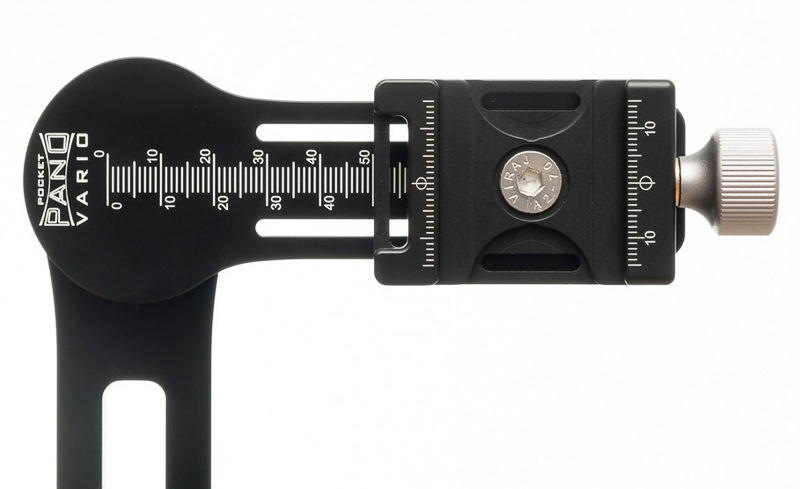
You have two “rotators” on the adapter, the lower rotator for horizontal rotation and the upper rotator for vertical rotation. Both offer different click stops, the lower one can be adjusted to either 15°, 20°, 30° or 60°:
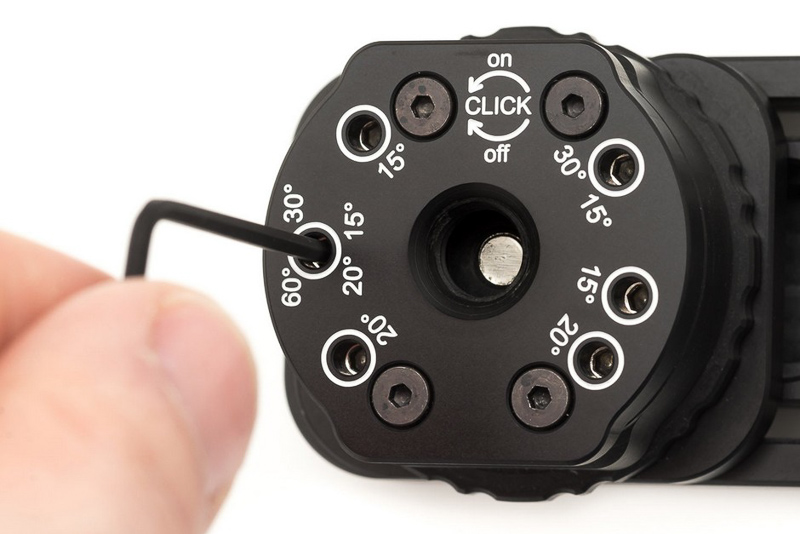
While the upper one can be adjusted to 22.5°, 30°, 45° and 90°.
You can even adjust the strength of the click stops for both rotators.
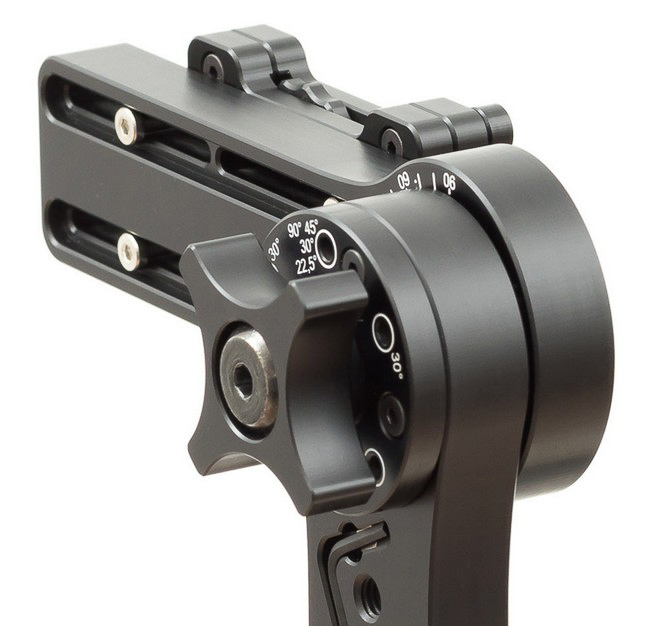
The upper rotator has also one big screw which can be used to adjust the friction of the vertical movement. This can even be set for heavier lenses, more on that later.
In the picture above you can also see the wrench for adjusting the click stops, it has a very clever store away feature and is hold in place by magnets.
This table gives a little overview how the click stops work for different focal lenghts:
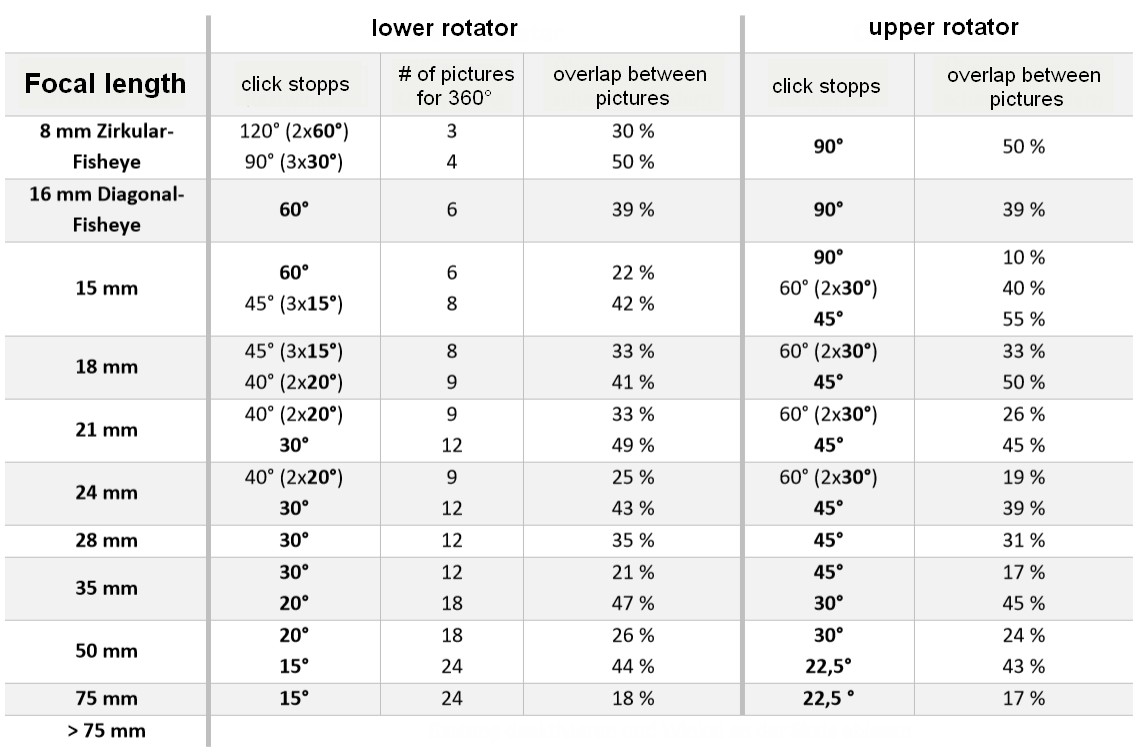
The manufacturer recommends to not use a combination of camera and lens which is heavier than 1 kg, but you can still use it with heavier stuff as I will show you in the following section.
In the field
I have used this panorama adapter for different usage scenarios to see what it is capable of and how it handles in the field.
Lago die Braies with Loxia 21mm 2.8
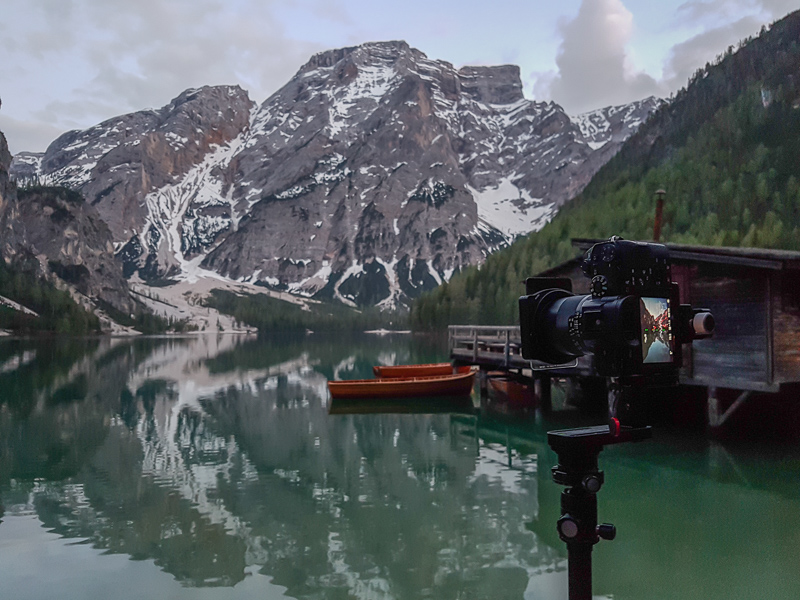
To use this adapter with the Zeiss Loxia 21mm 2.8 was my main intention when I bought it. Currently there is no wider lens with the same lens signature (combination of compact size, contrast, sunstars, flare resistance) and I also didn’t really like the idea of having to pack bigger filters besides my beloved small 70mm filter system.
While even with a simple one row panorama I can get to the field of view of a 14mm lens with a lens as wide as 21mm rotationg around the nodal point is quite important.
Furthermore this whole multi row setup weighs less than my former Novoflex Castel-Q nodal rail.
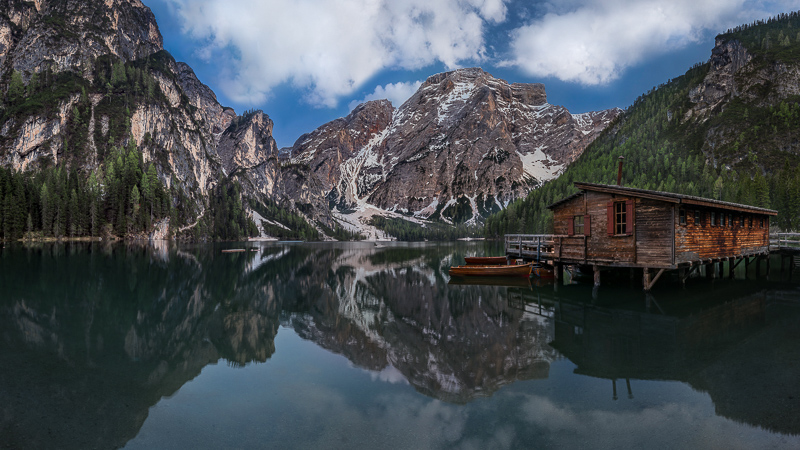
For this application there wasn’t really anything to complain about. Once set up for this lens it was possible to take panos in a breeze with the help of the click stops.
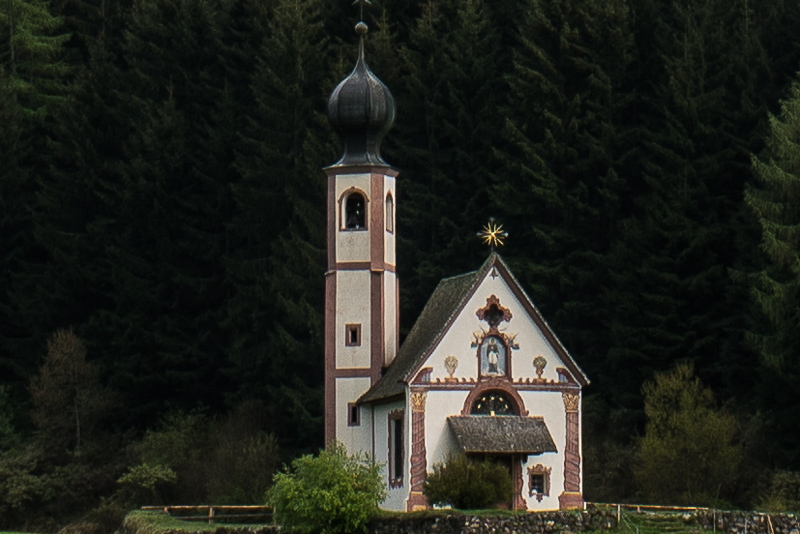
Church St. Sebastian with FE 85mm 1.4 GM
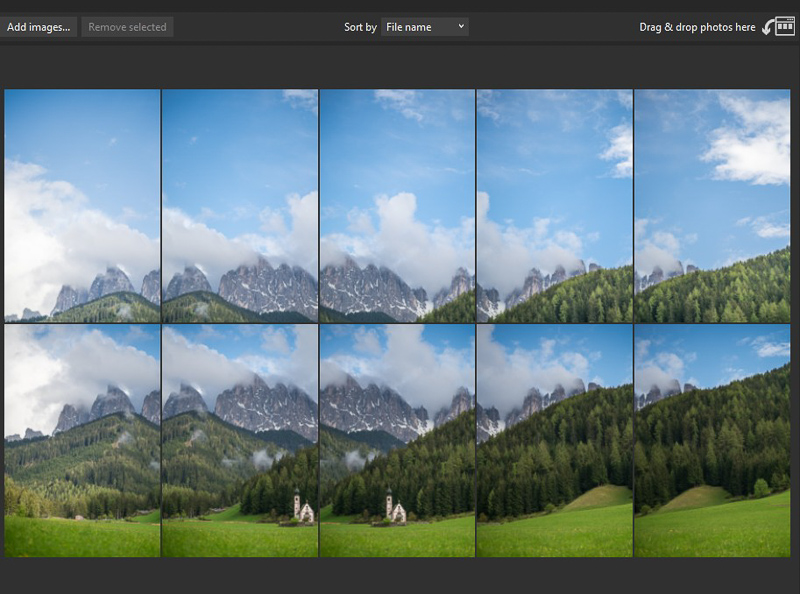
Usually I only travel with a few primes so sometimes I don’t have the “right” focal length in the bag. Many people crop in these situations but I rather take a panorama to increase image quality and not degrade it by cropping.
I do especially like 85mm lenses for this purpose: many of these offer really great image quality with a flat field of view and you also don’t necessarily have to rotate around the nodal point.
For this scene I wanted something like a 50mm framing but I only carried 21, 35 and 85mm. I also liked the idea of using that GM at f/1.4 to get a bit more depth with the very slightly blurry foreground.

As you have seen in the previous chapter the smallest click stops are best used for 75 or better 50mm lenses, not for 85mm lenses.
So in this case I set it to the smallest increment (15°) and always took another shot inbetween the click stops.
Even if you only have a click stop every second frame this makes life much easier, as you have some orientation when going for another row.
The Sony A7rII with L-bracket and the Sony FE 85mm 1.4 GM is about 1.6 kg, despite the 1 kg rating this was absolutely no problem.
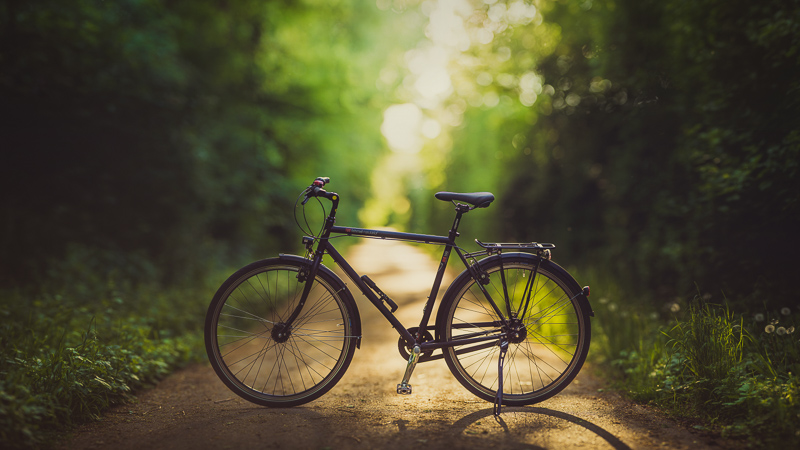
Bike Brenizer with Olympus OM 180mm 2.0 Zuiko
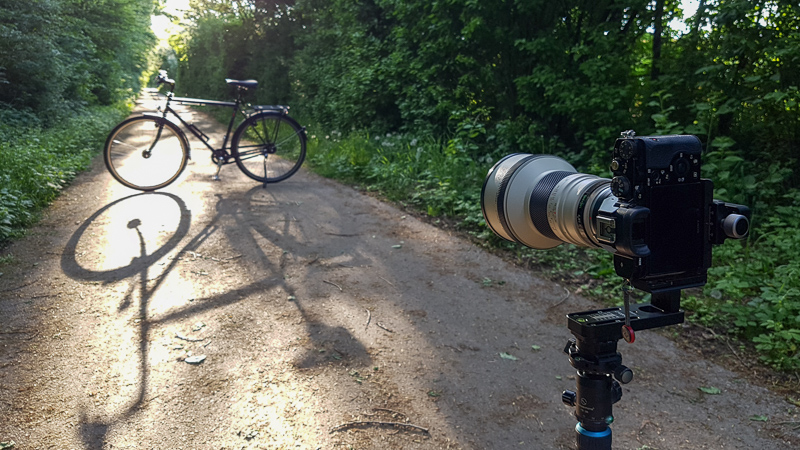
Another application for which I like to use panoramas are Brenizer or Bokehpanoramas. For these you sometimes have to take multiple rows of several shots with fast, long, heavy glass.
After I had used the adapter a bit I was brave enough to try it with the 1.7 kg Olympus OM 180mm 2.0 Zuiko Auto-T lens. So with camera we are talking about a 2.5 kg setup.
With such a setup it takes a bit longer until the vibration is gone, but it was still possible to get the job done.
Be cautious: I am not recommending to use this adapter with whatever heavy setup you can think of (I didn’t want to put my almost 4 kg Canon EF 200mm 1.8L USM with camera on it). I am just saying the manufacturer is being very honest with his 1 kg rating in a time, where most manufacturers will give you the breaking load of their products.
Recommended for 
This product actually exceeded my expectations, something which only happens very rarely. It is ligther than most ultra wide lenses and allows me to imitate pretty much any wider focal length with my 21mm Loxia, while I can still keep using my small filters.
It is also easy to set up which makes me actually use it in the field.
The only thing I would wish for were slightly smaller steps on the rotators. But there is no question: at this size compromises had to be made and my occassional brenizer work is obviously not the intended usage scenario anyway.
You can get this for 199€ on amazon.de (affiliate link) or directly at the manufacturer’s homepage.
Other Articles
- Tripods for mirrorless cameras
- Overview: Lens Reviews
- User-Guide to wide-angle lenses for Sony a7 a7II a7rII
Support Us
Did you find this article useful or just liked reading it? Treat us to a coffee!
![]()
![]()
![]() via Paypal
via Paypal
This site contains affiliate links. If you make a purchase using any of the links marked as affiliate links, I may receive a small commission at no additional cost to you. This helps support the creation of future content.
Latest posts by BastianK (see all)
- Review: Mandler 35mm 2.0 7e - July 18, 2026
- Review: Viltrox AF 26mm 2.8 Evo FE - July 15, 2026
- Review: Sigma 24-35mm 2.0 Art DG HSM - July 11, 2026
Cet accessoire semble s’ inspirer fortement du matériel anglais > 360 PRECISION < . Probablement, plus lourd et plus costaud …
These are completely different products.
It would also be nice if you could write your comments in english, so more people are able to understand them.
the 360 precision works only with fisheye lenses I think…
What is your procedure for finding the nodal point of a lens?
Of course, after posting the previous comment, I noticed the link in the review to finding the nodal point…. 🙂
As there are many methods I will nevertheless share mine:
I put a small stripe of scotch tape on my window and use a ruler to draw a vertical line on it.
Then I go very close with my camera and tripod to that window and make sure that line overlaps with the vertical line of a house as far away as possible.
I level the camera on the tripod and use a rotating plate to rotate the whole thing until both lines are on the edge of the screen.
Now I adjust the position of the camera on the nodal rail until both lines overlap on the edge of the frame as well.
If done correctly I am already finished, but I will also check the other edge of the screen and make adjustments if necessary.
I was just about to order the Novoflex Castel-Q. But saw a couple of weeks ago this review was coming. Being a novice in pano shooting I thought it was smarter to start with single row pano’s and a sturdy nodal rail for my A7III Loxia setup. I also was considering buying a zoom for landscape (24-70 or even 24 105). But I am also using the Nisi 70. And like manual lenses a lot.
Apparently I don’t have an opinion on my own and follow the advices on this website now for a couple of years. (-:
Thanks Bastian, I’ll give it a try!
I also started using the Castel-Q for one row panorama some time ago.
But in the end I didn’t really use it that often for the following reasons:
It is pretty heavy and bulky.
You need additional marks on the tripod’s clamp so it is always in the same position.
The screw for locking the camera is somewhat hard to reach (or my fingers too big).
You have to slide in the camera from the side and in the process every second time one of my Peak Design Anchors got stuck.
Of course there is a benefit to the Castel-Q: you can also use it as a macro rail.
But that is a feature I did neither need nor make use of.
Hi Bastian, this is an interesting product and you’ve done a very useful overview of it.
I’m wondering how you worked out the focal length of 48mm equivalent from the stitched 5×2 panorama you took using your 85mm lens? Is this something that is easy to calculate and if so what method did you use to do so please?
Thanks!
I am using this brenizer calculator by Michigan based wedding photographer Brett Maxwell.
The only additional information you need besides focal length of the lens you use and pixel size of the sensor of your camera is the pixel size of the final panorama.
Thanks Bastian, I’ll check it out.
Not clear why software wouldn’t make a mess of Astro panoramas. 6 frames would be at least 3 minutes lag…at 30 second exposure. If the software handles it this is a very interesting product. Wounded what it would do on a tracker….
The sky frames pose little problem for the software, as there is no relative movement to something else in the frame.
I compared different methods for improving astrophotography shots here.
Hi Bastian,
Very nice review and i’d surely want to get one, to be used on my a7r3 and the loxia 21mm. However, the link that you provided for amazon is in german, and from what i could barely figure out it only has the S version, not the K version. I’ve looked at other english amazon sites, there are none. Hence, if you could be kind enough to assist me by pointing to the right link for the K version, i’d be much obliged. many thanks
As an international customer it is best to contact the owner of the store directly: info@pocketpano.de
I recommend to do it rather sooner than later, the store will be closed down for holidays from June 24th until July 13th.
Will do that, thanks Bastian
Does it work with zoom lenses?
Generally yes.
Depends a bit on the size of the zoom lens and when changing the focal length you would have to adjust the rail.
Bastian,
Just trying to understand this product. What is the benefit of this product over Arca Swiss P0 ballhead that you reviewed recently. With that ball head if i take 3 shots and merge them in post? What is the value that it adds?
Please have a look at this article which explains why rotating around the nodal point is important (for wide angle lenses).
Just a rotating plate on top of your tripod (like Arca Swiss P0) works for longer lenses (~85mm and longer) but not for wide angle lenses if there is any foreground in the picture.
Received the PP vario yesterday. I looks and feels great. Lightweight yes. But I think it can hold more than 1 kilo. I realised that my universal L-plate form 3Legged has no center engraved markings and can be attached many different ways. So I am wandering which dedicated L plate for my A7III? Sunawayphoto, Markins? They both have center markings but it looks you can still slide the baseplate left/right while attaching to my A7III. Should I make my own marks on camera and L-plate? The GIF above shows the Sunawayphoto. Any advice?
The Sunwayfoto has markings and the Kirk as well, Markins I have no experience with.
Most can be slided to the side to allow access to the connectors, but will usually sit snug on the camera and markings will work.
Bonjour,
Very interesting article, but…, I do not understand everything. Had a look at the Nodel point site and the Pano site, but they do not show me an example of how to do it.
For a A7R3 camera, is it possible to give me the nodelpoint, which is the wrong name, for example for the FE 28mm f2 lens, and for the FE55mm f1.8, so that I can have a look what that means on my tripod, and how that works out.
As I get it, the shorter the focal length, the more the Nodel point is to the front of the lens, in general. At the 50mm lens the point will be at about the bottom of the lens…?
Thank you very much.
Is Photoshop OK for the stichting, or do you prefer the Microsoft editor?
Without a nodal rail or a pano adapter I doubt you can check where the nodal point of your camera/lens combination is.
As the Microsoft Image Composite Editor works better and is free I usually use it and not Photoshop.
https://www.panoramic-photo-guide.com/finding-the-entrance-pupil.html
If I place the entrance pupil of the lens on the ax of rotation of a leveled head? At least I can make a Panorama of one row?
If your setup allows to do that: yes it will work.
OK thank you very much.
Ps. The affiliate link to Amazon.de gives another pocketpano…, and the various version is not mentioned on the site…
Sorry, again…
As stated on the Panorama site, the entrance pupil of a 50mm lens is about at the bottom.
I did some testing with your window line trick, and found for my FE55mm f1.8 that the lens front is on the ax of the rotating point…
Can this be correct?
Yes, with many lenses it is close to the front element.
Thank you again!
https://wiki.panotools.org/Entrance_Pupil_Database
Perhaps it is possible to make a database for our favorite lenses…
Is there a way to mesure exactly where it is?
Hi Bastian,
I’ve finally got the product delivered to me a couple days back. Really impressed with the quality of the product, good craftsmanship. No complains there.
However, the manual is in German, so I wonder if you could assist me in setting it up.
I am using a Sony a7r3 + loxia 21mm. Your table offers a guideline to take a 9-shot pano for 33% overlap and 40deg clicks. How do I set it up? Basic question is how do I set it up to take shots with 33% overlap? And one last thing, how do you determine the nodal point of the loxia lens?
Much obliged, thanks.
I asked the manufacturer if he has already an english manual prepared,
if not I will try to explain.
Much appreciated, thanks Bastian. I have an upcoming trip to Iceland in September. Hopefully by then, I can make full use of it…
Entrance Pupil of the
FE 55mm f1.8
64,8mm from sensor
Zeiss Bâtis 85mm f1.8
18,2mm from sensor
Distance sensor to E-mount is 18mm
Hallo Bastian,
mein Objektiv für den Nachthimmel (an Sony A7rii) ist das doch recht schwere und lange Sigma 14mm 1.8 Art (kommt der Adapter ja noch dazu). Meinst du das System funktioniert damit auch noch?
Vielen Dank fûr deine Einschätzung!
Habe Bedenken, dass das sinnvoll nutzbar ist.
Dazu kommt, dass das Sigma einige Probleme mit dem Nodalpunkt hat, siehe hier (recht weit unten).
Hi Bastian, and thank you for this review, and for all the work the team is putting out!
Your article really got me interested in serious pano photography. I never really read about parallax issues but still noticed them with my Batis 18, now I know what’s wrong. Since I’m considering getting the PocketPano, I got in touch with Lütz to see if they had a chartlist of Sony lenses entrance pupil position. Unfortunately they don’t, so I went on and chatted with someone at Sony support, and he told me that he would try to get the data on the specs page for every prime lens in the catalog. I hope this go through so we can all enjoy perfect nodal settings. Also useful, all the Zeiss lenses for Sony FE (Batis/Loxia, not the Sony-Zeiss ZA) have this information available on their page, check it out.
Thank you again, you’re one of my best source on info about Sony photography on the web. You guys are honest, knowledgeable, practical, and you have a “real-world, day-to-day enthusiast photographer” perspective on the stuff you test/use and techniques you present, a quality many lacks. Keep up the good work!
Thanks for your kind words, greatly appreciated!
Bastian,
what is the advantage of using a nodal pano head for the Church St. Sebastian?
Without any foreground I would shoot an image like this with a normal tripod head or even most of the time hand held without any problems.
As I have written:
“Even if you only have a click stop every second frame this makes life much easier, as you have some orientation when going for another row.”
In my experience most stitching software works best with similar increments between the single shots.
With things like sky you also sometimes have only few elements in the frame that you can use as guidance for how far to move the camera.
What difference will it make rotating the lens on its nodal Point compared to just on the ballhead for the finished stiched Image. Can du Show a comparison?
When you rotate around the nodal point you will avoid stitching errors due to parallax misalignment.
If you are only using longer lenses (85mm+) and have no foreground in your picture there won’t be a difference.
If you take pictures with wide angle lenses and have objects closer to the camera there will be a significant difference.
This is what stitching errors look like: https://www.flickr.com/photos/erictastad/4707893948
So, e.g. for the 15mm equiv Pano shot with the loxia of the lago. Do you think there would have been parallax errors of the building in the foreground without the pano Adapter?
This is hard to tell, but as this was a 2 row panorama it is pretty likely there would have been a good amount of stitching errors without one.
Bastian,
Thank you for a great article, the topic has definitely got me thinking and trying new techniques. I have tried doing a few panoramas and bokeh panoramas without a setup like the pocket pano and have had poor results and definitely get why you would need the setup to get good results.
My challenge is the engineer in me believes in the KISS principle (keep it simple stupid) and all the moving parts and possibility of loosing them makes me think that there is a more simple way.
I’ve scoured the internet and have come across a video of another person who uses a nodal rail + panning tilt head and it seems that it accomplishes the same task and has less pieces to mess with. If I went this route, theoretically replace my ball head with something like that and just need to carry the nodal rail which seems to be able to carry easily.
(please remove the link if you feel it imposes on your website, I have no relationship with this person)
https://www.youtube.com/watch?v=JqBrFmWFxJw&t=612s
part to watch 55s – 2:35
I am pretty sure that the config he has would perform the same for 1 row of photos but do not know if it would do so for multiple rows.
With your experience in this area do you believe that the method he uses would be comparable for 2 or more rows?
I truly appreciate the work that you guys do, I am a novice in photography and feel that this website is giving me a master level class in all the possibilities of different techniques and methods that exist out there.
I will try to answer all your questions, if I missed one don’t hesitate to ask again.
A nodal rail with a panning base is enough to take parallax free one row panoramas, yes.
You don’t need to replace your head, best get a rotating Arca Swiss clamp like Leofoto RH-1L.
And don’t get one of these tilt or 1-way heads, imho they are useless for anything but super tele lenses (even there I would use sth else).
For 2 row panorama this setup will at times not work properly, especially with wider lenses and things in the foreground.
With 14mm his method is not suitable for more than one row.
Got it, thanks for the feedback. I ordered a nodal rail and will try a 1 row with my existing tripod and see if I can get some better results.
to follow up on this, I received a 200 mm nodal rail last night and did a few panoramas test shots in my living room, the stitching came out much better than previous attempts. I can’t wait to try an astro shot if we get good weather.
on the downside I think the rail I purchased is too long and won’t be able to use it with all my lenses, My tests so far are with a sigma art 35mm 1.4 and the rail was just out of the frame but that is a fairly large lens, I’m pretty sure if I tried with anything smaller the rail would be in the field of view. I will be ordering a shorter rail. It was $20 on ebay, so not to big of a mistake.
Glad to hear it turned out to be an improvement 🙂
Thanks for introducing this compact pano adapter. Yeas ago I had developed and built a several own adapters with a focus on achieving small solution. Recently I have used commercial foldable aluminum adapters from Heijnar and Sunwayfoto. Your test has encouraged my to give the Pocketpano S a try. I use the standard size adapter on a compact levelling base from Sunwayfoto for my Sony A7RIII and a Tokina Firin 2/20mm . This combination fits perfectly. Finally I have a easy to handle panorama set-up that convinces me highly in terms of stiffness and compactness. I can confirm your possitive rating for this PocketPano product. The features combination is unique and the sales price is reasonable.
I’m really keen on giving this system a try, in order to lighten my load when hiking. But am I correct that it has the following limitations:
– it can’t be used for long exposures of >30secs because e.g. streaking clouds and light trails won’t match up between frames?
– it won’t work for aurora borealis due to it moving between frames?
What other limitations are there?
I wouldn’t try stitching exposure with more than 30s. Stitching streaking clouds taken with ~15s worked quite well though.
But whether it works or not depends on: exposure time, focal length, speed of clouds. So there is no general answer possible.
Same is true for Aurora Borealis, sometimes those lights move very fast, sometimes not.
Sometimes I adjusted grad filters when moving the camera, with a polarizer that is less of a good idea.
Thanks for the tips – I now can’t wait for my next trip to try this out in earnest! Also, I’m looking forward to seeing if the A7r4 has a >60MP sensor, because if it does, then it will be perfect for lightening ones load, since one could take single frames when panos won’t work and then crop them. I currently use a 36MP A7r, so in theory image quality should be comparable (so long as my lenses aren’t out-resolved).
When you’re using filters such as ND grads and circular polarisers, do you adjust their positions between frames to compensate for the different view being shot? If so, then does this cause any problems in post-processing
How well do the images compare to those taken on medium format and large format? Is this setup a potential lightweight replacement for them?
You can easily replicate the sensor area of a medium or large format camera by taking panoramas with full frame (or other) camera.
A few things may be noted though:
You do not get 16 bit files as some of the medium format cameras offer and you do not get the big pixels of a medium format camera
(depends on the camera you are using, if you are using an A7s with its big pixels this is a different matter).
In the stitching process (when using wide angle lenses) some pixels are bent and distorted,
which can locally degrade image quality. But you will have a ridiculous amount of pixels,
so this should not be a problem for you. With longer lenses this is a non issue in general.
I plan to make Bokeh panos using the Brenizer method with a Sigma 85mm f1.4 DG DN lens. Sounds like I might not need more than a top rotating plate. Is that correct or would I benefit from using something to give movement around the nodal point?
You would benefit from it but it is not a neccessity.
Maybe try a few first and see how it goes.
Personally, doing bokeh panoramas with more than one row, this adapter reviewed here makes my life sooo much easier.
Easier in post is definitely better. I’m assuming based on the other lenses you tried that the Vario model should handle an A7RII with the relatively small Sigma 85mm f1.4 DG DN?
Thanks for your advice and reviews. You guys have the best review site around.
In terms of weight it will work, not 100% sure if it is really long enough for the 85mm to hit the nodal point.
Hi, Thanks for the article, much appreciated! Am interested in doing a fairly “simple” stitch on a tripod. Will be using my GFX and the 110mm f2. Will be looking to do 6 x portrait orientation shots (2 rows), to achieve one landscape shot. Is this product what is needed or could I get away with a nodal slide, that I already own? Thanks again! 🙂
With 110mm focal length and if there are no objects in the foreground you should be good to go with what you have.
Thanks, will give it a go! This item would provide extra accuracy though? 🙂
Would like to try it with a Brenizer method with people in the image? Is this the best head or is there another that would be better suited? Thanks! 🙂
For pure Brenizer work I would prefer something with narrower click stops, but I am not aware of any head which offers those.
Thanks! Much appreciated!
hallo bastian,
in der auswahl für einen panokopf stehen bei mir
– pocketPANO VARIO-K
– nodal ninja 6 mit rotator
pocketPANO VARIO-K ist günstiger + leichter, hat besseres packmass
sehe ich das richtig, dass der einzige wesentliche vorteil von nodal ninja eigentlich nur die einfachere nutzung der umfangreicheren klickraster-funktionalität ist ?
– horizontal klickraster 10 optionen max 5 grad (vs 4 optionen max 15 grad)
– horizontal klickraster 7,5 grad (vs 4 optionen )
Hallo Detlef, den Nodal Ninja 6 habe ich noch nicht selbst benutzt.
Generell scheinst du das aber richtig zu sehen, mit einer Ergänzung: der Nodal Ninja sieht so aus, als wären die Schienen länger, dadurch wärst du möglicherweise in der Lage auch größere/längere Objektiv zu verwenden.