Introduction
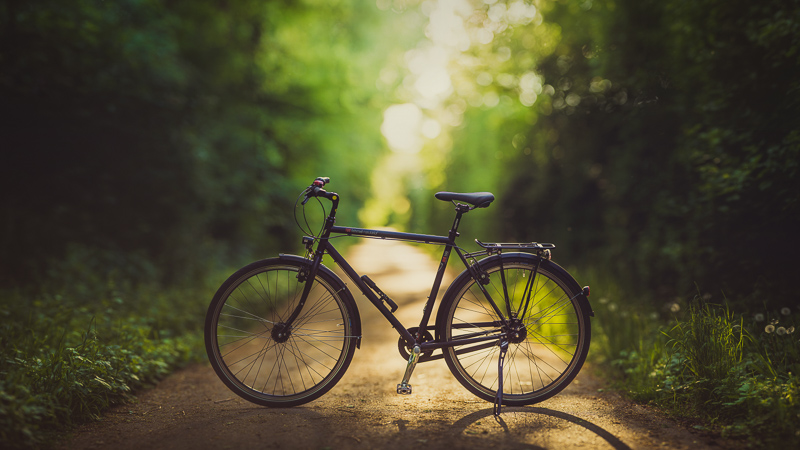
Brenizer or Bokehpanorama is a panorama technique to get a wide angle shot with the much better bokeh of a longer tele lens. In this article I will show you what it is all about and which lenses work best.
What is a Brenizer/Bokehpanorama?
By using longer lenses and taking a panorama you can simulate the look of fictional, wider, very fast lenses that are not even technically possible to build.
With a 200mm 2.0 and taking a multirow panorama of 6×6 frames with 50% overlap you can create the look of a fictional 50mm f/0.5 lens. If that is not enough you will vastly increase the image quality compared to a single shot.
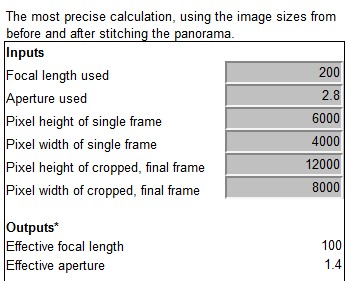
The name “Brenizer” is related to NYC based wedding photographer Ryan Brenizer, who was one of the first to use and promote this technique. For the calculations of what fictional lenses my panoramas are equivalent to I was using this brenizer calculator.
What lenses work best?
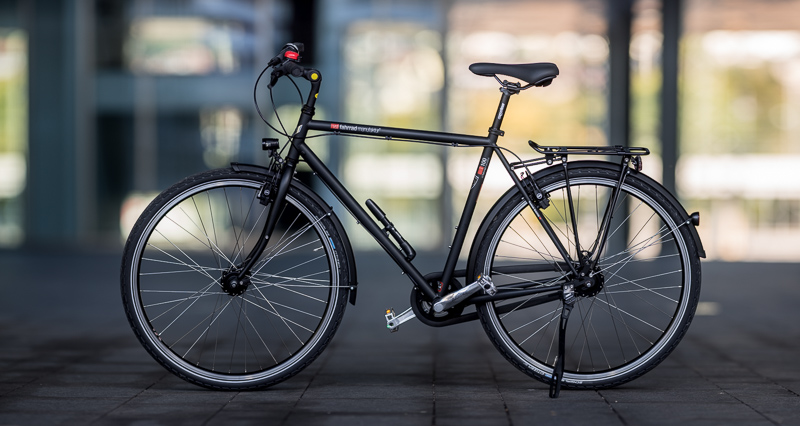
The quotient of focal length divided by maximum aperture is generally the best indicator for the blur potential and how useful a lens is for brenizer work.If you have two lenses with the same quotient, for example a 200mm f/2.0 (“100”) and a 400mm f/4.0 (“100”) the look these lenses are giving is somewhat interchangeable:
You can imitate the look of the 400mm f/4.0 by adding a 2x teleconverter to the 200mm f/2.0 (or by simply cropping) and you can also imitate the look of the 200mm f/2.0 by taking a panorama with the 400mm f/4.0.
To keep the panorama work to a reasonable degree you should try to stay away from super long tele lenses (300 to 800mm) though. As, for example, to get the look of a 100mm f/1.0 lens you would need 3×3=9 images when using a 200mm f/2.0 lens. You could also use a 400mm f/4.0 lens, but you will need 6×6 images, so it would be 4 times the work (50% overlap in both cases).
A list of noteworthy lenses, the higher the number the better:
- 600mm 4.0 / 300mm 2.0 = “150”
- 800mm 5.6 / 400mm 2.8 = “143”
- 500mm 4.0 / 250mm 2.0 = “125”
- 200mm 1.8 = “111”
- 300mm 2.8 = “107”
- 400mm 4.0 / 200mm 2.0 = “100”
- 135mm 1.4 = “96”
- 180mm 2.0 = “90”
- 135mm 1.8 / 105mm 1.4 = “75”
- 90mm 1.25 = “72”
- 200mm 2.8 / 85mm 1.2 = “71”
- 135mm 2.0 = “68”
- 85mm 1.4 = “61”
- 90mm 1.5 / 75mm 1.25 = “60”
- 50mm 0.95 = “53”
The ones marked in grey I would not consider, as they are too long, heavy, rare, expensive or several of those things at the same time.
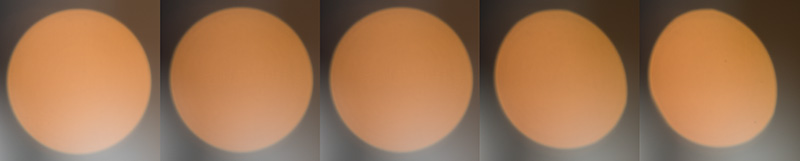
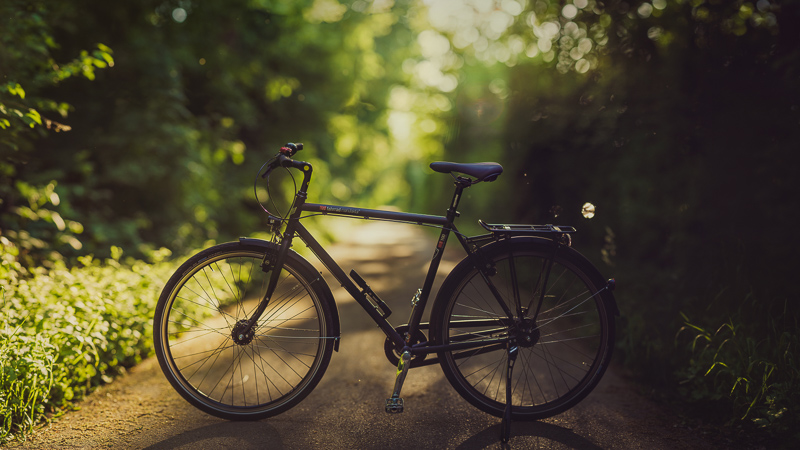
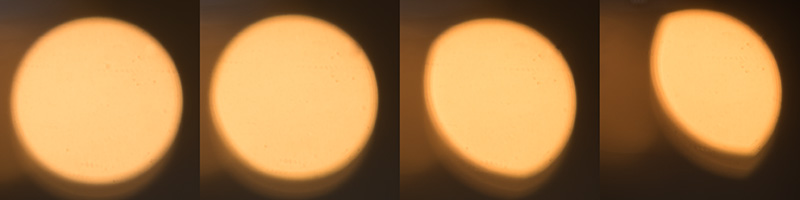
This is not everything though: with lenses that feature strong optical vignetting (which – amongst other things – leads to the truncation of light circles in the background) you may end up having a hard time to stitch the single frames.
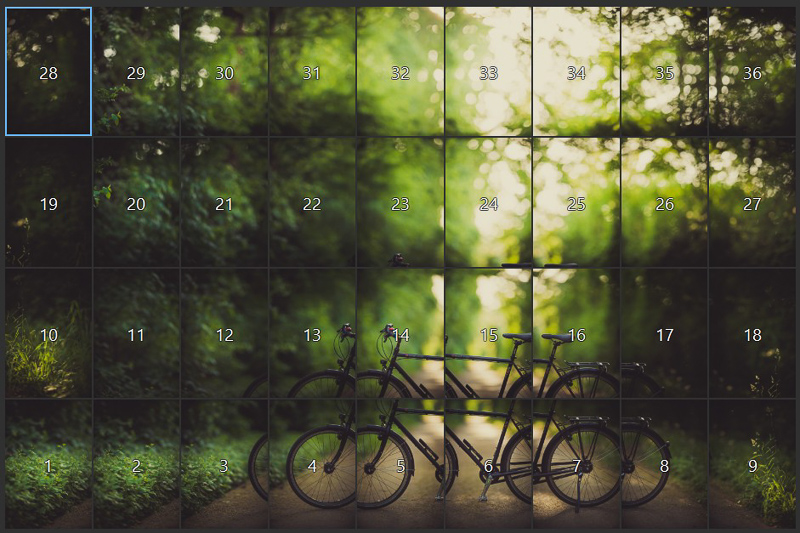
Even if you manage to properly stitch the panorama you will have cat’s eyes everywhere in the frame, not just towards the borders, as can be seen in this example:

It is very hard finding decent information on optical vignetting, so over the past months I had a look at a bunch of fast long lenses and tried to find out which one works best for brenizers.
Each of the following brenizers has been taken as a 4×9 shots multi row panorama, so the distance to the subject has been changed. Neither did I own all of the lenses at the same time nor would I have been able to take the panoramas with all these lenses under the same lighting conditions, so there are obvious differences visible.
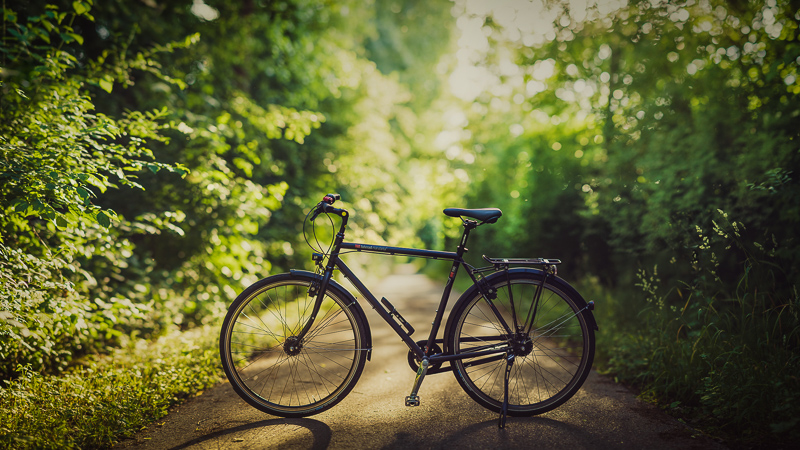
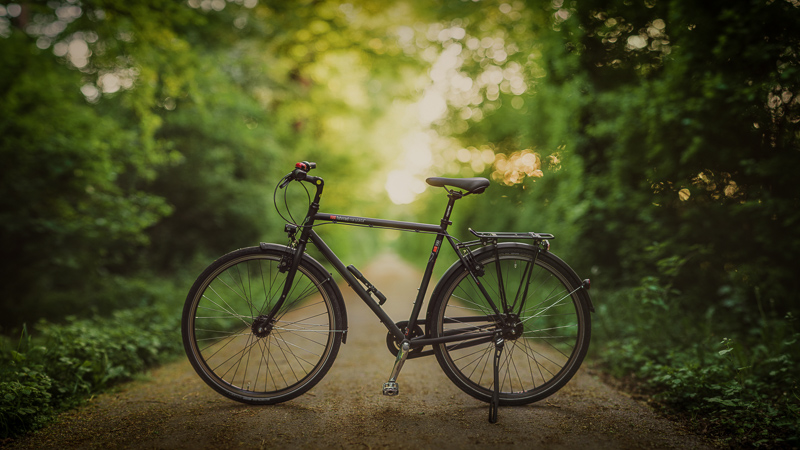
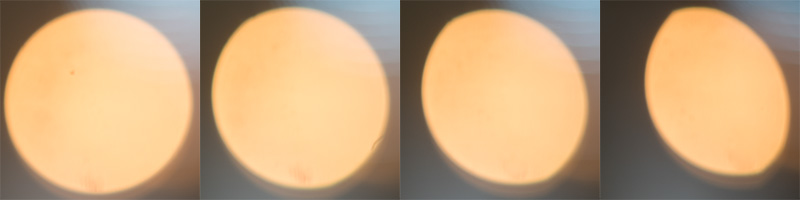
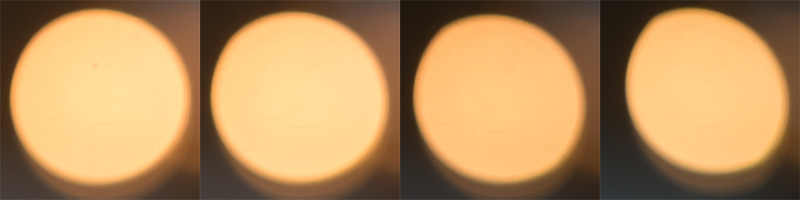
Sony FE 85mm 1.4 GM
This is the only native and also the most modern lens in this comparison. At closer distances it shows almost no optical vignetting which is quite amazing, but you will still be able to spot cat’s eyes when you focus on something further away.
85mm is a little short for such a big brenizer, this will lead to some unfavourable perspective distortion. So I think in this case a smaller brenizer (2×5) gives the better result:
825g | $1799 | full review
buy from amazon.com | amazon.de | ebay.com | ebay.de | B&H (advertisement/affiliate links)
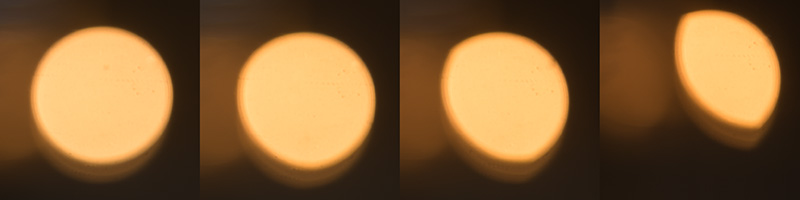
Carl Zeiss Jena Visionar 109mm 1.6
This lens is the cheapest in this comparison and the result is anything but bad, I actually prefer it to the much more expensive Canon 135mm 2.0. Unfortunately you really have to watch out for any stray light hitting the front element.
910g | $250 (including adapters) | full Review
buy from ebay.com | ebay.de
adapters: Ø62,5mm to M65 adapter | M65 helicoid (17-31 or 25-55) | M65 to E-mount adapter (advertisement/affiliate links)
Canon EF 135mm 2.0 L USM
I sold the lens before I took a optical vignetting series. Still, this lens would have probably been worst in that regard featured in this comparison. Stitching did also need several attempts and there are still some errors visible in the background.
708g + adapter | $999 (new) / $700 (used) | full Review
buy from amazon.com | Amazon.de | ebay.com | ebay.de | B&H (advertisement/affiliate links)
Carl Zeiss Jena Visionar 168mm 1.9

In direct comparison I like the results from this lens a little more than from its bigger 183mm brother as the transition zone is smoother and shows less outlining.
2525g | $300 (including adapters) | full Review
buy from ebay.com | ebay.de
adapters: Ø80mm to M65 adapter | M65 helicoid 25-55mm | M65 to E-mount adapter (advertisement/affiliate links)
Olympus OM Zuiko 180mm 2.0

The Olympus shows noticeable optical vignetting, no wonder as it is very compact for what it is. Despite this I really like the rendering and so I find it hard to justify carrying one of the much heavier lenses in this comparison instead.
Unfortunately this lens is very rare and expensive.
1700g + adapter | $2500+ (used) | full Review
buy from ebay.com (advertisement/affiliate link)
Carl Zeiss Jena Visionar 183mm 1.9

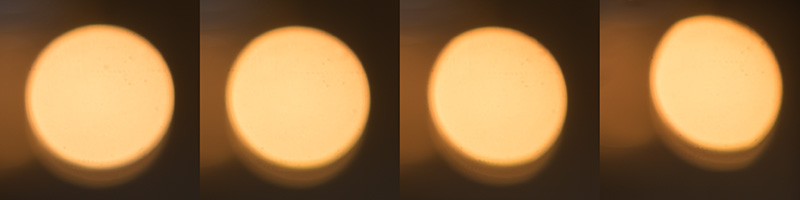
This old projector lens is able to render beautifully smooth background bokeh, only the transition zone is a little bit harsher compared to the Canon and the Olympus due to some outlining.
Still, if you are after big aperture for small money you should consider this lens.
2965g | $350 (including adapters) | full Review
buy from ebay.com | ebay.de
adapters: Ø80mm to M65 adapter | M65 helicoid 25-55mm | M65 to E-mount adapter (advertisement/affiliate links)
Canon EF 200mm 1.8 L USM
The blur is the smoothest in this comparison which was to be expected. Optical vignetting is also visible with this lens, but if you don’t mind weight and price the “Eye of Sauron” is undoubtedly still the king when it comes to smooth bokeh. It is also one of the best corrected lenses in this comparison.
3020g + 315g (hood) + adapter | $3000 (used) | full Review
buy from ebay.com (advertisement/affiliate links)
Conclusion
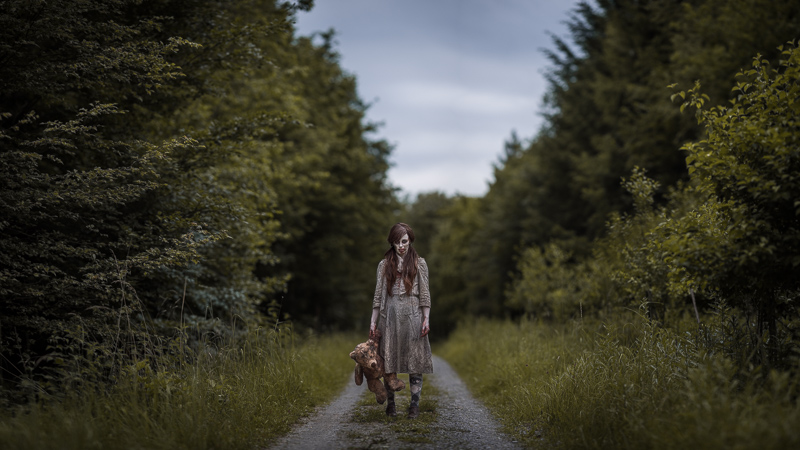
By using the bokehpanorama technique you can create very visually striking images with a look you cannot get from a single lens. Of course it is not a technique to use for every shot you take, but I found it to be a nice addition to do just one or two in an outdoor potrait session.
I tried to give you an overview of what lenses work well for this application. Most of these long yet fast tele lenses are very expensie, but as you have seen in the previous chapters those longer projector lenses are very interesting for brenizer work: they cost about a tenth of modern lenses with comparable focal length/maximum aperture combination and some of them feature amazingly low optical vignetting when used on a full frame camera.
This is not to say they are prefect: these lenses are very heavy and somewhat ill suited for normal photography, as they don’t feature an aperture diaphragm and therefore cannot be stopped down. The limited resolution and higher CA are nothing to worry about for brenizer work, but you have to look out for lens flares.
Nevertheless, these projector lenses can give you the look of a 3000$ lens for a fraction of that cost!
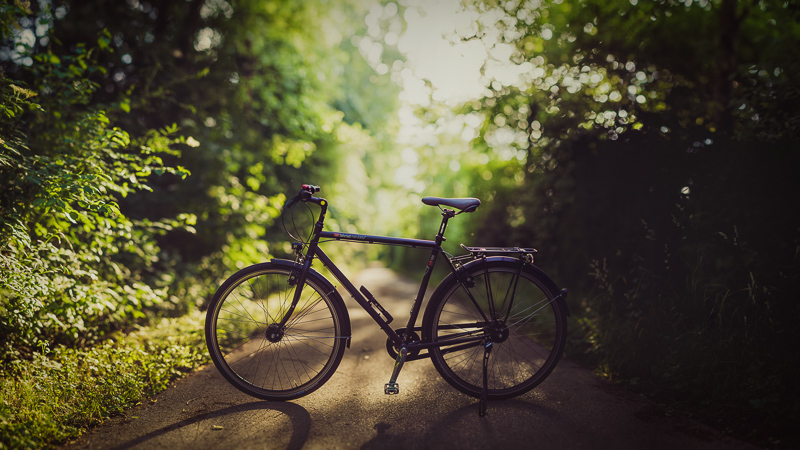
Sample Images
Other Articles
- Our honest guide to FE lenses
- Overview: Lens Reviews
- User-Guide to wide-angle lenses for Sony a7 a7II a7rII
Support Us
Did you find this article useful or just liked reading it? Treat us to a coffee!
![]()
![]()
![]() via Paypal
via Paypal
This site contains advertisement/affiliate links. If you make a purchase using any of the links marked as advertisement/affiliate links, I may receive a small commission at no additional cost to you. This helps support the creation of future content.
Latest posts by BastianK (see all)
- Review: Mandler 35mm 2.0 7e - July 18, 2026
- Review: Viltrox AF 26mm 2.8 Evo FE - July 15, 2026
- Review: Sigma 24-35mm 2.0 Art DG HSM - July 11, 2026
Nice overview and very nice examples, in particular the indoor portrait from David Braddon-Mitchell!
I recently started to develop some interest in the method as well, as I like methods that bring back this ancient film feeling when you’d only see in the darkroom whether your idea for a shot worked out. However, my two longer primes (90 and 135) are only 2.8, so I am missing out on a bit of blur potential: https://flic.kr/p/2568AnC
May swap the 90mm 2.8 with the 85 1.8 for that reason.
Best, Felix
Nice Article, can you add more on the mechanics of how to stitch them all together?
Also is the effect of the technique significantly limited with the use of a not so fast tele lens?
The only lens I have access to on your list is a canon 200mm f2.8, Is it worth me trying the technique with that lens?
For stitching I usually use Microsoft Image Composite Editor, which is free to download.
I try to take pictures with 50% overlap (horizontal and vertical), but if it is only 30 in a few shots it is not a big deal.
You can use your 200mm 2.8, with only 9 frames you can get the look of 100mm f/1.4 which sould already be interesting.
If you take a bigger one with 36 frames you can get the look of a 50mm /0.7 with very good bokeh.
So yes, I think it is worth trying 🙂
another follow-up question, using the spreadsheet you linked to, how are you determining how many photos will give you a specific effective focal length / aperature.
If I use the right side of the calculator and put in 200mm F2.8 and then spec out 100mm I get the F1.4 effect but it doesn’t reference out how many photos to get the desired effect.
I tried the left side of the calculator and started making up numbers with the same 200mm F2.8 and said 1000pixels for width and height of single frame and 4000 pixles for width and height of starting frame and it comes up with 48mm F.68
I guess my brain isn’t comprehending the pixels to # of pics calculation.
Can you help with the understanding? thanks in advance
That I figured out using a self made excel sheet, but you can indeed use that calculator for that:
You need double the amout of pixels in both directions (I was using a 24mp sensor as example as it is easy to calculate), that means 2 shots with zero overlap or 3 shots with 50% overlap.
Very interesting article! thank you very much for it. I read it with a lot of pleasure 🙂
A couple of questions regarding the people photos.
Do you make a shot of the model and them you shot arround? or you make it also ensambling photos even over the model?
I understand you used a tripod? Did you try making handheld shots? I mean the photo of the lady in the trafic jump.
Regards and thanks in advance
Thank you 🙂
Usually taking one shot of the model and after that the shots around is what I would try to do.
If your model is good at holding still you can “split” it over several frames, too.
Both shots with the girls have been taken without tripod.
It takes some practice, I try to use the grid lines for orientation.
Hello Bastian,
thank you for your answer. I was making Brenizers yesterday in the lights of the Saturday night. All handheld.
Some questions about the technique.
About the model. After you make the central photo of the model, I start to make photos around. Do you ask the model to disappear from the scene? Or you keep her there until you finish to shoot around.
When making the photos around the “central” one where the model stays. In the initial photo of the model do you keep some lateral space to be able to assemble with the other ones? Or do you include some contour of the model to simplify assembling?
Regards and thanks in advance
Dear Jorge,
I let the model stay in place as moving her may lead to shadows changing.
I try to take one shot where the whole model is in but the surrounding pictures will still contain parts of the model to simplify stitching.
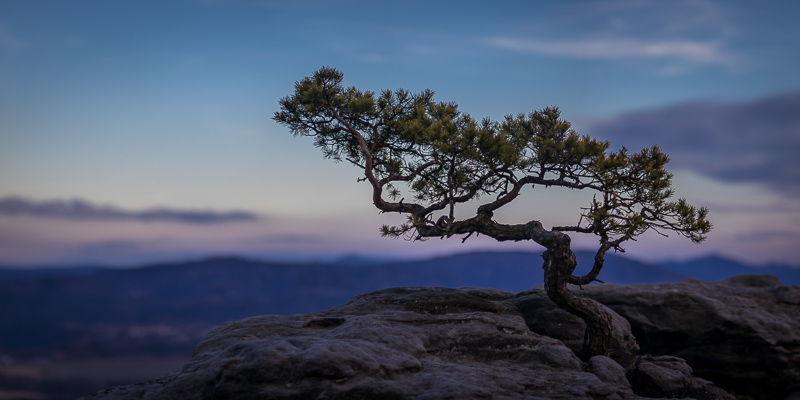
Thanks Bastian, I was wondering those same questions about the subject/model. I’ve tried it a few times in the field with wildlife and trees, without much success. Both animals and trees have this frustrating tendency to move. And usually I can’t get the animal in the right location! When I saw the one of the bonsai pine, I was inspired. Very helpful post, great demonstration photos, and great technical details, as always.
Thanks for the feedback!
And as is often the case: practice makes perfect 🙂
Just FIY: a user on Fred Miranda, Daniel Buck, is the person behind this technique. He promoted this technique in 2007. Ryan Brenizer saw it from him a year later, copied it and named it “Brenizer”.
http://www.fredmiranda.com/forum/topic/544062/
Hey Roger, slow the roll with the slander, please. On my very first public post about this, I noted that with a photographic community this size and math being universal, there was no way I could have been the first to stumble upon this, but no one I showed it to had seen it before (it’s hard to find this post since Amazon deprecated the blog but it’s out there on very much un-editable Internet archives) . Given that, in the month or so before I explained it I tried to work out all sort of stuff about it: how to do it with candids, various sort of lighting, etc. It’s the way inventing works quite a bit: the conditions line up and then things start popping up all over. Joel Grimes also invented this independently, a bit later but I believe him when he says he hadn’t seen my work (or Dan’s). Someone pointed this picture out to me later, but sure as heck didn’t see it when I was working through all this stuff. I’ve never been on Fred Miranda other than occasional Buy and Sale forums … there is a long enough digital record of all the forums I have frequented to show this as well. And yeah, I called it first “Ryan’s strange lenses” when I was figuring it out and basically doing a good-faith prior art search for this very issue, and then “bokeh panorama”: others started calling it The Brenizer Method and then they formed a Flickr group that I figured I should probably join and help people out, and that was that. But I definitely didn’t do anything duplicitous, and happy to note Daniel’s discovery as well. I’ve always been excited by the free flow of information about photography and I just don’t want anyone (especially Daniel, wherever he is!) to think that I meant to act with disrespect or to cheat off anyone’s test, so to speak.
This pretty much tells my long and storied history with the Fred Miranda forums, haha: http://www.fredmiranda.com/forum/viewprofile.php?Action=viewprofile&username=ryan+brenizer
But seriously, the Internet will always be a weird place but I hope Daniel hasn’t been thinking I ripped him off for a decade. I just had a theory that worked out well and then tried to help others do interesting things with it. Have a good day, this was a really interesting and well-done post!
Whew, finally found the language I used in my very first post.
“Now, I’m sure out of the tens of millions of people out there, some people have done this before, but I’ve never seen it.”
I knew there was nothing new under the sun, but that’s the plain truth. But the really funny thing was that I found this from basically the same debate in another forum … nine years ago. Of course it’s also an example of the common but more outlandish fallacy that I claimed to invent the panorama.*
https://www.flickr.com/groups/1121852@N21/discuss/72157622202507627/
*My mother was a fifteen year old French prostitute named Chloe with webbed feet. My father would womanize, he would drink. He would make outrageous claims like he invented the question mark. Sometimes he would accuse chestnuts of being lazy.
Not at all. I have been using this cheat for 38 years, when film and the darkroom were still tools of the trade. Cheats abound among old pros, and this is just one of them.
Not very fair…
What is not fair?
Probably because he learned the technique from Daniel then named it after himself…
I had to try the technique and just completed a sample shot of my kids cereal box sitting on our island countertop. I took 36 shots and stitched them together with the tool that Bastian recommended. It was easy to do and provided a rather interesting photo.
I have tomorrow off and will be visiting the Bridge of Flowers and plan on putting this technique to work.
Thanks for a great post !!!!!!!
You are welcome 🙂
Brilliant post. Tks for sharing!
this is amazing. thanks for this great article
and thanks to all genius photographers.
Interesting results! I really appreciated this post. Especially the calculations behind quantifying the total bokeh effect.
A little note about the originality of this technique. The technique itself is not exactly new, as stated before. Although it seems to be rarely used to pronounce (and put “numbers” on) the bokeh effect – like this post is about. But I’ve seen many examples of image stitching techniques being used to obtain other characteristics. The panorama is of course one common and simple example that is more effect-oriented. A slightly more complex variant is moving the camera in parallel with the subject (rather than just turning it), which results in an image that mimics orthographic projection. Like aerial photos stitched together, or an overview of a complete 2D Super Mario level from a video game strategy guide.
I’ve also seen a related methodology be used in studio photography in the late 1990’s, where two or more pictures of a model were taken in a similar manner as above. It gives the impression on the final image as if a longer lens was used, as well as increases the resolution. The latter being quite important when early digital photography of limited resolution was used for large and high quality print.
Inspired by this post, I put together a quick visual aid to compare depth of field, aperture, rough cost, and equivalence using bokeh panoramas. The costs aren’t researched carefully, just my impressions. This plot is less about obtaining “impossible” f/0.5 or f/0.25 lens effects (which is already explained well in the post), and more about how one might use an inexpensive lens to achieve the same depth of field as a more expensive lens.
I bet someone with a large catalog of lens costs versus lens speed could put together a much more accurate version!
https://www.flickr.com/photos/bwtownsend/41916371505/in/dateposted-public/
BastianK thank you for sharing this!
I wonder why you prefer to use Microsoft Image Composite Editor rather than to use Photoshop?
What are the differences between the two?
Most important thing: it is just doing a better stitching job.
You also have more choices in terms of projections.
Thanks!
I have been coming back to this article very interesting. I OR ordered one of the pan heads discussed in your more recent article and am anxious to try it out with some Pentax 67 glass which due to the shallower dof on 35 should prove interesting.
To my knowledge there are only few fast lenses for the Pentax 67.
I think the only one that makes sense is the 2.8/165 and this will still be giving you more DoF than a 2/135 or 2.8/200 on a 35mm camera.
My 67 105 F2.4 on 67 will be a 50ish 35mm equivalent field of view with a F1.2 DOF…. The yes but, is that the 105F2.4 is sharper than any 50 f1.2 that I am aware of wide open. i am really looking forward to playing with this combo, as well as the 85 F1.4 equivalent…. The real fun will be my Kiev 88 250 F3.5 which will shoot like a 80mm F1.15 ish lens…. Not sure that the pan head can handle the jupiter 36B though its a beast…..
I have this lens. Its charper than anything but the RF 50 1.2
Am I correct in thinking that with a 100mm f 2,5 a series of 9 partially overlapping pictures would result in a 50mm f1,25? By the same logic, how many pictures would be necessary to obtain an even larger aperture?
Yes that is correct.
How many pictures you need depends on what equivalent focal length you want to create.
For a 25mm f/0.63 look it would be 36 pictures including overlap.
Going wider may not make that much sense.
I agree. Thank you for the helpful reply.
Thanks for the inspiration. Will try this out with my Sony Zeiss 135/1.8 which should be more than adequate I guess.
This is a really nice article Bastian! I didn’t know that the bokeh shapes in the corners were call mechanical vignette. Have you seen the new Sigma 105mm Art lens? As I think this is supposed to remove the issue completely, if I understood the techy stuff correctly. I have been playing with this technique for almost a decade now and lately have been getting rather obsessed with it. I made a blog post about the Meyer 75mm f/0.95 lens here: https://www.edwardnoble.com/single-post/2018/06/08/The-Best-Bokeh-Pano-Lens-No-Really-This-Time
but perhaps more interesting is the graphs I made on the weight of the lenses versus the effect. Like Ben I had one with prices once too, but it got really confusing as they can vary wildly.
I also made an 89 shot pano from the Sigma 135mm f/1.8 Art lens here over the weekend: https://www.flickr.com/photos/eddnoble/43376751011
I also expected the Sigma 105mm f/1.4 to not have strong mechanical vignetting, but this is not really the case.
The Sony FE 85mm 1.4 GM fares better in this regard. Actually it is the best f/1.4 lens I know of when it comes to this.
I would also be very very careful with praising that Meyer lens before they have actually build one.
So far their lenses have been ridiculous rip offs.
They even claim to build a 50mm 0.95 for Nikon F-mount which is technically not possible.
But I quite like your graphs nevertheless 🙂
I was also asking Zhong Yi for a review sample of their 135mm f/1.4 twice already, but never got a reply.
Sorry for the late reply, I wish I had seen this article sooner. I have a lot of experience with building panoramas with fast(ish) telephoto (more or less, depending on my intended vision) for many years. Trying to overcome the lower MP count of Micro Four Thirds, as well as the bigger DoF. What I have noticed and found most frustrating, besides mechanical vignetting, is the flatness of the focus field of a lens. Quite often I encounter problems, where a lens might not have a flat enough focus field (it may warp towards or away from your subject) when trying to stitch them together, the out of focus elements may bend in a different direction than the previous or next frame. Creating very noticeable (basically can ruin the final image altogether) artefacts (like grass changing its direction suddenly) that can not be corrected in post and it’s very hard to judge in the field. It makes it very difficult and unpredictable to create such images and still, I try them as often as I can because I love the results (when they work) so much. I haven’t had enough lenses of my own to test this but I do want to get (very soon) fast-ish macro lenses to test this, like the Olympus Zuiko 50mm f 2 1:2 Macro, other lenses like Tamron 60mm f 2 Macro would work. There are some legacy Macro glass that goes as fast as f 2 for Sony FE, even more rarer ar the Macro f 1.8 glass as well.
I kinda doubt macro lenses will solve your problem.
Actually, I have never ever heard of that problem.
I think your problem might be this:
When taking a pano by rotating the camera around the nodal point of the lens (which is the usual way to do it)
the shape of the plane in focus is a circle running around you, so if you take pictures of something big and flat not everything will be in focus.
A macro lens surely won’t help with that. Using a longer lens and keeping a bigger distance to your subject will.
The lens I used where I noticed this issue the most is the Sigma 60mm f 2.8 on Micro Four Thirds cameras. I have not seen similar issues (or to that extent) with, for example, Olympus 50-200mm f 2.8-3.5 or 14-54mm f 2.8-3.5 (at the long end). I have tried moving sideways while trying to keep as close to similar focal point plane from the subject and I still noticed this issue, very strange. The issue, to my imagination of reasoning, might be not the subject being flat as more as the background (or foreground) that falls on the corners of the image might be bend in different shape or direction by astigmatism and (lack of) flat focus field capability of the lens. It can, and will, confuse the stitching software to which part of the image should fit where when there is not enough sharpness (as is it would out of focus by nature) for the algorithm to understand how “the world” should be stitched.
https://www.dropbox.com/s/bkggfjkjh32c81m/Panorama%20Artefacting%20Problem.png?dl=0
On this example, I used the Panasonic GX7 with Sigma 60mm f 2.8 at f 2.8 with a tripod, for a total of about 60 images and it has many such issues where the out of focus elements seem to distort in all manner of shape even though I used around 40 to 50% overlap between each image
Sorry about the crude drawing, its the only way I can explain the train of thought:
https://www.dropbox.com/s/16hz2w5m1plyovq/Theory.jpg?dl=0
Called Field Curvature, this is one excellent resource that helped me understand better the problem I have been noticing for the past 5 years since I’ve been trying to do this sort of images. And I am still learning: https://www.lensrentals.com/blog/2018/02/mtf-tests-of-the-sony-fe-24-105mm-f4-oss/
Love the idea and am going to try it with my Soligor 200mm f/2.8.
Also interested in how it compares to taking just one shot with my 178mm f/2.5 Aero Ektar on my 4×5 camera. Depth of field is about 6″ at 15′.
Sorry for the really late reply on this post, I’ve got a 4×5 speed graphic and have been on the lookout for an Aero Ektar, How do you like it? Is it a pain to manage with the weight of the lens?
I have seen an impressive good review of the Samyang 135mm f:2 on these pages. Could it be a good lens for stitching panorama’s? Has anyone used it for that yet? Greetings, and many thanks for your very interesting articles. HD
You can also use that lens for that application, yes.
When comparing the Samyang to name brands (Nikon, Canon, etc) you will find differences in contrast and sharpness, especially wide open. But sharp is better suited for macro, not portraits.
A good read, as alwyas Bstian, thank you.
Personally, I have been experimenting with this method for quite some time, with mixed results. I have 2 lenses which I use for this type of work- MF Samyang 85 1.4 and Sony 100 STF GM.
First, the Samyang. While it produces pretty visible mechanical vignetting, if I am being careful with it, the results are pleasing and easily “wow” clients. But I guess same can be said about any 85 1.4 🙂
Now, the 100 STF GM… in theory, it should be a winner. Almost no mechanical vignetting, “perfect” smooth bokeh and plenty sharp. And yes, those qualities do make stitching easier and you are guaranteed to have no lemons in the background. But the resulting images are… dull? I mean it`s hard for me to write this as I REALLY try hard to love this lens and it has it`s moments, but I feel that the Brenizer method is simply not one of them. Maybe it`s the learning curve, or maybe it`s just plain “find more appropriate subject/background combo” situation. I guess it`s just a general problem I have with this lens- I try to like it too much and not see its obvious shortcomings. Maybe you had a chance to play around with this lens using this technique?
I also saw some bokeh panos taken with the 100mm STF GM and didn’t like them.
The light discs are smoother, but in a bokeh pano they will appear much smaller because of that.
Therefore I think the bokeh pano will look more like it has been taken with a lens with the t-Stop of the STF lens (or in this case somewhere inbetween f/2.8 and f/5.6, but clearly worse compared to a 1.4/85).
I’m afraid I’m someone who finds STF lenses dull. They look, to me, a bit like a regular f2.8 lens which someone has run a Gaussian blur filter on.
I received a new “toy” this weekend for my 4×5, should allow the Bokehpanorama effect in one shot – Kodak Aero Ektar 178mm f2.5
I wonder if it would be worth trying to cobble together a mount for the Sony?
This sounds like an interesting lens indeed
Hello! I’m revisiting this excellent and comprehensive article as Sigma has just released their 200mm f2 prime. Obviously a lens of those parameters has to reach for some comparatively niche applications to justify itself, and I was surprised to find that none of the usual reviewers had picked out bokeh-pan and ultrafast wide-angle simulation as an area that it would excel.
Re-reading, I’m reminded that being mirrorless native and with excellent AF performance and 2020s optics is unlikely to matter much for a static subject, fully-manual, tripod-only sequence and process – but even so, it seems like a much more practical purchase than a used Canon 200mm at pretty near the same money.
With recent years we’ve gotten several 135mm 1.8s that are probably a more affordable and generalist compromise entrypoint, but I suppose it’s nice the 1.0 “bokeh-pan quotient” finally has a contemporary system representative.