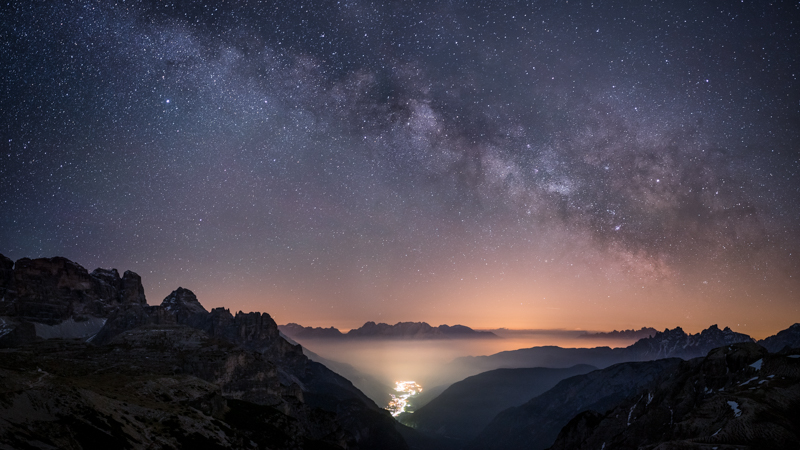
For decent Milky Way shots you need really good conditions – which don’t come often – and a good location. Regarding the latter I decided to go for the Dolomites in Italy, so I followed the weather forecast for quite some time and one weekend the conditions were finally said to be what I needed, so I decided to go there and challenge my luck…
In the Bag
As I wasn’t bound by airline carry on restrictions this time I brought a little more gear than usual. For astrophotography I carried my trustworthy Mindshiftgear rotation 180 panorama* backpack. In the belt comparment I was carrying my A7s, Zeiss Loxia 21mm 2.8, Voigtlander VM 35mm 1.7 + 5m filter and my Samyang 14mm 2.8. I also carried a very sturdy Gitzo Series 4 tripod and of course a remote trigger.
Before the shot
The Dolomites are roughly a 5 hours drive away from where I live, so I checked the weather forecast to show at least two days in a row with no clouds. Of course it also had to be around new moon to capture the Milky Way at its best.
I scouted the area from afternoon right into the evening to see what spot might work best. Before that I also checked in which direction the Milky Way will appear. There are several Apps that will help you to figure this out, I use Stellarium.
This shot was taken at the end of the blue hour, I quite liked the valley with the small town in the middle:
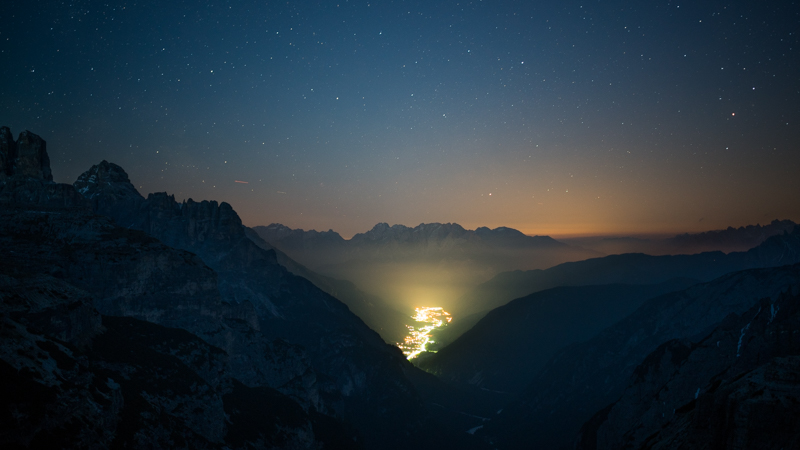
So I decided to come back later, when the Milky Way spans over the valley.
Taking the shot
When doing astrophotography I always use my A7s, shadow noise and dynamic range at higher ISO are still worlds ahead of the A7rII. For these type of shot I also almost always take panoramas as these will significantly increase the quality of the final image (and also the pixel count of course).
This was the first time I used the Voigtlander 35mm 1.7 + 5m filter for astrophotography. As can be seen in my 35mm comparison coma correction isn’t exactly perfect, but stars are far less demanding than cityscapes so I decided to give it a try.
All my bigger tripods have a rotating plate on top (see also this article) so I can easily take panoramic shots. As there wasn’t something very close to the camera in the frame a nodal rail wasn’t necessary in the first place.
Here I decided to take an array of 2×2 shots, of course all with the same settings: f/1.7, ISO3200 and 15s:
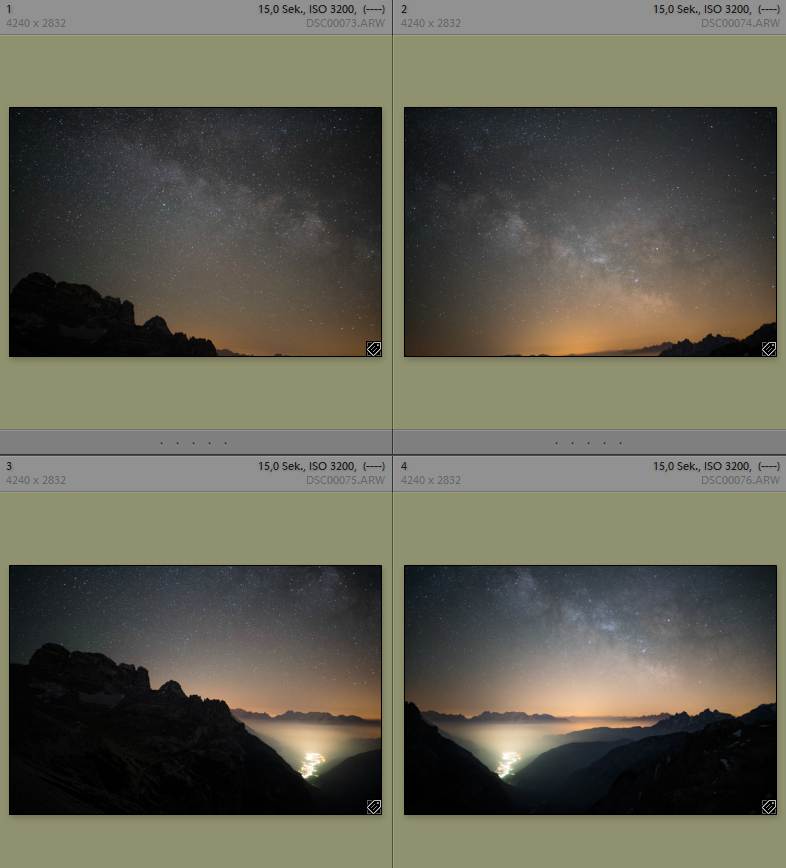
I exposed for the highlights (town) to not blow them out and lose too much information there. Also 15s is actually a bit too long for a 35mm lens and the stars will already become short streaks, but this will hardly be noticeable in the final image.
After the shot
Nowadays it is possible to create panoramas directly in Lightroom, this offers a few benefits as you don’t have to adjust white balance to match each of the shots before combining them and you won’t loose any information which often happens when using external software. This is the still unedited panorama in Lightroom:
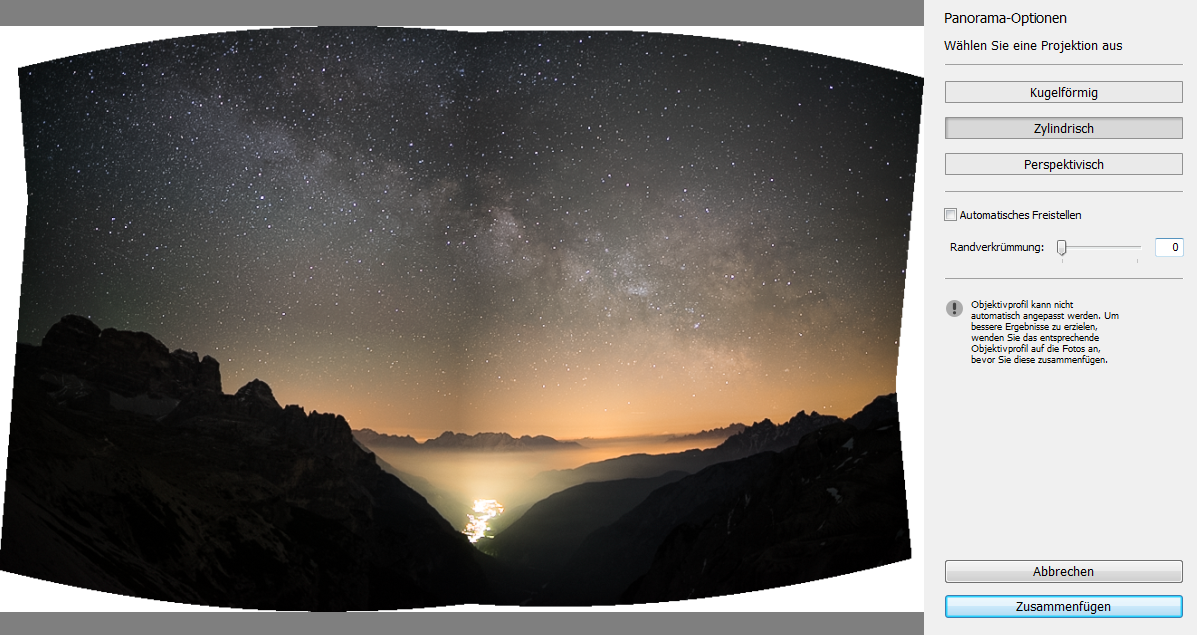
Unfortunately there is no decent profile for the Voigtlander 35mm 1.7 to correct vignetting, so you will see dark seams where the single images connect. Furthermore the horizon is bend as the camera wasn’t leveled.
But before addressing these issues let’s have a look at the global settings I chose for this shot:
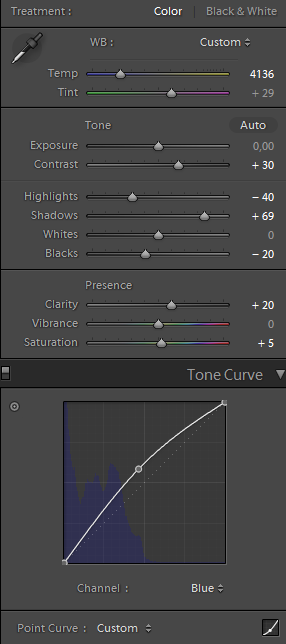
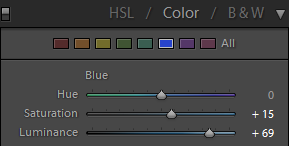
I also did some alterations to the blue color:
We still have to address the seams between the single images though, which I did by the use of the local adjustment brush (slightly increased exposure):
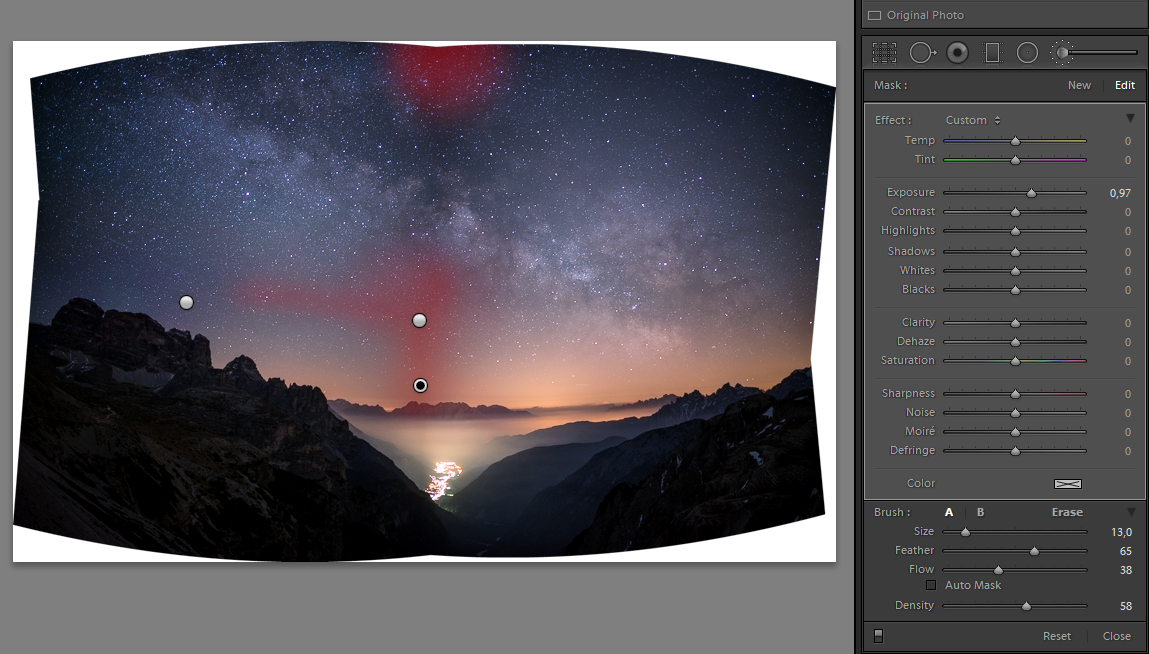
I also corrected some green color near the left border this way.
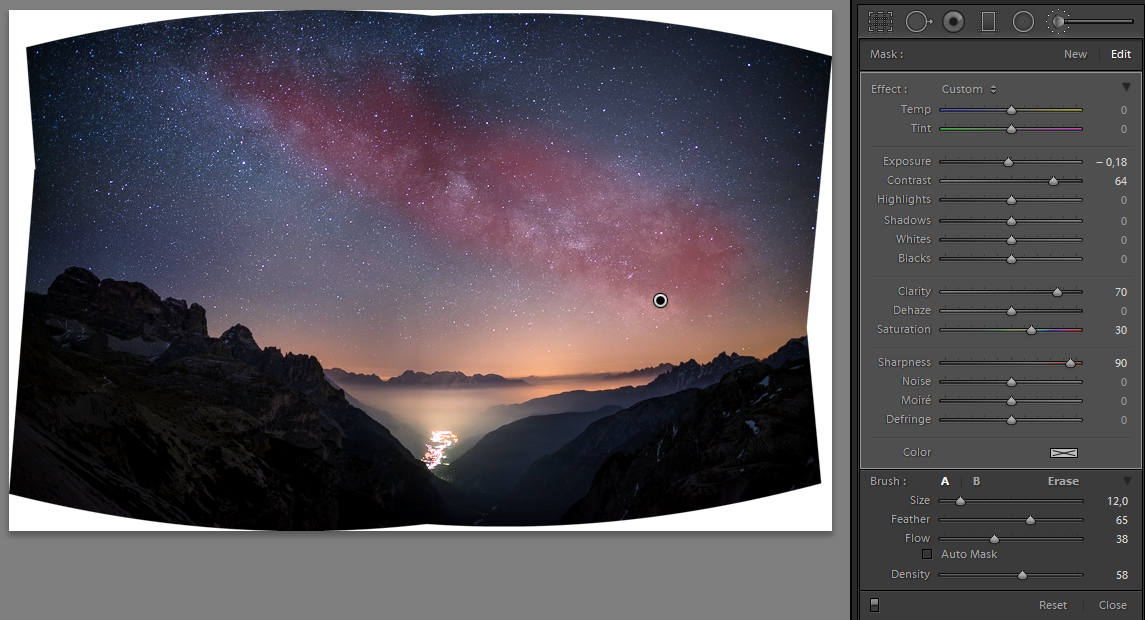
I improved the outcome of the Milky Way with a local brush as well, called “Night – Enhance Milky Way” created by David Kingham, which can be downloaded here.
PS: David’s presets and tutorials are very good, so be sure to check them out!
This leaves us with the bend horizon. To correct this I will use Photoshop’s “Adaptive Wide Angle Correction”:
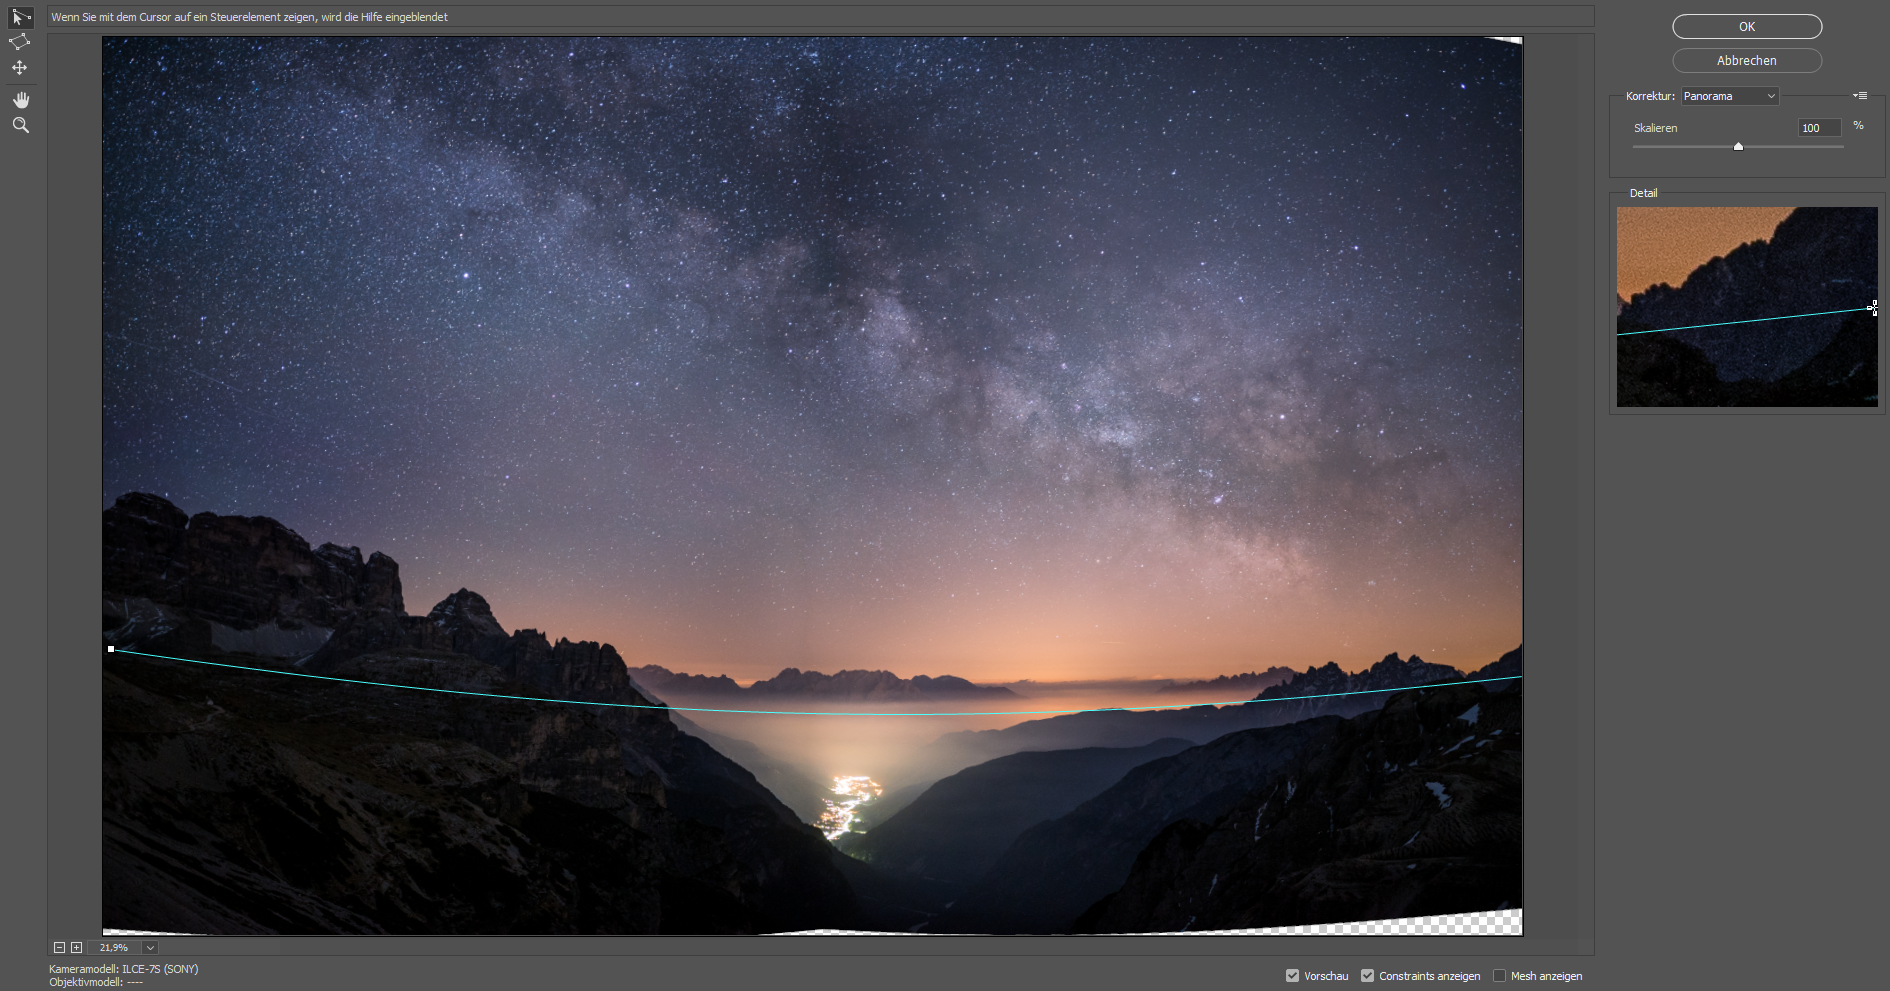
This is pretty straightforwarded, you just draw a line from the left border to the right along the bend horizon and tell photoshop this is a horizontal line:
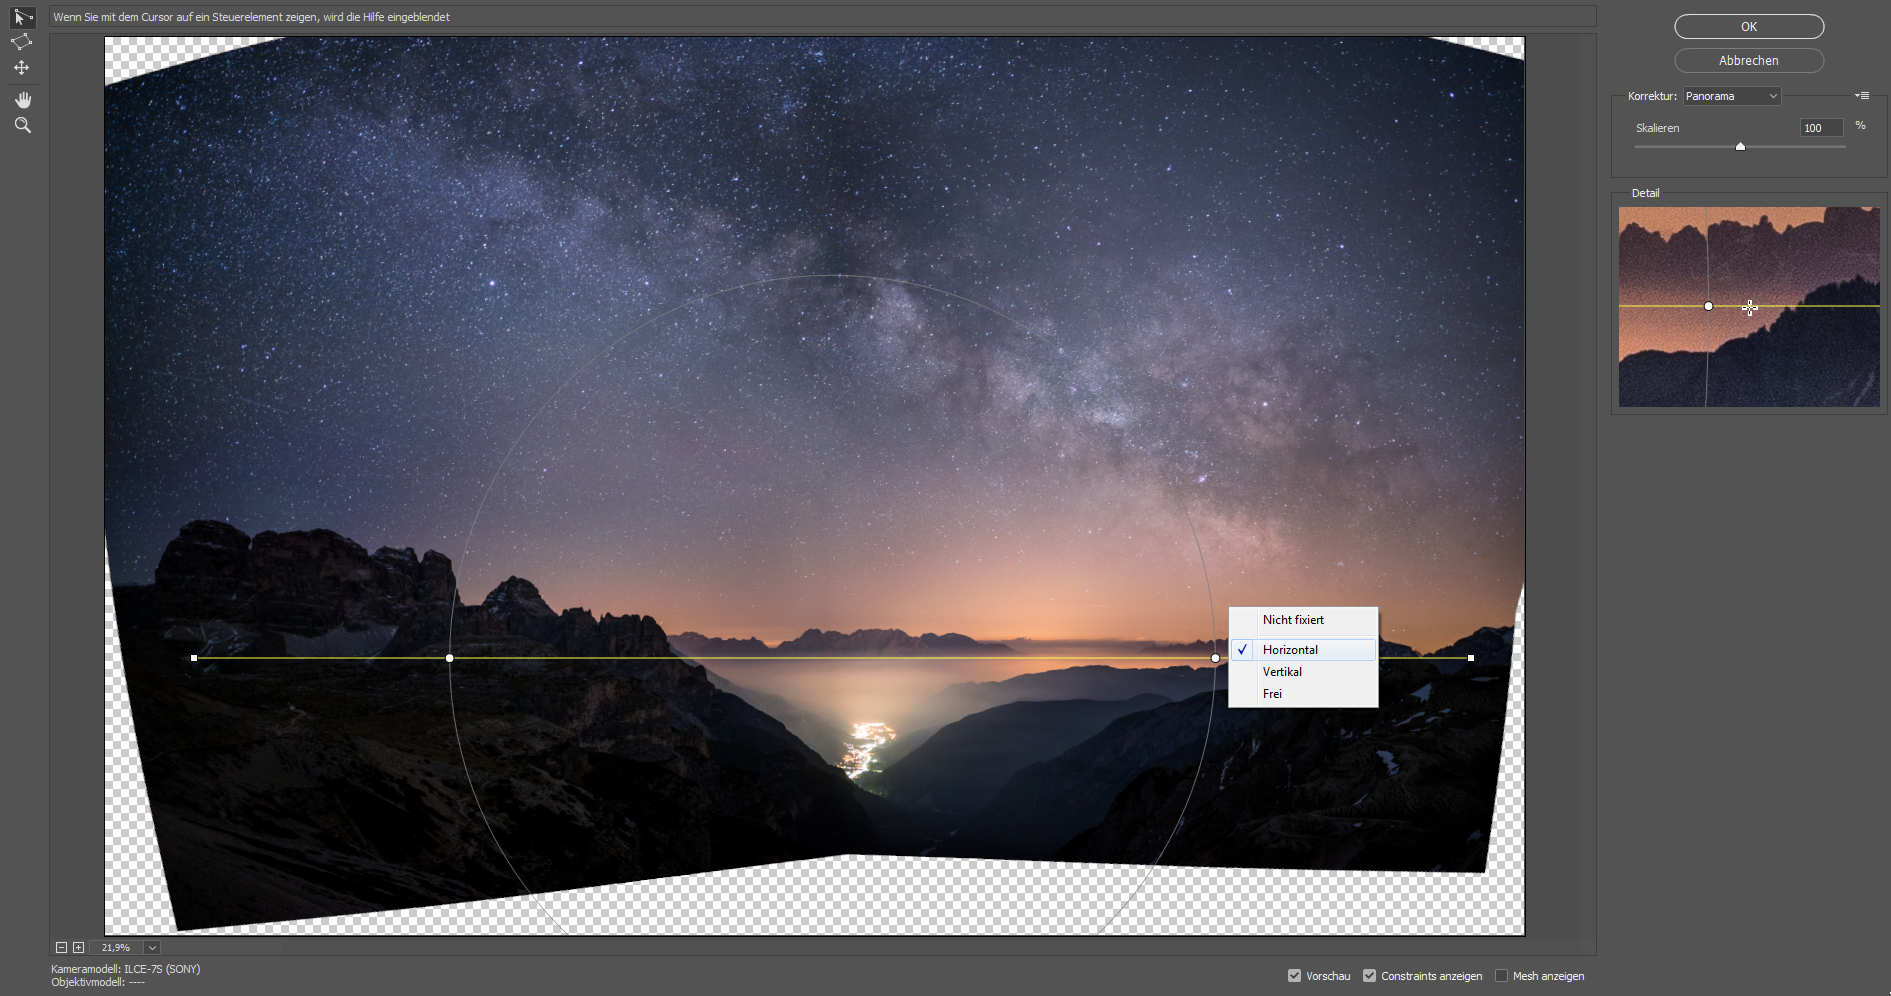
Now the image can be cropped to the desired ratio and that’s about it!
Final image

This is the final image as I uploaded it to flickr.
Other Articles
- Manual photographers: 0.2 BastianK
- Overview: Lens Reviews
- User-Guide to ultra-wide-angle lenses for Sony a7 a7II a7rII
Support Us
Did you find this article useful or just liked reading it? Treat us to a coffee!
![]()
![]()
![]() via Paypal
via Paypal
This site contains affiliate links. If you make a purchase using any of the links marked as affiliate links, I may receive a small commission at no additional cost to you. This helps support the creation of future content.
Latest posts by BastianK (see all)
- Review: Thypoch 21mm 3.5 Ksana Epoch - January 13, 2026
- Review: Canon EF 50mm 1.0 L USM – Still the world’s fastest AF lens - December 30, 2025
- Review: Nikon Nikkor 105mm 1.8 Ai-s - December 28, 2025
Really nice result, a lot of detail in the core! You are really lucky you have the Alps so close near your home. Dark places enough out there haha. I unfortunately live in the Netherlands, one of the most light polluted countries in Europe. I found out that with Photoshop it is possible to gain more detail in the core (especially above city lights, it is easier to adjust very small regions) than i managed to do with Lightroom. Also the panorama function of Photoshop often works a lot better, so that saves some work in fixing artefacts 😉 (I use the A7s, loxia 50mm and the Voigtländer Heliar 15mm III)
I really like this picture!
Dear Juriaan,
Thank you for your feedback!
Are you happy with the results you are getting from the 50mm Loxia (and do you use it at f/2.0 for that purpose)?
If you have any images to share I would gladly like to have a look 🙂
I am asking because I am currently thinking about which ~50mm lens I am going to use for stitching milky way shots.
The Voigtlander Nokton 50mm 1.5 – whilst otherwise a great lens – suffers too much from the thick filter stack 🙁
Hi Bastian. Thanks for the tutorial. For stitching starry sky I strongly suggest using the FE55/1.8 which has almost no coma, field curvature or LoCa wide open. You can see my results here:
https://www.flickr.com/photos/yht09/33464229891
Also I think with longer focal length an equatorial mount would be quite handy. I am using the Sightron nanotracker which I think is the smallest one available and hardly adds any burden to my hiking trips. By using 0.5x speed the image quality can be improved visibly and the blur of foreground is still within control.
Dear Haitong,
thank you for your comment and showing me those excellent pictures!
I am not really happy with the focus by wire for these kinds of shots though, the Batis 18mm 2.8 already gave me quite a headache in this regard.
Nevertheless I will (I actually do already) strongly consider that lens, as it is quite small, lightweight and the optics look very good for that purpose.
I was also exploring guidance systems, but at the moment I am not really interested in deep sky and if the image is to be stitched later I can use longer exposure times with longer focal lengths (as I did here as well).
Hi. The guidance system is not limited to deep sky shots, but also very handy for astro-landscapes with wide and normal lenses. If you try tracking shots with longer exposure and lower ISO you may find much enhanced details and room for editing. It’s quite amazing!
I also hate fly-by-wire focus but for night sky shots I think I can do with it and even AF by A7S often gives me satisfactory results.
I might indeed give that Nanotracker a try. When I checked a few days ago what options there are, it was the only one that caught my interest because of small size and weight.
Would you mind sharing a shot of your setup?
I am still thinking about what ballhead to use on the tracker.
Glad to! I’ll send you a mail later.
Dear Bastain,
I really like the Loxia 50mm for astro photography. I mainly use it to stitch milky way shots. I often stop down to f/2.5, but that is not really necessary. At f/2 there is a little bit of coma, but it did not matter during stitching. The lens is really sharp and a joy to handle 🙂 I’ve just put three unedited pictures on flickr shot at f/2, f/2.5 and f/2.8. I’ve also added a few shots I took with the Loxia 🙂 https://www.flickr.com/photos/151225024@N07/34916580501/in/album-72157681591141013/
If you want to see more just say so, than I will take a look in my archive!
Your link gave me a 404, may you recheck it? Thank you!
https://www.flickr.com/gp/151225024@N07/3uJ34V
I hope it will work now 🙂
Yes, thank you!
Very helpful!
Bastian,
I left you a couple of comments on this photo on Flickr actually. I just picked up the Sony FE 28 f/2 and got decent results, will post soon. However I definitely agree with you about the focus-by-wire method, it’s just slower and more frustrating. I’m hoping to find something in that 20-35mm range that doesn’t break the bank like the Loxia, but it’s proving difficult. Here’s hoping the new E-mount Voigtlander lenses handle CA, coma, and vignetting well, because the new 35 looks mighty tempting…
I would recommend not having high hopes for the new Voigtlander Classic 35mm 1.4.
It will probably have less issues with field curvature, but otherwise it will be the same as the (in my eyes) far from great VM 35mm 1.4.
Bastian,
Why did not you use your Samyang for the shot? I have a feeling that (at least with a7r2) the amount of detail in a 4x15s stack with iso a bit cranked-up would be comparable, but much easier to process (even longer is doable, but then you’d need to stack sky/ground separately to avoid trailing).
regarding the focus (especially for focus-by-wire lenses) I find one of the approaches used to focus telescopes quite useful, i.e. the Bahtinov mask (https://en.wikipedia.org/wiki/Bahtinov_mask).
You can print it with ink-jet on a transparency matching the filter size of a given lens + some stick-out piece to get it in/out of the filter thread more easily, or just use handheld. Use it on one of the bright stars/planets with iso cranked up to make the rays more visible in live-view, and it works like charm even with slower lenses 🙂
Victor,

I also took a shot with the 14mm here, but I wasn’t overly happy with the amount of details captured:
14mm was also a little bit too wide here.
With the A7s in my experience stitching a longer lens will give me better image quality than stacking with a wider lens.
Combining both (stacking+panorama) will be even better of course, but also takes quite some more time in post and during the capture.
Hi Bastan,
You also have the Samyang/ Rokinon 14mm? In that case you have a very good sample I guess, mine is only sharp in the center unfortunately.
Something that works even better than stitching with a long lens, is making a stack of every part of the panorama. I tried this recently and it works really well. It is a lot of work but it results in an enormous amount of detail. It gave me the possibility to even recover some detail at the horizon without causing to much noise (which is really difficult in the Netherlands due to light pollution).
Yes, the shot was taken with a 14mm 2.8 Samyang (MF DSLR version with hilarious distorion).
It is a rather decent sample, but I had to try 4 to find this one.
Still: I don’t really like that lens. Build quality is very very bad.
Furthermore there is no way to easily fix the distorion. I tried all LR profiles, including one I created myself, and also PTLens. With straight lines near the borders they are all loosing it.
I am eagerly awaiting the release of the Laowa 15mm 2.0. If it is any good (and from a few shots I took at Photokina it doesn’t look too bad) my 14mm will be retired in a heartbeat.
I’m using the Voigtländer 15mm f/4.5 for some months now, I really like it also for astro photography and traveling since it is really small. By using exposure to the right the post processing result are very nice, and by using stacking it just works perfect! I usually use the lens for wider landscape milky way shots and panoramas. For more detailed shots I use the Loxia 😉
Hi Bastian,
Congrats for this very useful and detailed article!
I tried to take a milky way shot in the Swiss alps using this panorama stitching method in LR.
3-4 shots taken with a 35mm on a sony a7, for a vertical panorama. Each shot has more than 50% of the previous shot.
The problem I encounter is: LR cannot stitch the upper picture(s), i.e. the ones with “only stars and sky” in them. Thus, I end up with a frustrating square image that misses a good deal of the milky way ^^
Would you happen to have any idea of why this happens and how I could arrange it?
Any idea would be much much appreciated !!!
Kind regards,
Adrien from Switzerland
Dear Adrien,
it might be worthwhile trying Adobe Photoshop (if available) or Microsoft I.C.E. (image composite editor). These two are a bit better than Ligh
troom for panorama stitching.
Dear Bastian,
Many thanks for your answer, I will soon get Photoshop and see how it works. Meanwhile, I tried a free open source software called Hugin, which delivered pretty decent results (@adrien_j_r). Only weakness in my opinion: Hugin needs JPG files and will issue a TIFF file, so that (i) I need to do all or most of the editing on LR on the 4 RAW images before exporting them to Hugin and (ii) I lose quality in the end, as compared to LR where I could get a RAW image in the end ^^
Wish that Adobe improves the panorama option of LR !
Hallo.
Vielen Dank für den Bericht. Wird denn das Objektiv ein bevorzugtes Objektiv für die Milchstraße werden? Ich meinte, in einem früheren Test gelesen zu haben, dass es wohl eher nicht für die Milchstraßenfotografie in Frage kommt.
Beste Grüße . . . Karsten
Speziell für den Fall kaufen würde ich es nicht (da bietet sich eher das Sigma 35mm 1.4 Art an), aber es lässt sich (jedoch nur mit einem 5m PCX Filter!) gut dafür verwenden.
. . . dankeschön. 🙂
Ich denke aber, dass mich das Thema 5m PCX Filter überfordern wird. Mein englisch ist nicht das beste und so werde ich wohl die Finger davon lassen. Obwohl mich das Objektiv an sich schon sehr reizen würde. 🙂
Beste Grüße . . . Karsten
Guten Morgen.
Jetzt, nachdem ich eine Nacht drüber geschlafen habe, lässt mich das Thema nun doch nicht los. 🙂
Hast Du diese “Linse” (https://europe.optosigma.com/plano-convex-lens-50mm-diameter-2000mm-focal-length-400-700nm.html/) verwendet? Der Link, den ich bei fredmiranda.com im Forum gefunden habe, führt ins Leere.
Vielen Dank schon mal, für das Interesse und die Hilfe. 🙂
Beste Grüße . . . Karsten
Nein, das hier ist die richtige fürs 35mm 1.7:
https://europe.optosigma.com/plano-convex-lens-50mm-diameter-5000mm-focal-length-400-700nm.html/
. . . Dankeschön. 🙂
In one point I do not agree with you Bastian:
Taking a panoramic shot with the 35mm lens in horizontal mode you will have range of a 24mm lens (Minus the 20% overlap). In this case you CAN even use an exposure of 20,83 seconds, and the stars won´t show a coma, shooting one row.
When shooting 2 rows with 4 pictures in a panorama (2 rows over each other) you should have an equivalent of a 14mm lens (two rows: 35 mm x 2/5 = 14mm). That´s because every picture is taken in the 3:2 ratio and this ratio must be mathematically applied on the panoramic image. Did you get my point?
Except this part I like the way you show us, how to manage the astro photography and am very thankful, you share it!!!
I am not sure how your comment relates to the article.
None of the shots was taken as a 2×4 array.
Furthermore it seems you are still going by that 1/500 rule for calculating your exposure time, this is usually too long for my taste.
And the streaks that result from too long exposure times are not related to Coma.
Hello,
any suggestion about which remote trigger is satisfactory? I do not have smartphone now. How do you measure exposure time? I was looking around but i did not see any with integrated chronometer, nor the camera appears show exposure time 🙁
Best regards and thank you in advance
Hey,
without guidance system you will never need more than the 30sec you can dial in anyway.
You can then just use the 2 or 5sec self release, no need for a remote.
Love your blog especially “Making of series” – made me buy a used a7… now I already own an Irix 15mm f2.4 (which you don`t like particulary if I read correct :-)) and was wondering if any other legacy manual (SLR) lenses in the 35-50mm focal lenght could/would give good results making panos like you did here with VM 35mm f1.7?
Cheers, A.
Sigma Art 35mm 1.4 is your best option by far.
The older fast SLR lenses are not much cheaper but way worse corrected in terms of Coma.
I’ve seen quite a lot of panos from Sigma 35mm 1.4 (http://www.clarkvision.com/galleries/gallery.astrophoto-1/web/maroon-bells_nightscape_rnclark_c09.28.2013.o-bin6x6c1-1024vs.html
https://flic.kr/p/V3J1HA ) and they are near perfect… but these Art lenses are quite big and heavy I was hoping for something smaller, thats why I asked about the legacy ones 😉
I guess after reading about the FE 28mm 2.0 on your site this should probably be the best choice if low weight/size and cost are what you are looking for, right?
thanks for you reply, much appreciated,
Aleksander
It is probably the best native low cost option, yes.