In party 3 of my series I will tell you about my approach to post processing. This is my personal approach and there are many different approaches, some of them more sophisticated than mine, but I found that it works quite well for me this way.
In case you haven’t read part 1 and 2 yet, here are the links:
How I create Images – Part 1: looking for motifs and light
How I create Images – Part 2: working with the Sony a7
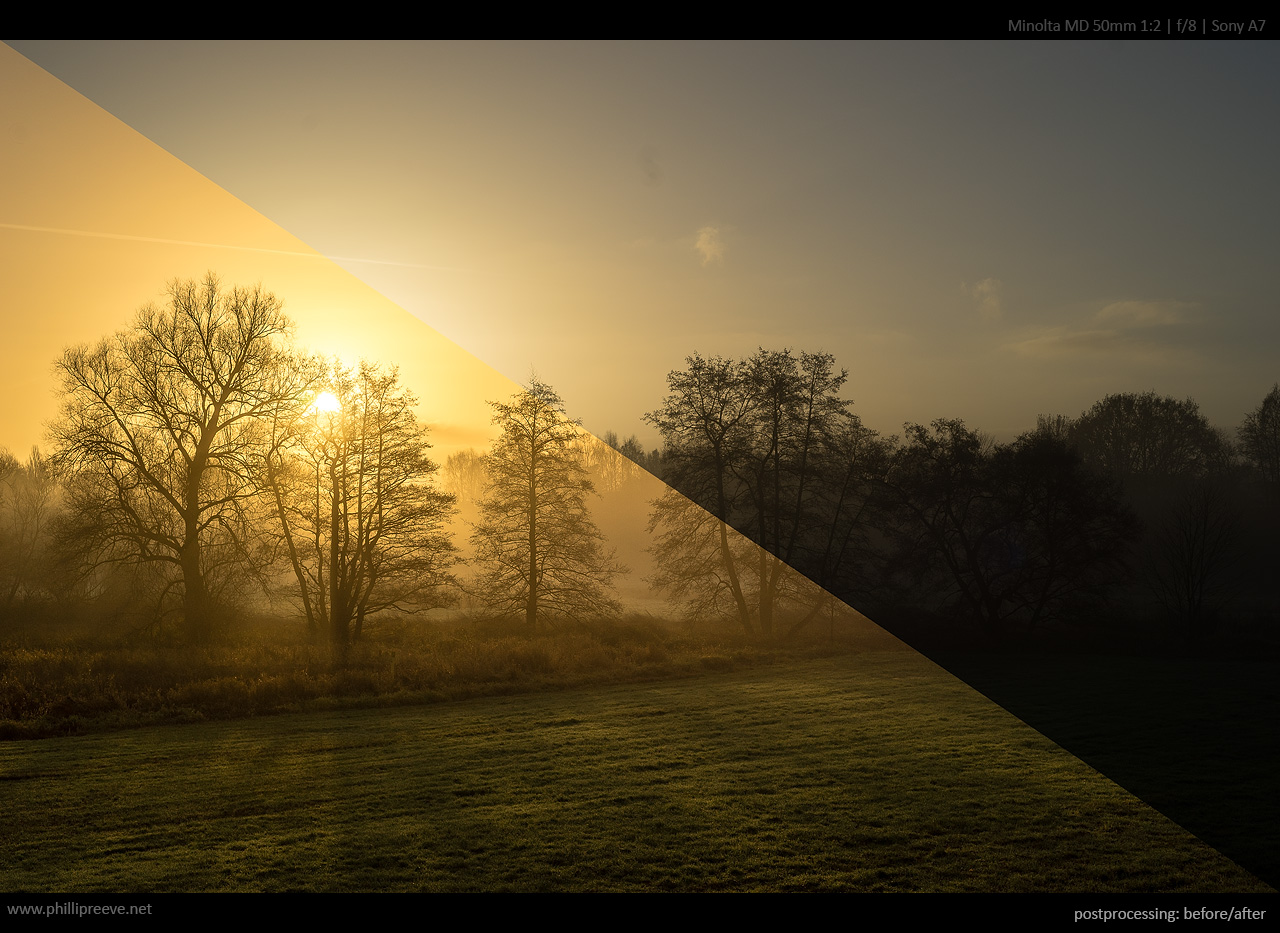
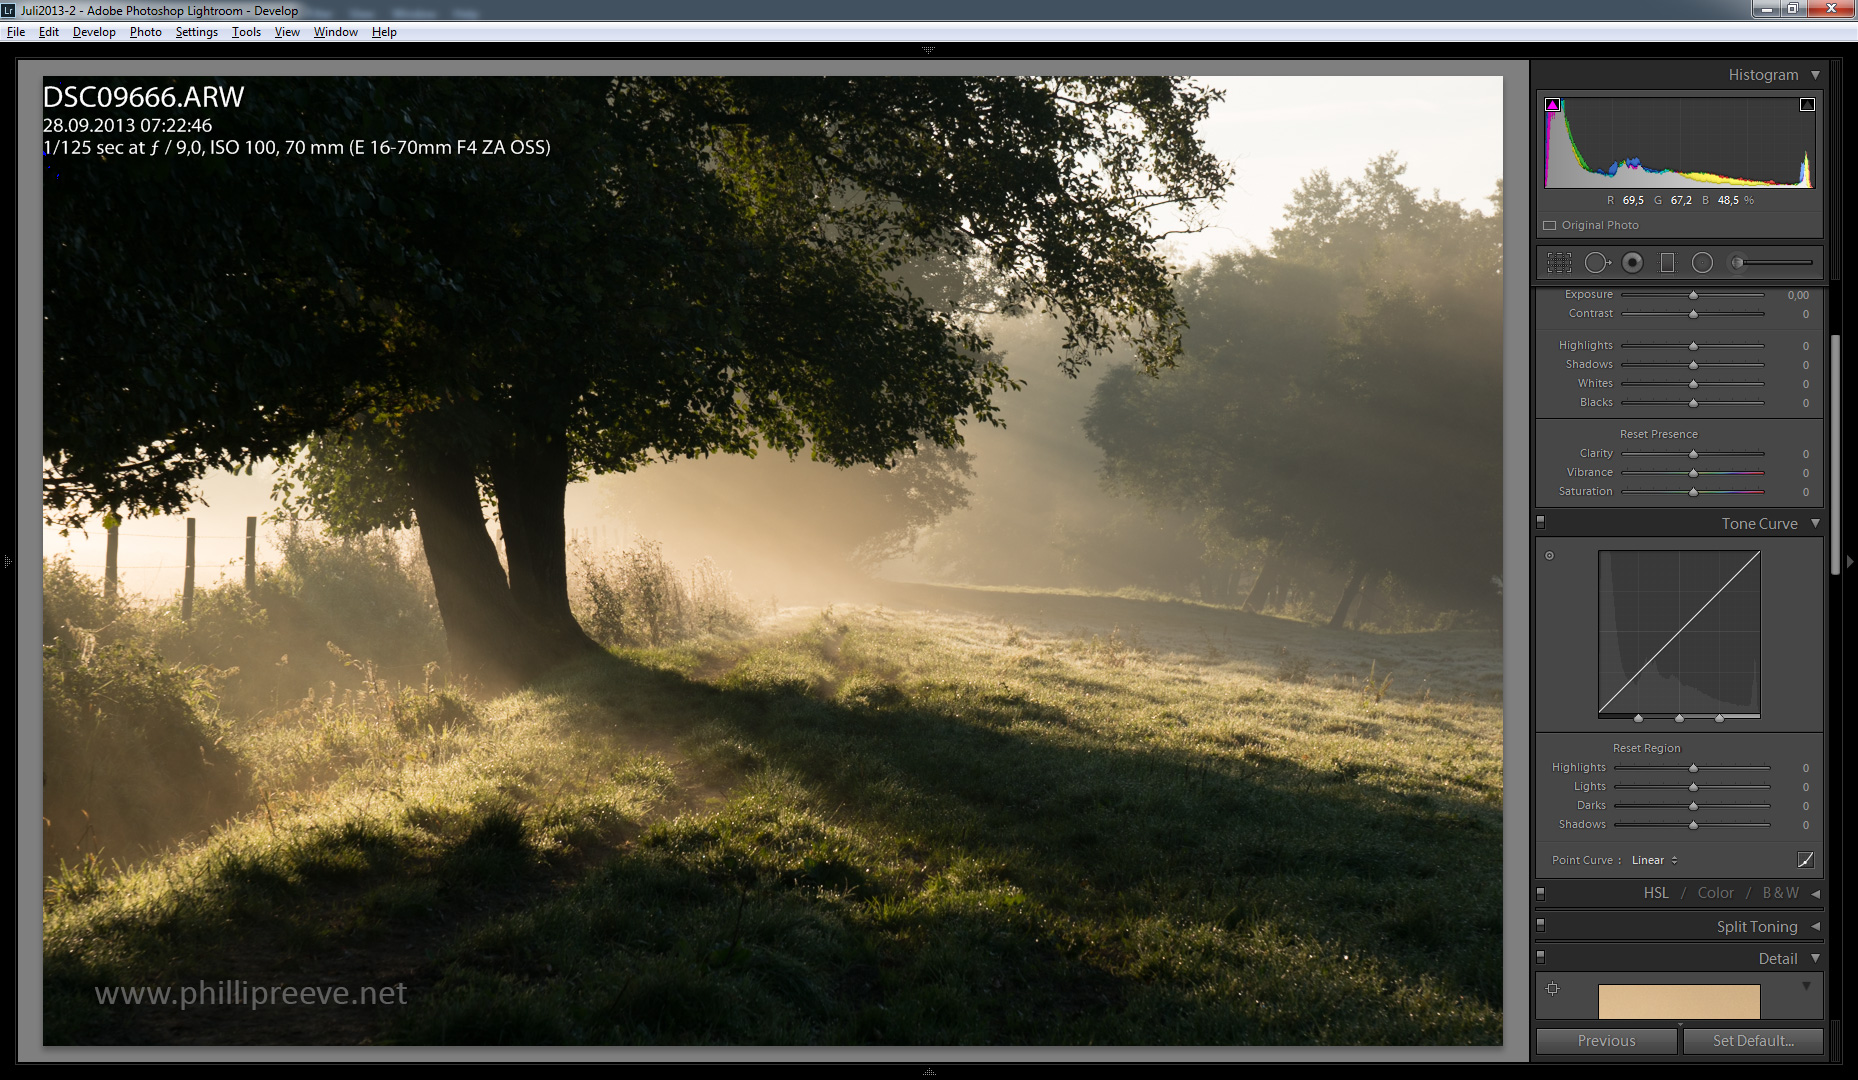
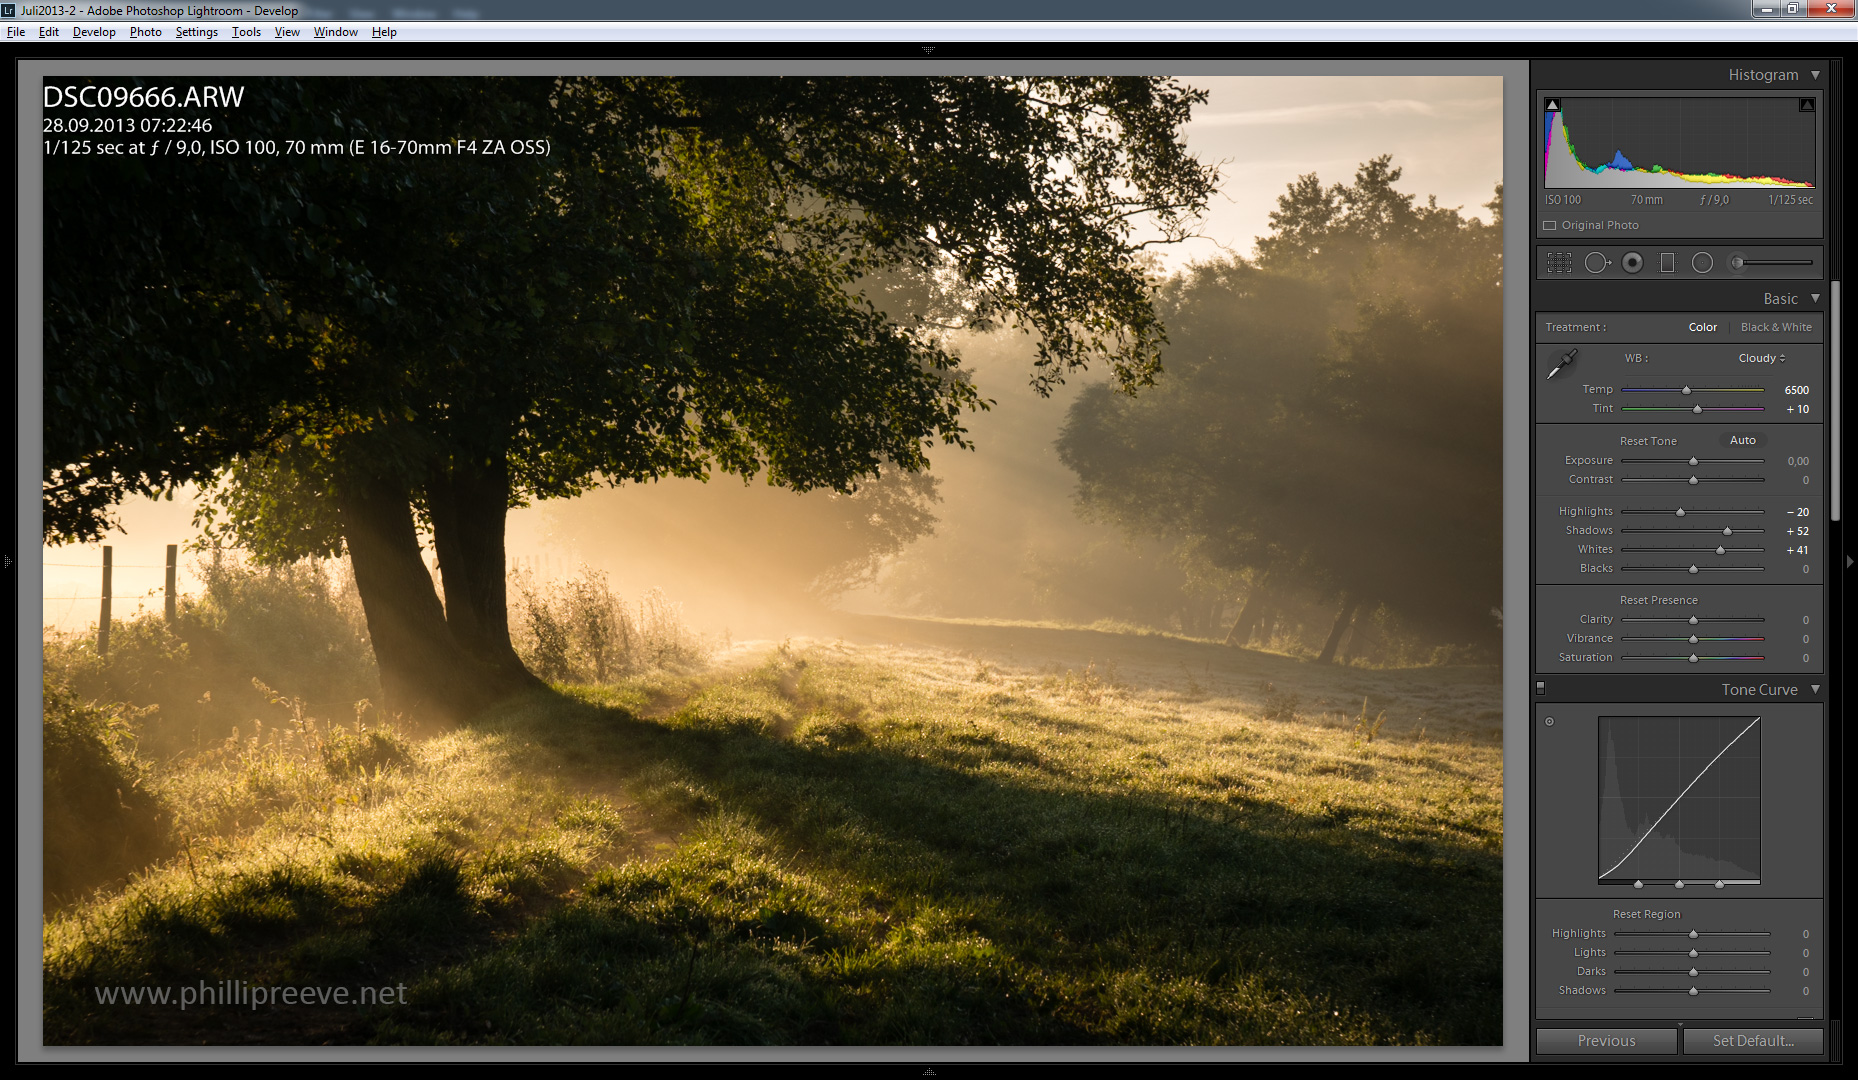
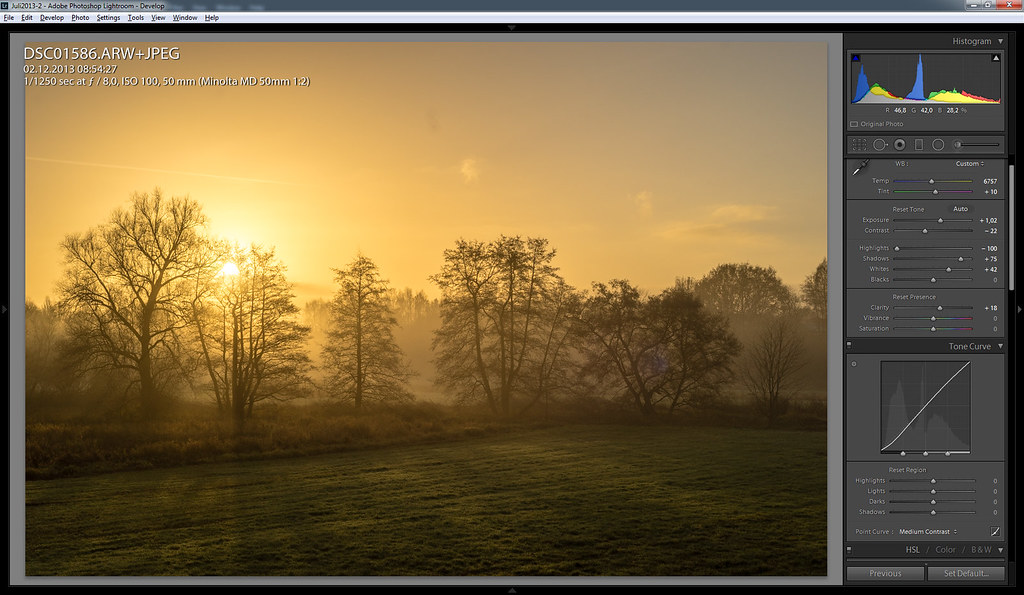
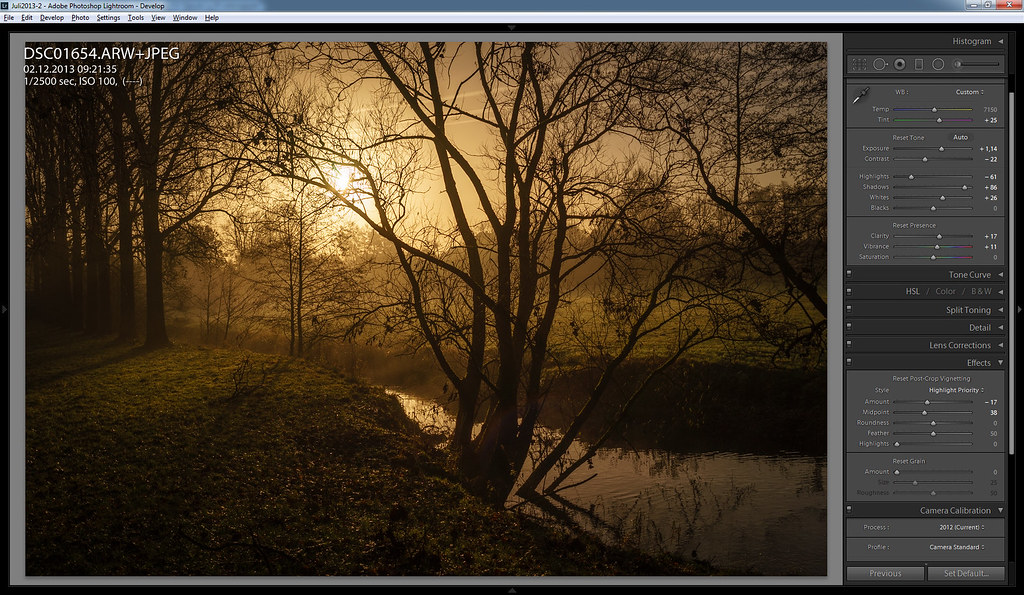
I will talk about this image later, but it makes a nice intro
I am completely self-taught, so it might be that I do things rather different than other people, or that I don’t know about an important feature of LR,
Software – Adobe Lightroom
I use Adobe Photoshop Lightroom 5 for my archiving and image processing.
What I like about LR is that I can do everything with it, I don’t need any other software and it is tailored for photographers. And since LR 4 it offers superior control over highlights and shadows, you won’t get this level of control over your image with Photoshop.
I used to use Photoshop for my processing and my archive consisted of many folders. This was super inefficient and cost me a lot of time, processing took me 2 or 3 times as long as it does today and the results weren’t as good.
The biggest downside of Lightroom is, that older version won’t support new cameras, you can’t for example open raw files from the a7 in LR 4, you have to upgrade to LR 5.
If you are thinking about buying LR (or anything else) please use one of my Amazon links, it won’t cost you anything and I will earn a small commission. Most people will sell you an E-book for$25 to tell you about their LR workflow, I do it for free.
Amazon.de
Import and Image selection
The first step is to import my images to LR, this is a strange concept for anyone who hasn’t used it before. LR will store you images somewhere on your hard drive and it will generate previews of your Raw files (I haven’t mentioned it before but I am shooting raw only). It will always keep your originals and never touch them. To get a processed image from LR you have to export it. This concept is strange at the beginning but after I got used to it I realized the benefits of this system.
Okay, now let’s select the images. I usually do this in 3 rounds.
I have read about much more sophisticated LR workflows, mine is rather basic but it works well for my needs.
Round one: rejecting and selecting
After the import has finished I start looking through my images. In this first round an image will either get rejected (shift + x on the keyboard), be marked with one star (1) or I won’t do anything with it.
I reject those pictures which are clearly not worth to keep because they are bad pictures or because they aren’t sharp enough because I messed something up.
I mark those pictures with a 1 which have some potential, but I don’t process them yet and always stay in library mode. Sometimes there are images were it is clear that they have potential, those will be marked with two stars.
Most images are neither rejected nor rated as 1 star.
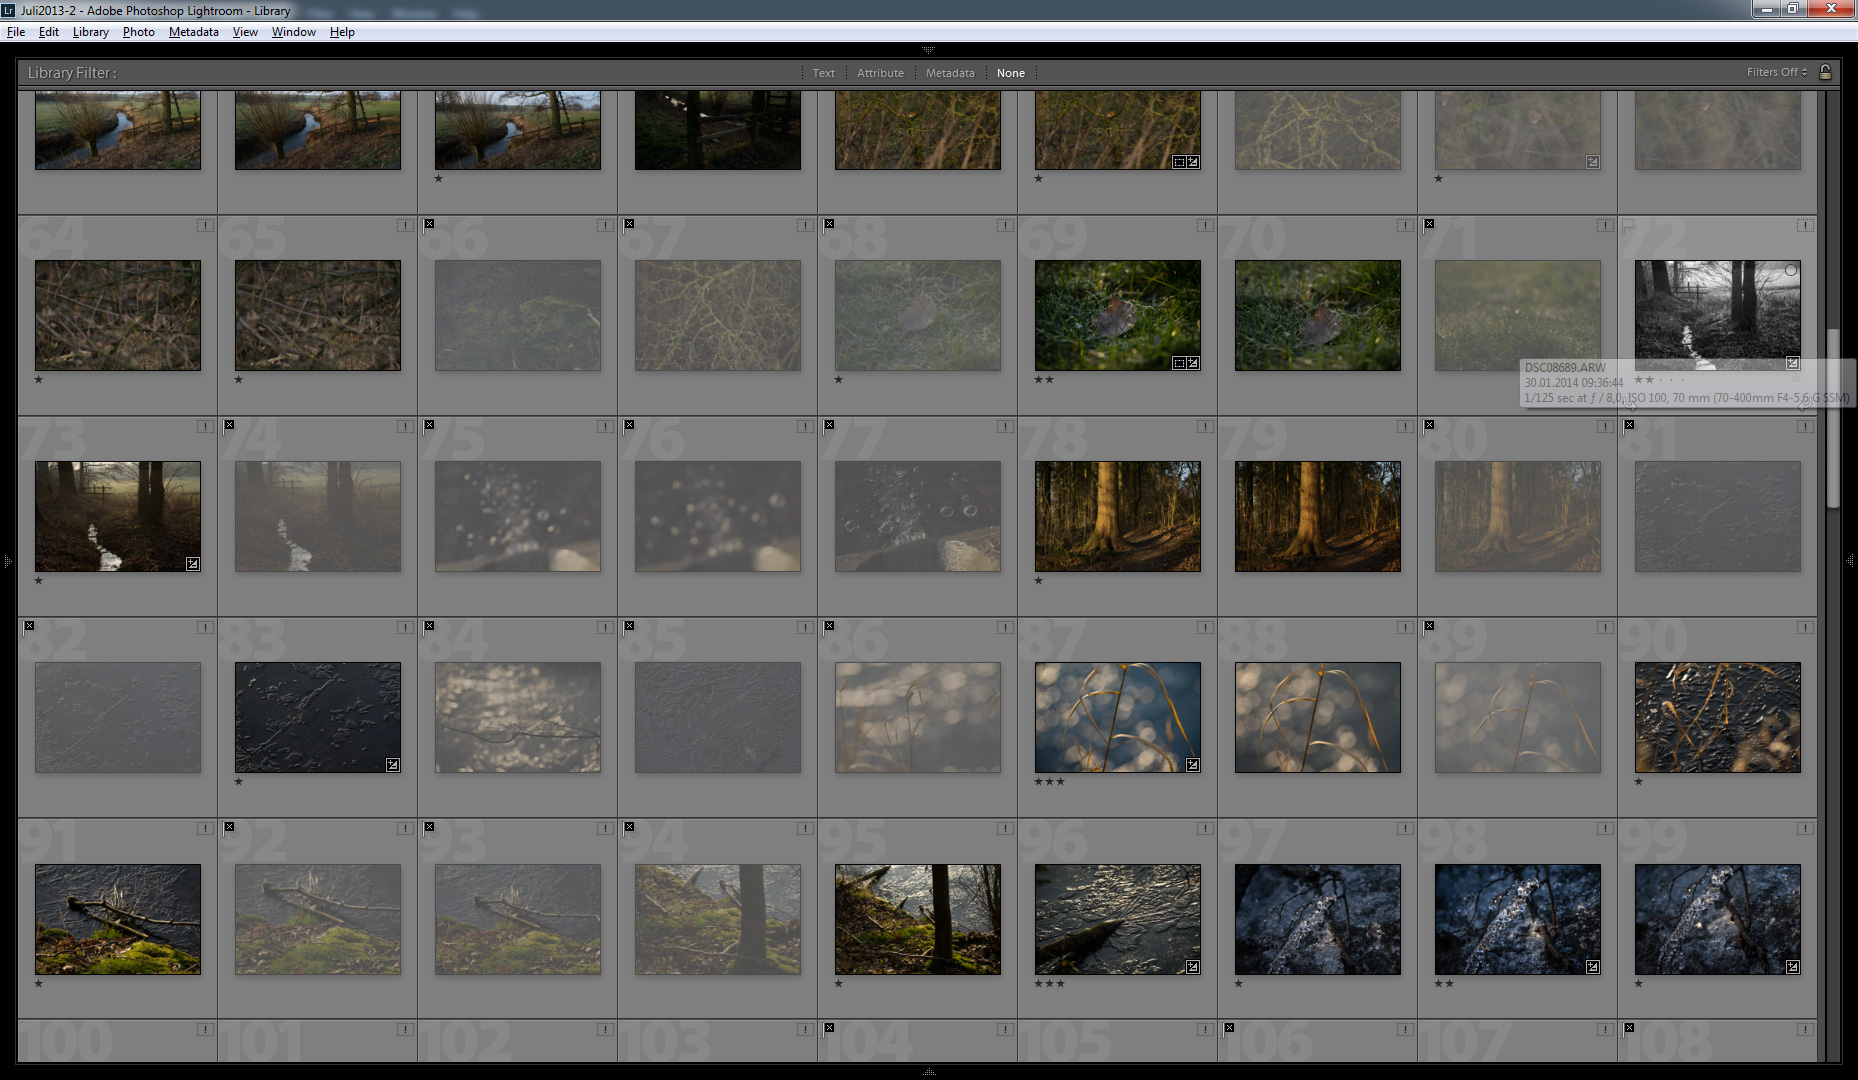 this is how my library usually looks after round 1
Round two: processing and further selection
After I have reviewed all the images I filter my images so that only those with at least one star are displayed.

Then I switch to Develop mode and start my post processing(pp) usually by applying a preset.
If I see, that an image looks good after pp I will rate it as a 2. If it doesn’t it will either be downgraded to 0 stars or not.
I usually spend less than a minute processing a single image; most often I do nothing more than applying a preset.
Round three: final selection and export
Now I change back to library mode and apply a two stars and higher filter, so only pictures which are rated two stars or higher are displayed.
It often happens that I have 2 similar pictures, usually I will downgrade the worse one of them to 1 star.
I will also rate truly exceptional images with 3 or more stars, but this happens really rarely.
The final step is to export my pictures. The export settings depend on what I want to do with the images, most often I just want them for web display.
I am not a fan of LR’s sharpening, it works okay on most images but it isn’t good at preserving small details, so I use a technique called step sharpening to resize my images to a width of 1280px. I will talk about resizing in depth in part 4 of this series.
A helpful German guy wrote a tool which reads the exif data and writes it onto a frame which it also creates plus it will resize my images with the step-sharpening-technique. So all I have to do is to select the images I want to resize to web resolution and click export. Now I upload them to flickr and I am done.
 export: the final step
Postprocessing
Okay, I have written 850 words and I haven’t talked about the actual post processing yet, lets start.
Over the years I have developed my own style and people often tell me that they can recognize my images just by the look of them. I can tell you how I achieve my look, and I can tell you some basic techniques, but to really learn how to create good images with an individual look, you will have to process many hundred pictures before you get a good feeling for the tools provided by LR (or any other image processing program).
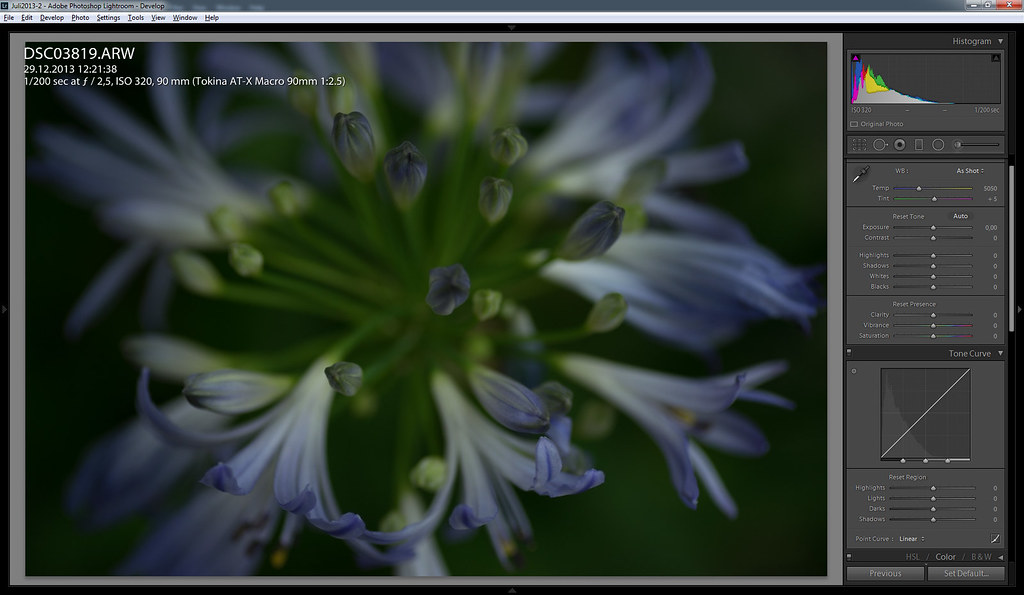
All images are different, but there are images which need rather little attention and there are those which need quite a lot of it. I will start with an easy one.
Usually I would apply my standard preset and be done with it. 10 seconds. But I will walk you through it so you can understand what I am doing.
Sample 1: My standard preset
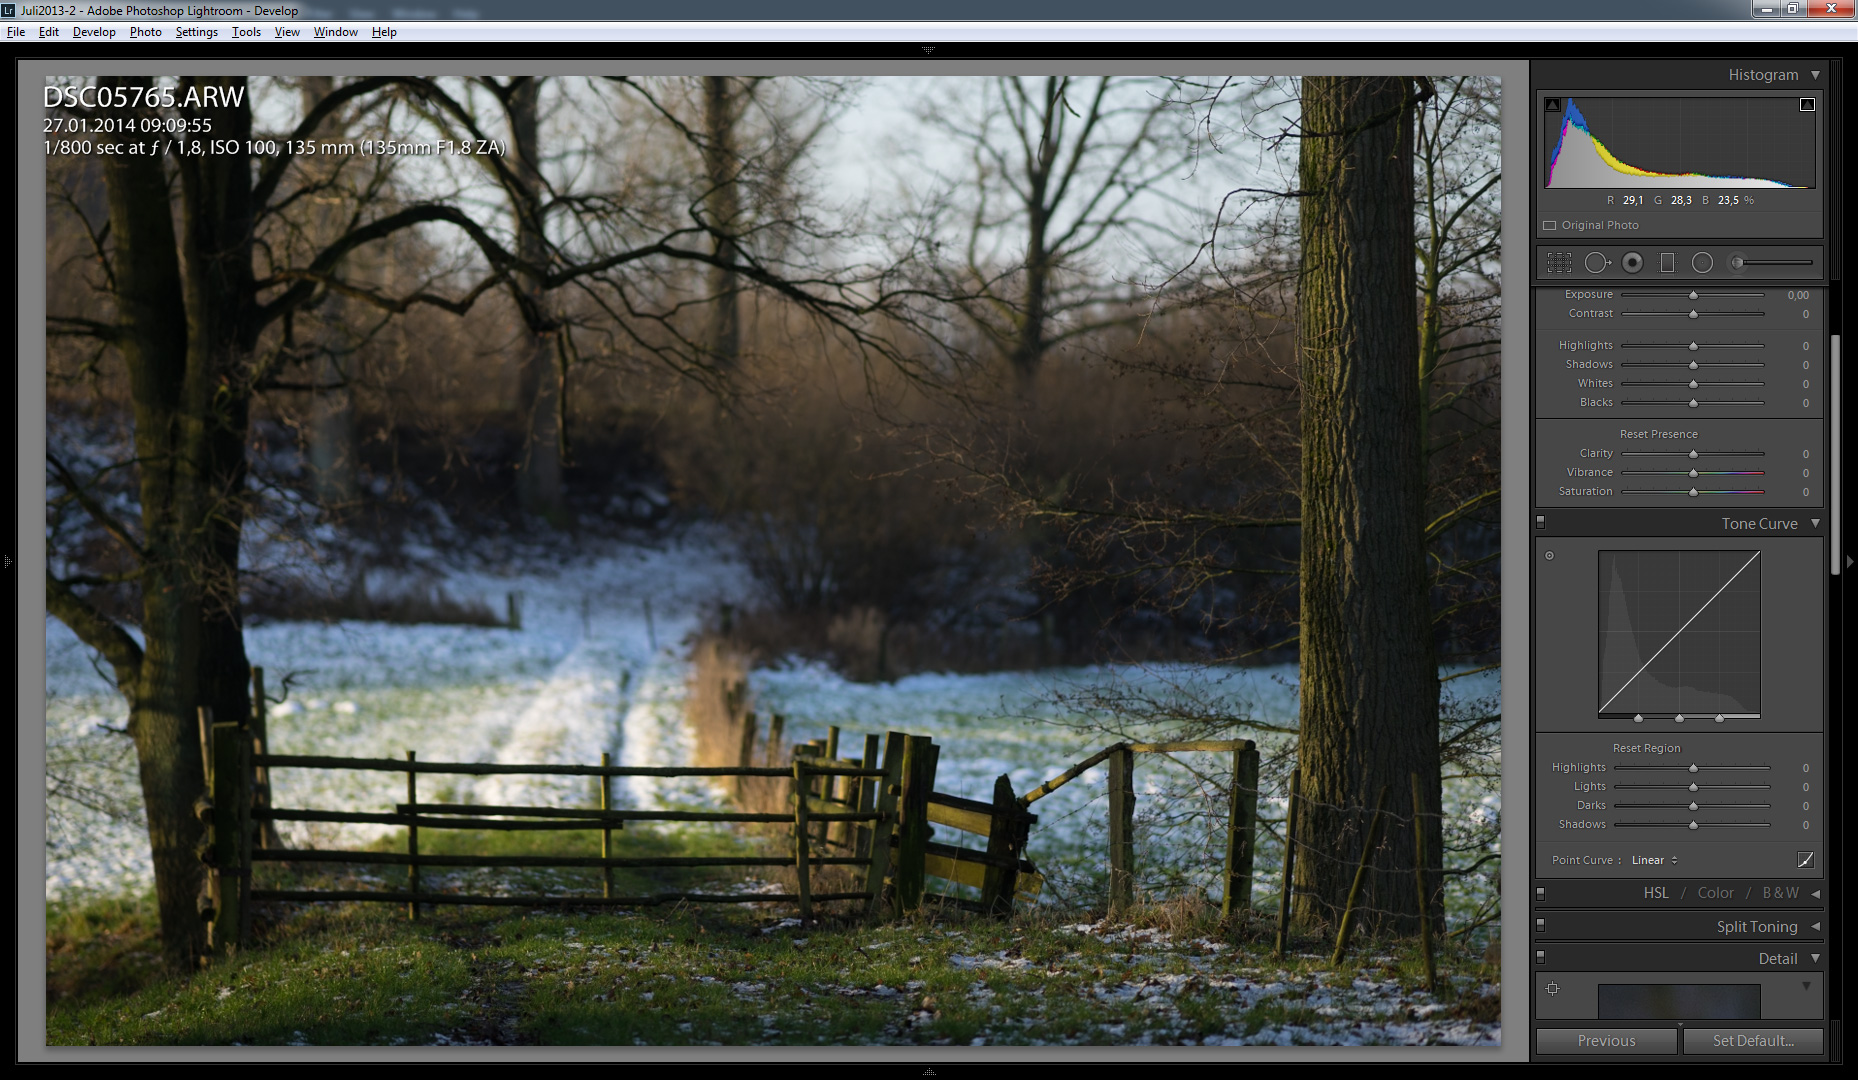
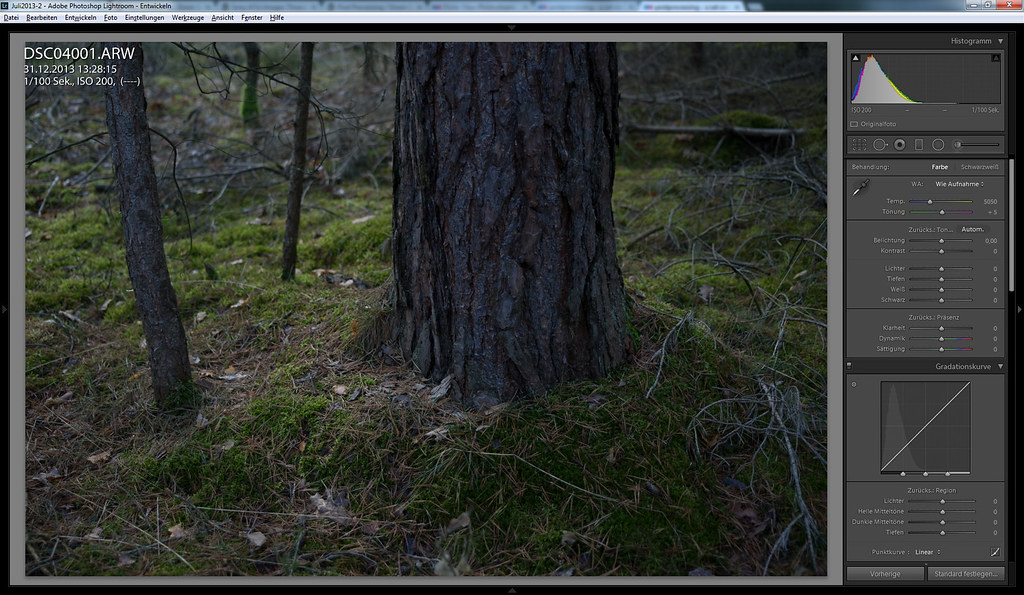
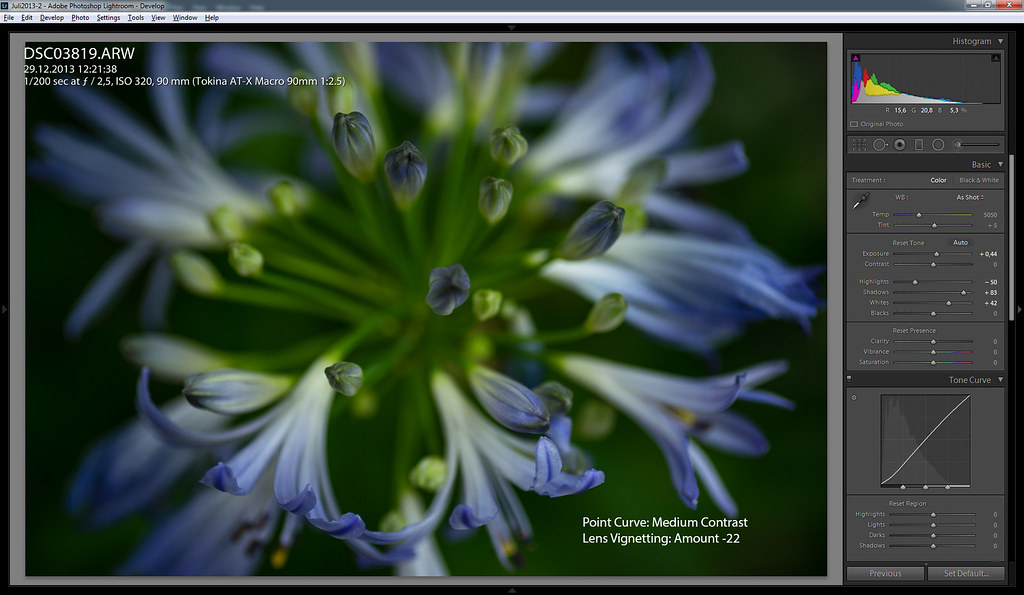
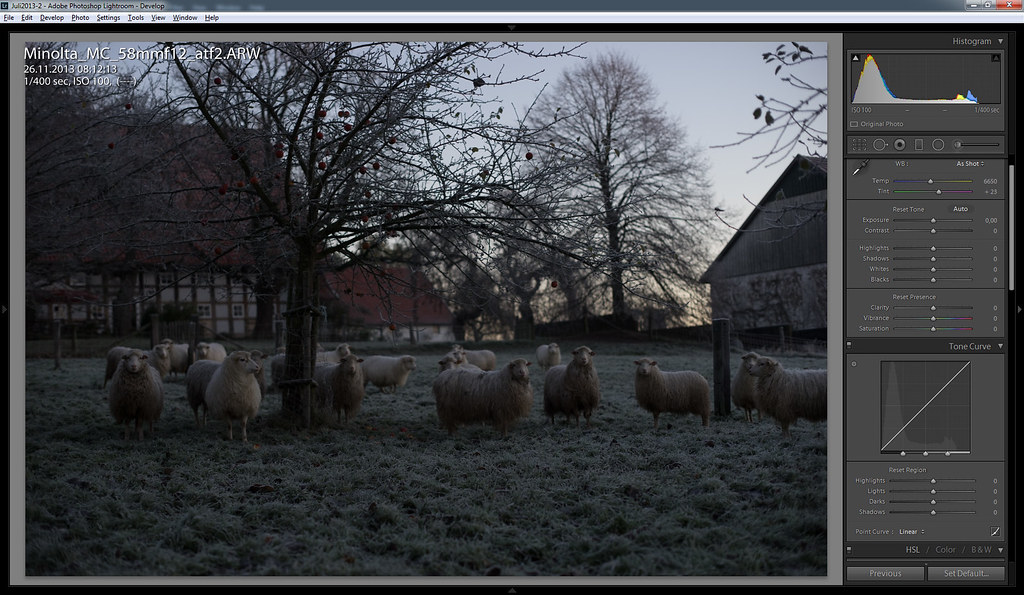
the unedited image
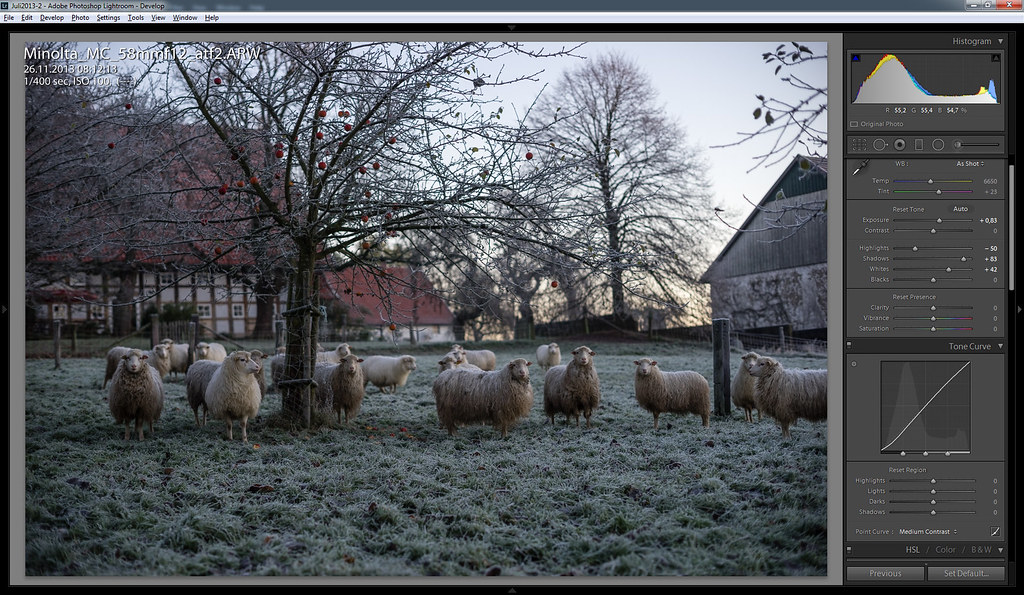
Contrast
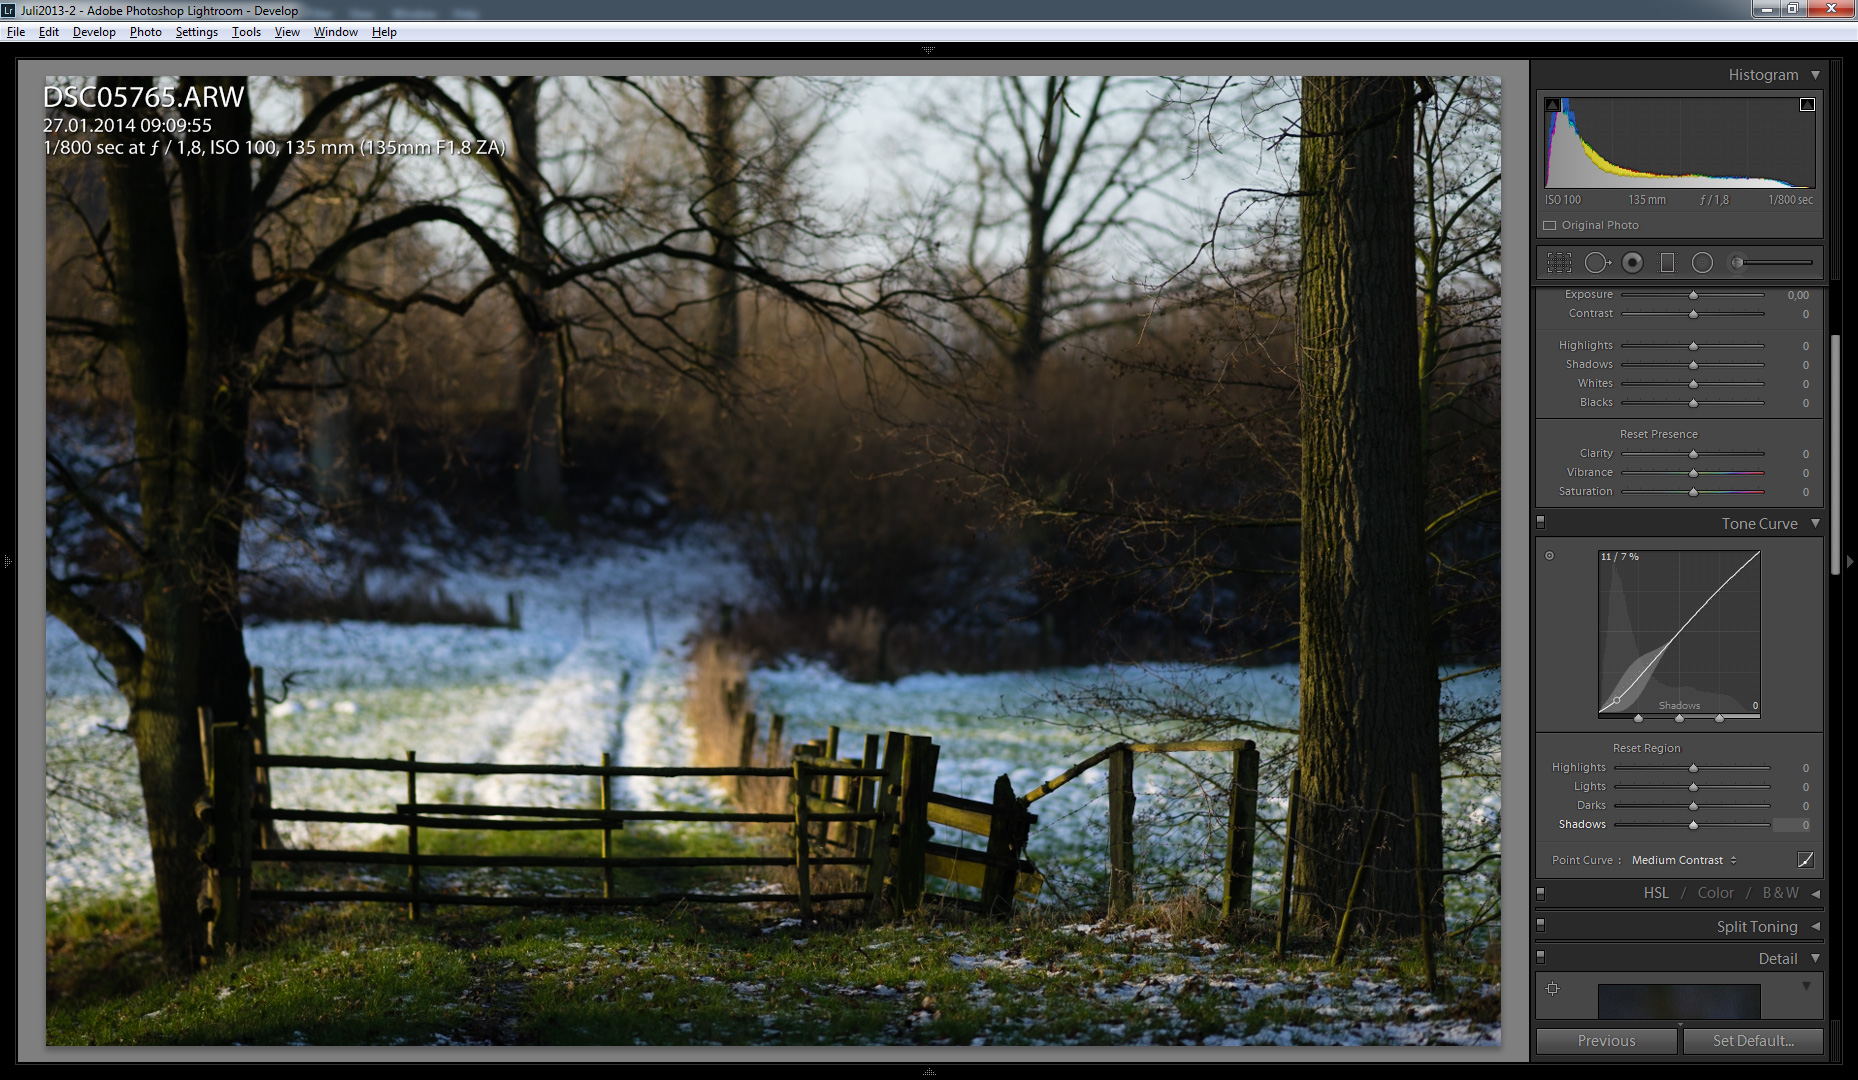
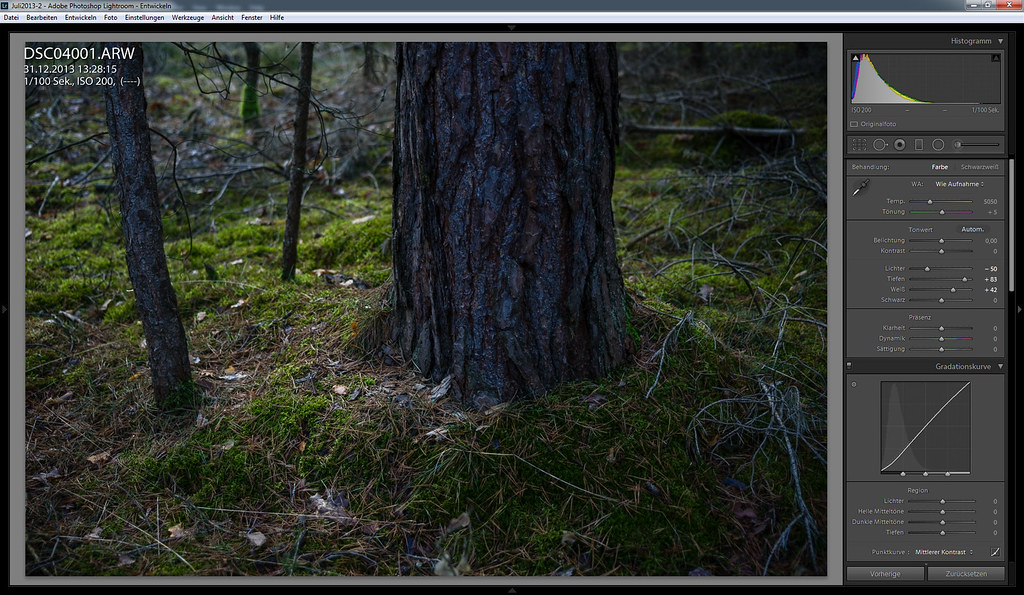
The unprocessed image looks rather flat, so I use a “medium Contrast” Point curve.
Now the image looks punchier, but the shadows are too dark, but I will tend to them later.
Whites
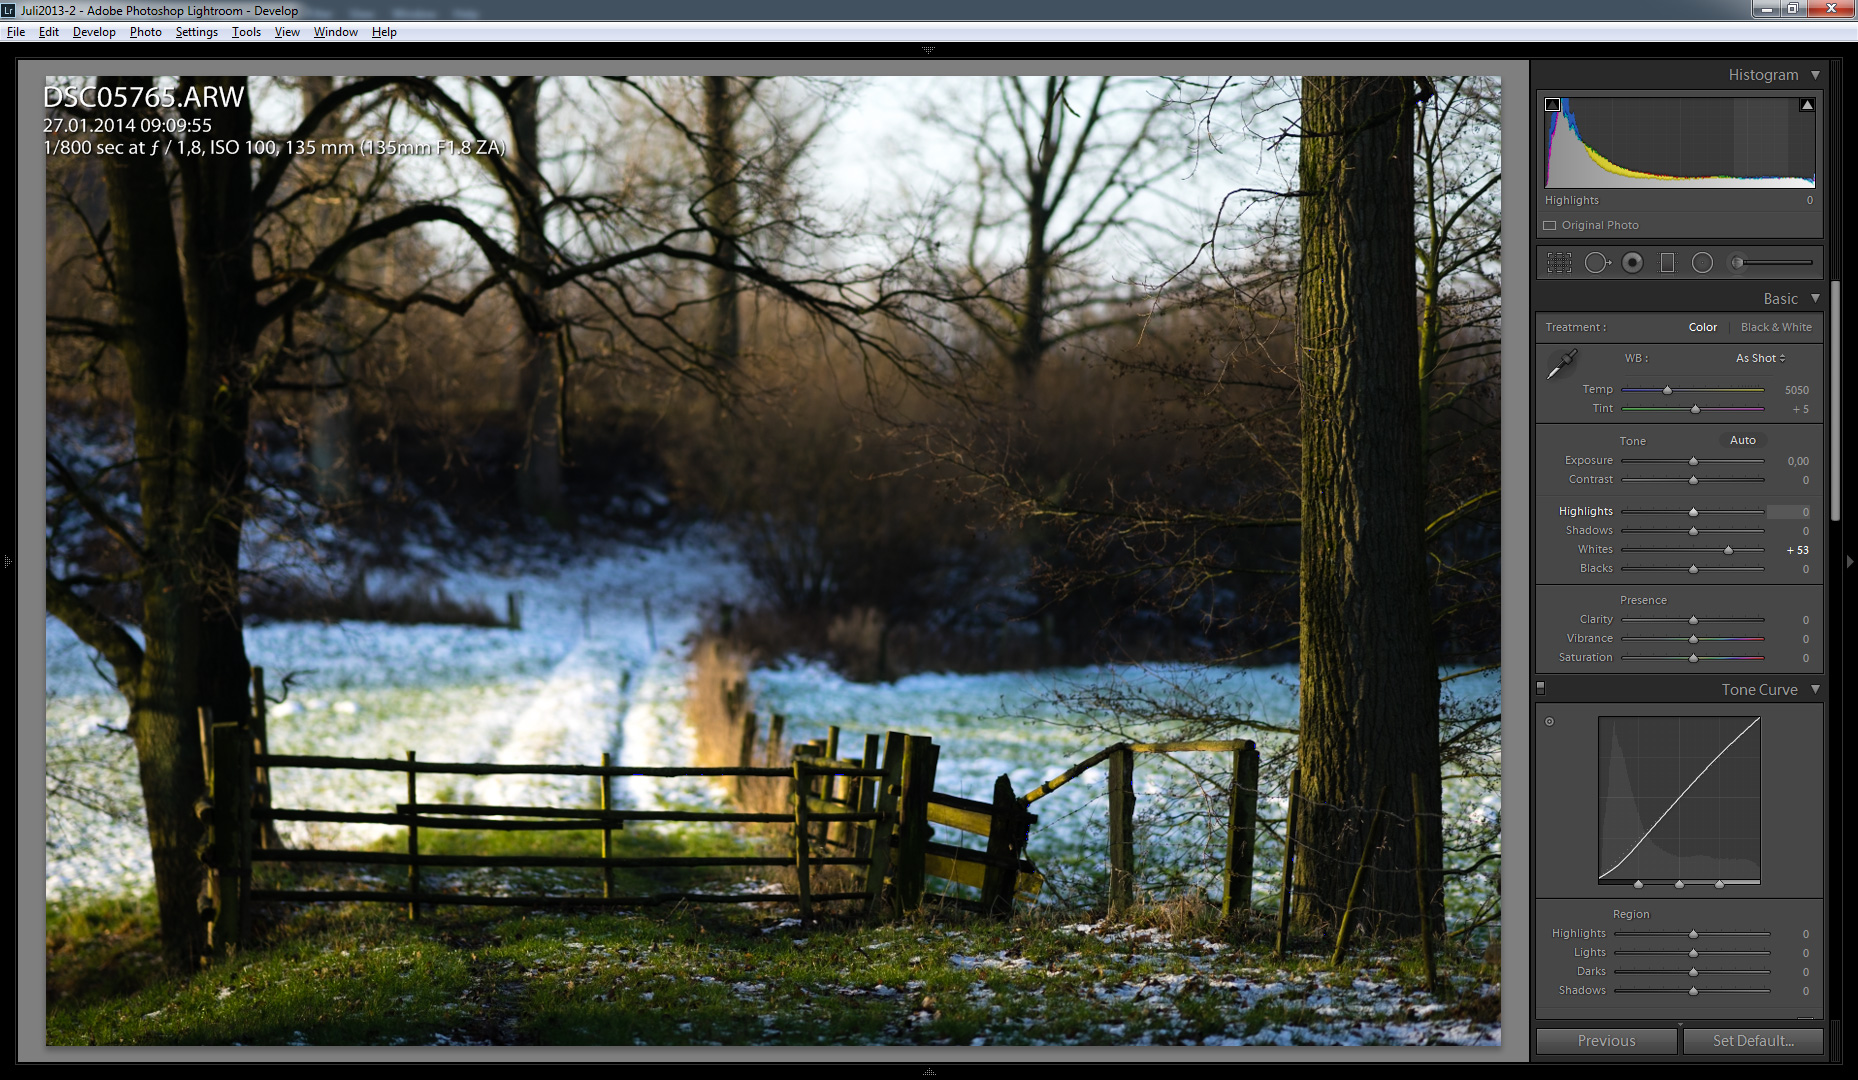
This is an important slider! When you look at the histogram you can see, that the snow in the image isn’t white but grey. But I want it to be bright, so I use the slider to brighten my highlights.
I could also have used the exposure slider to brighten my highlights, but it would have lifted the mid tones as well and I like to keep them rather dark.
With the White slider I am pushing it a little too far on purpose, some snowy areas are pure white now, I have blown the highlights.
Highlights
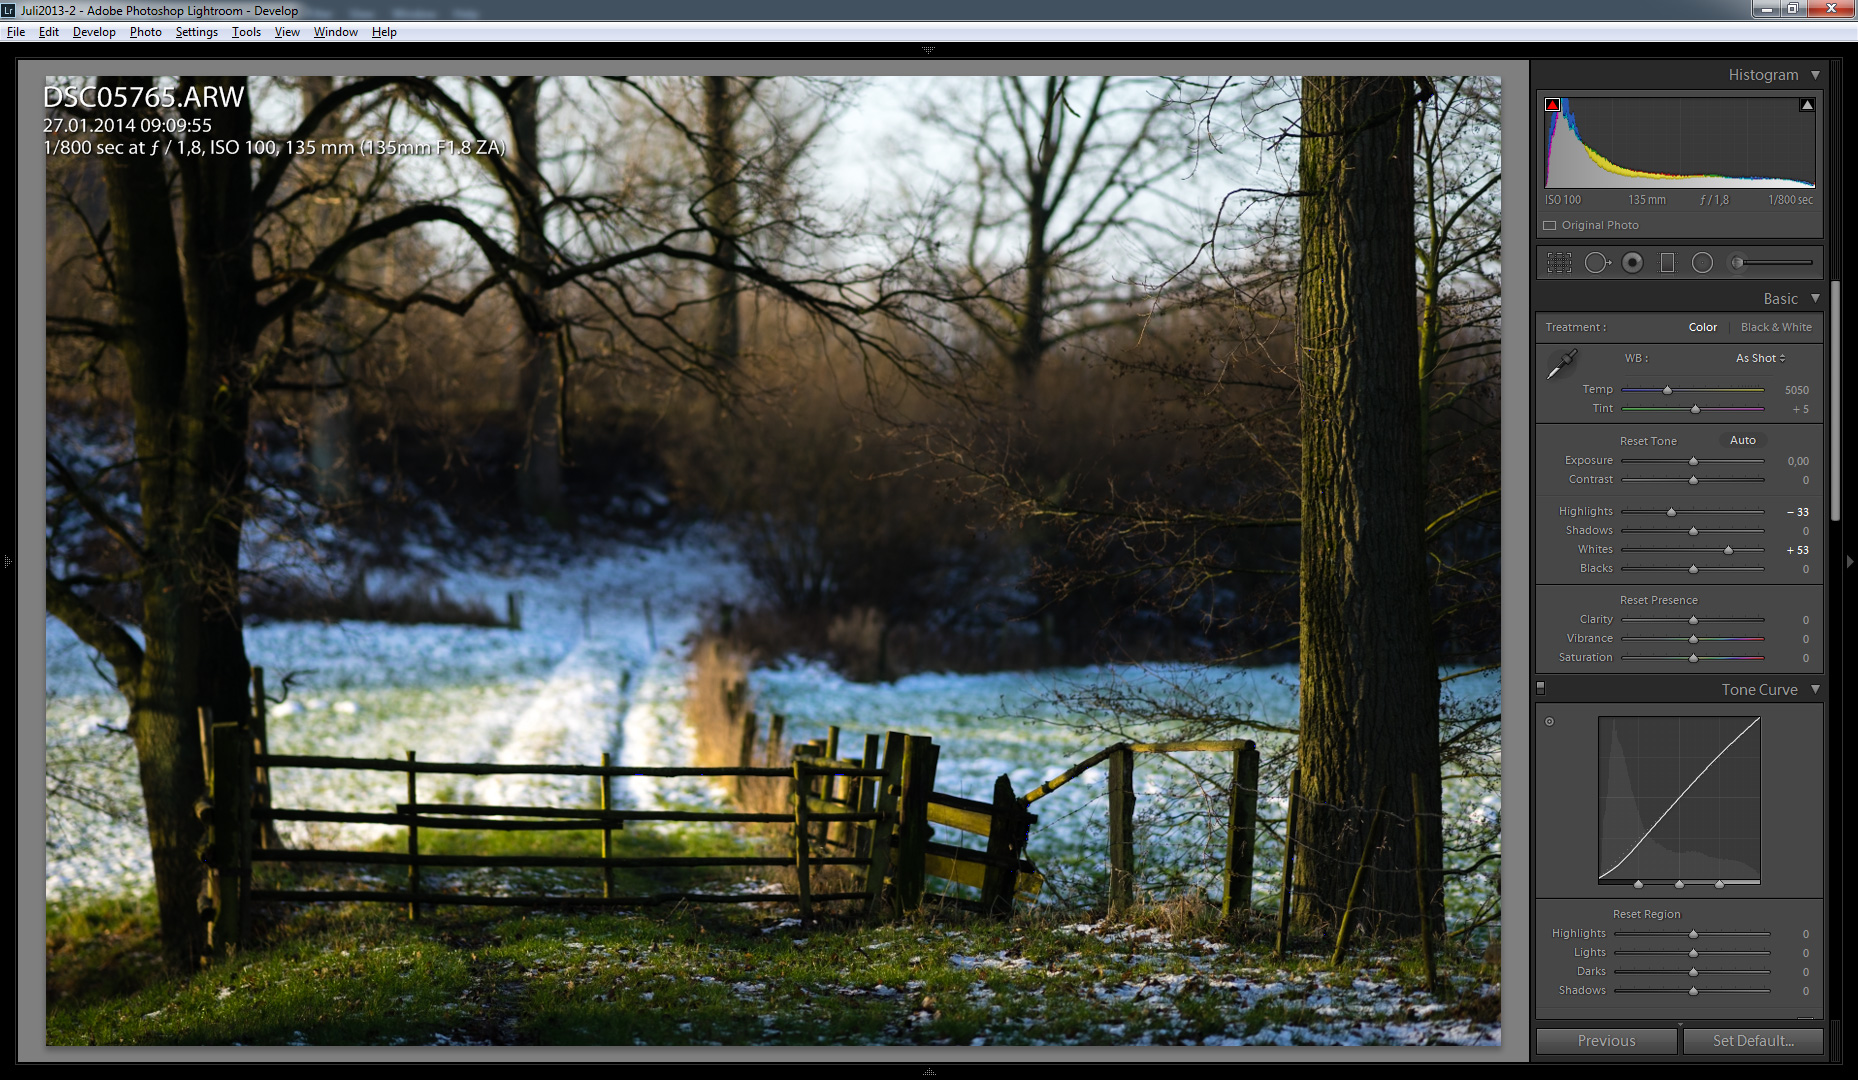
I use the highlights slider in almost any picture because in my eyes it results in a much nicer highlights roll off. And because I have lifted the highlights a little too far with the White slider I can pull them down just a little bit now. It also affects the sky a little bit.
Shadows
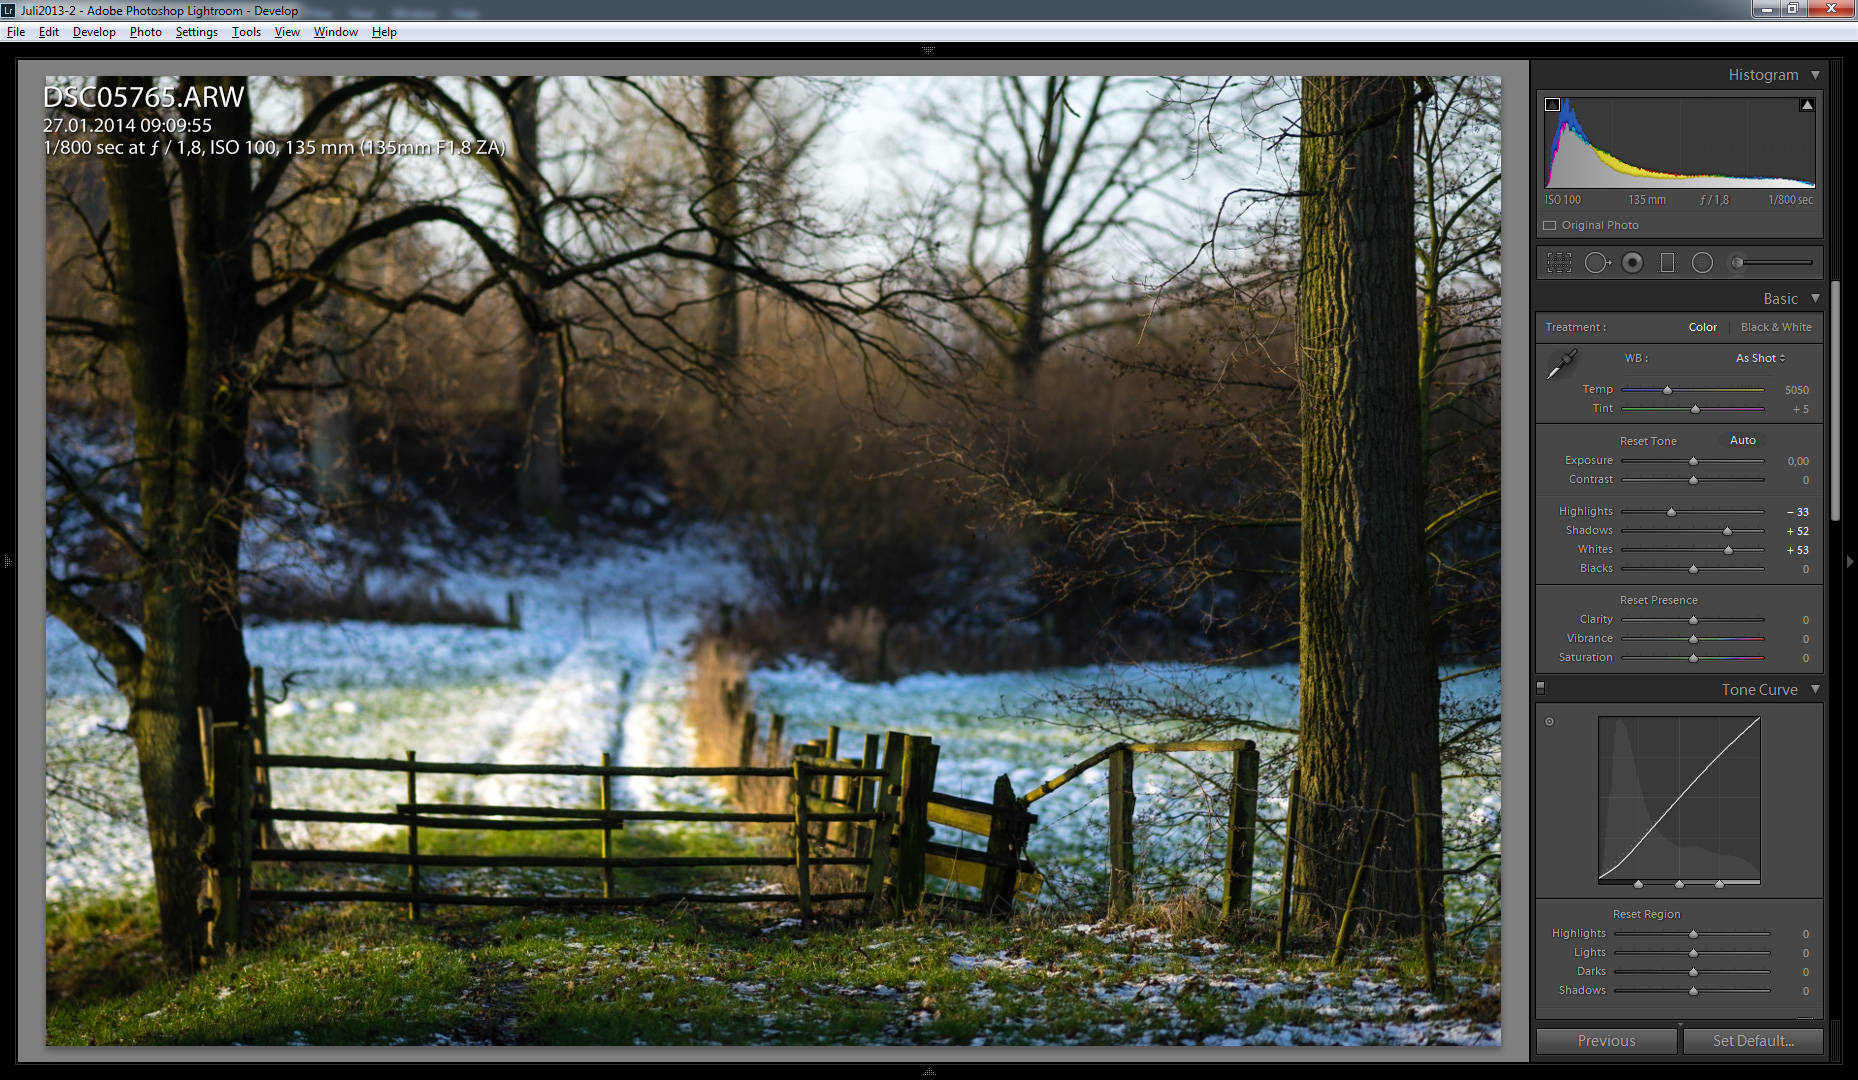
The great thing about LR’s shadows slider is that it only affects the shadows and not the mid tones as it used to in Version 3. When I increased the contrast the shadows got a little dark, now I will lift them just enough to have no more pure black.
Vignetting

I took this image at f/1.8 with a Zeiss 1.8/135 so there is already some natural vignetting, but in almost any of my images I add some vignetting because it helps to draw the viewer’s attention to the center of the image and away from the corners.
Conclusion
That’s it for this image. The result isn’t that different from the starting point, but that’s the case for most of my images, I want the processing to be subtle and realistic.
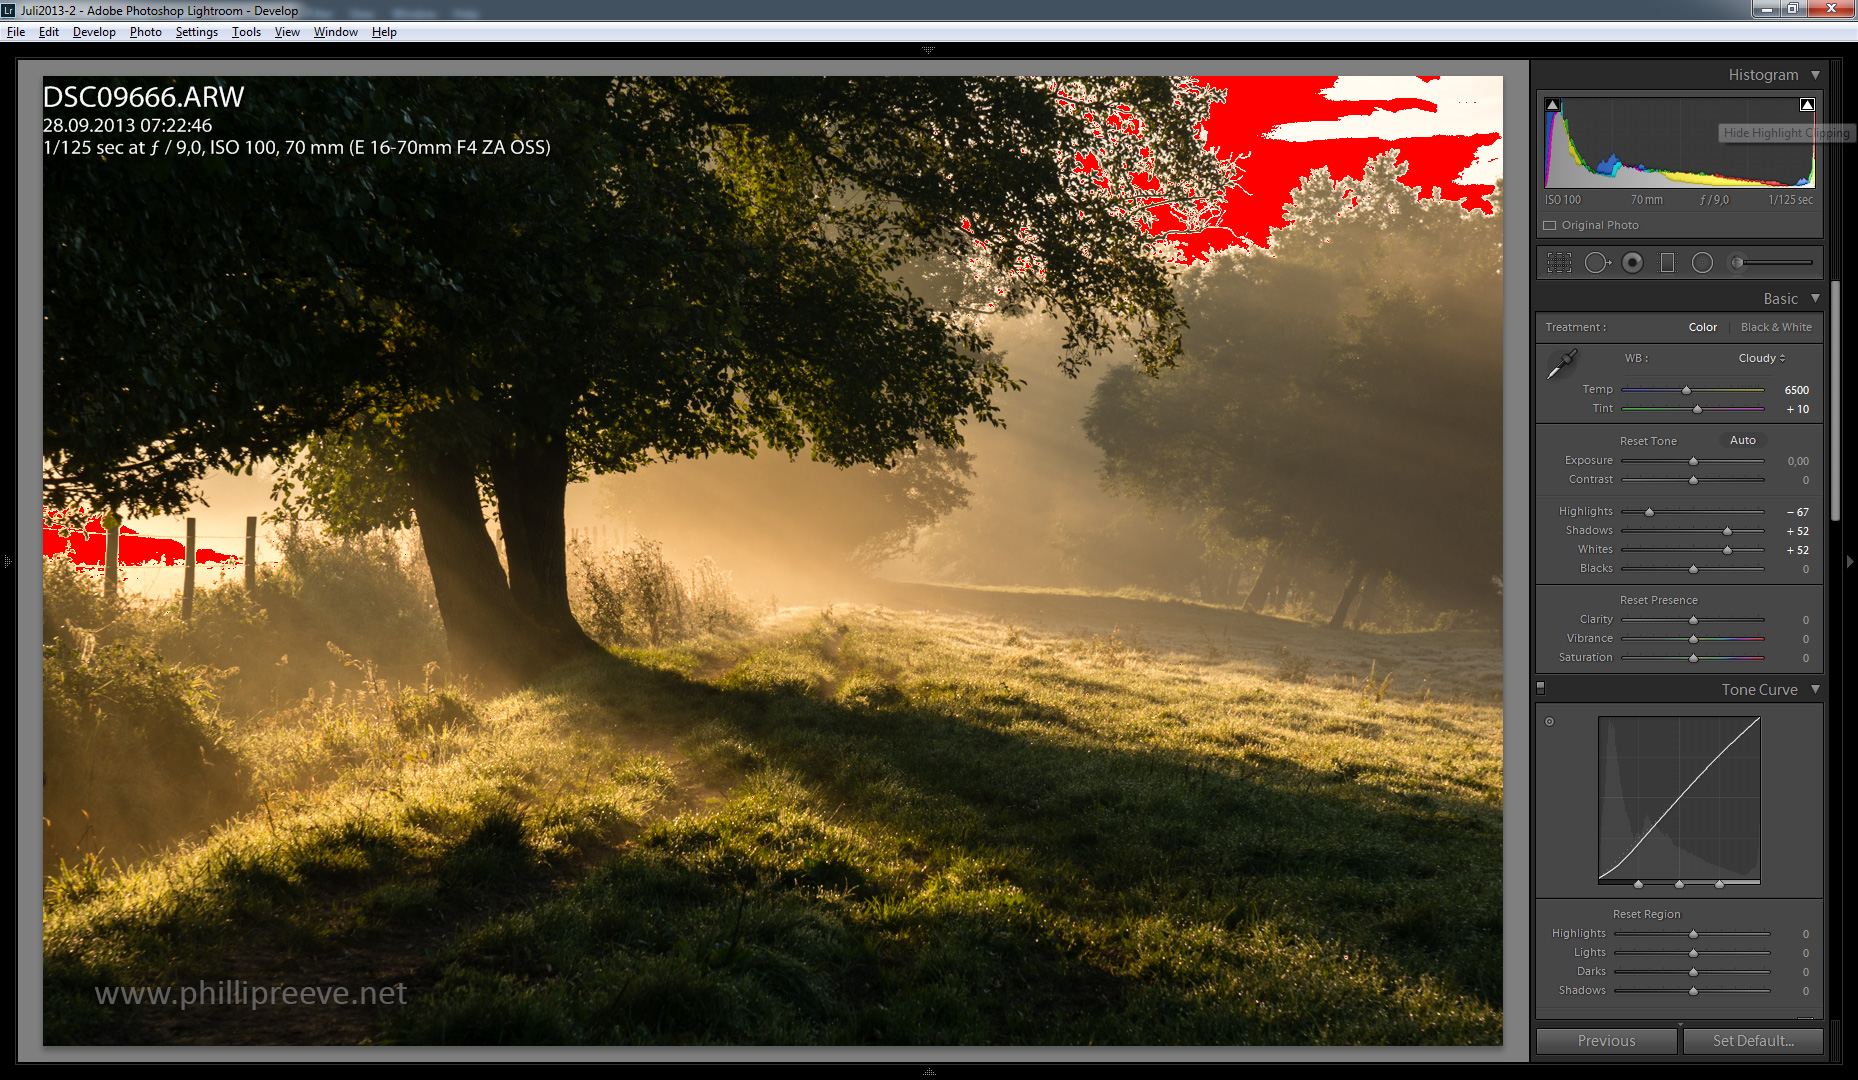
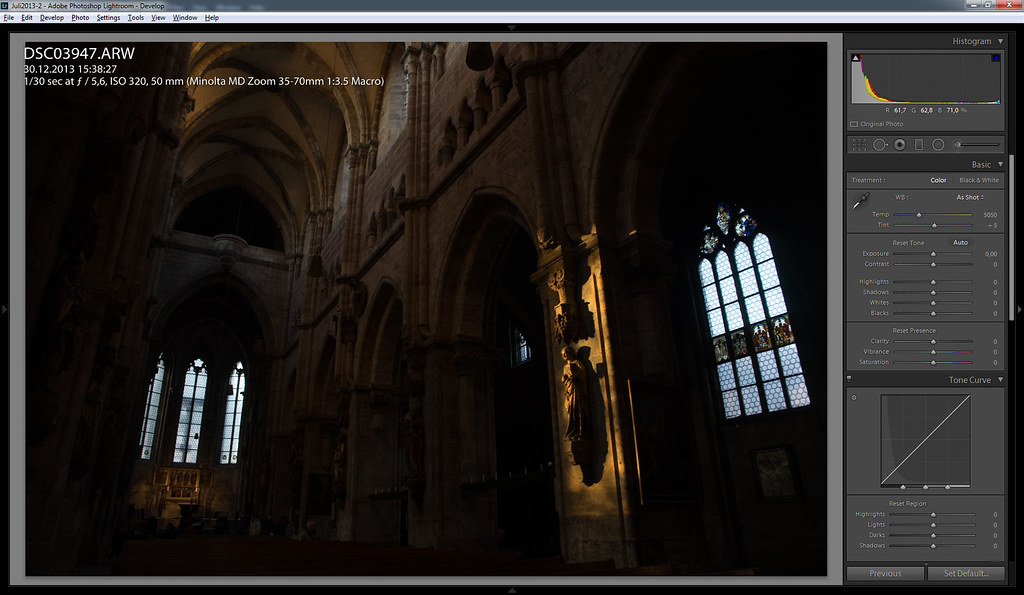
Sample 2: Managing a high contrast scene
This is my favorite image of 2013, the scene hat a really high contrast and I have slightly overexposed it, so that some highlight detail is lost. With the A7 and its higher Dynamic Range an Zebra this wouldn’t have happened.
Contrast
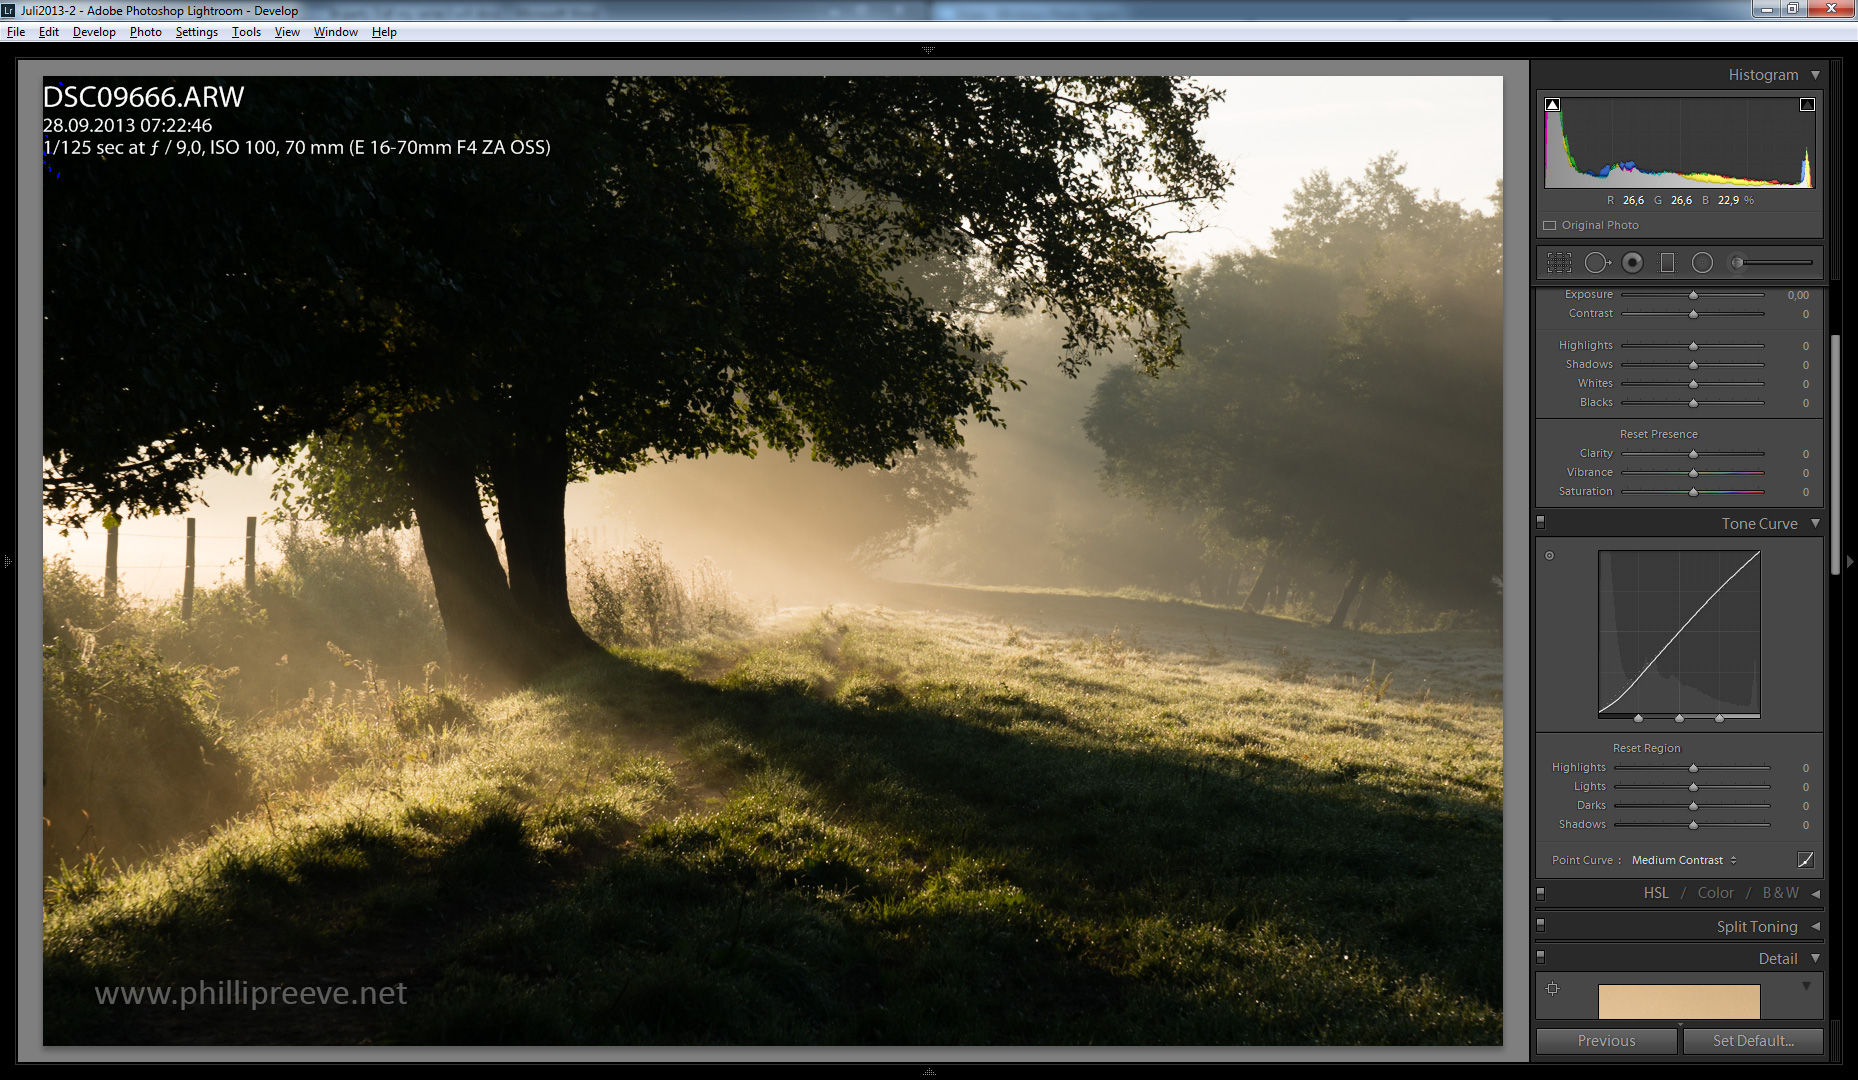
As I told you before: I always use this
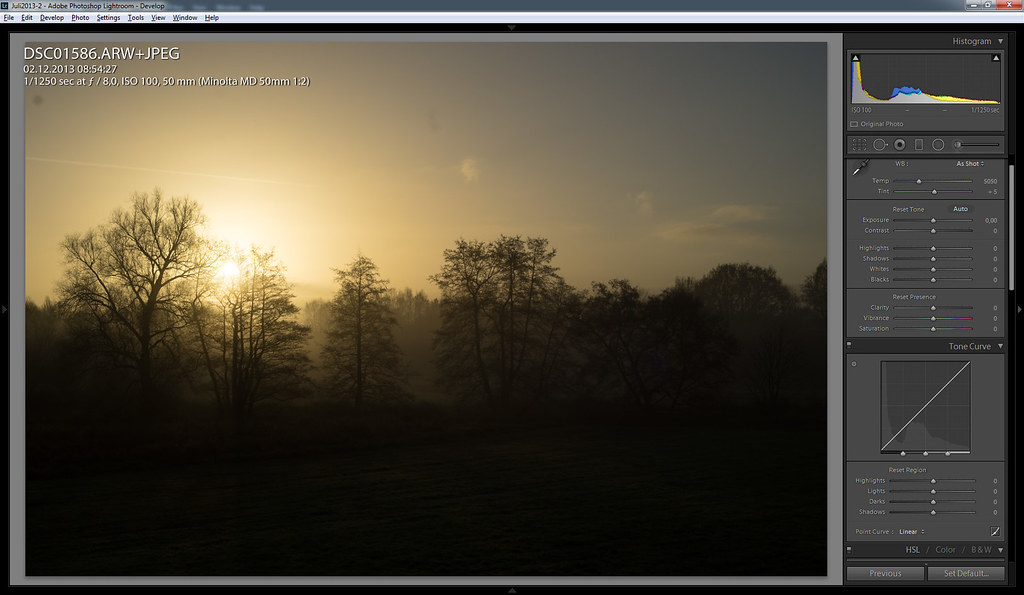
White Balance
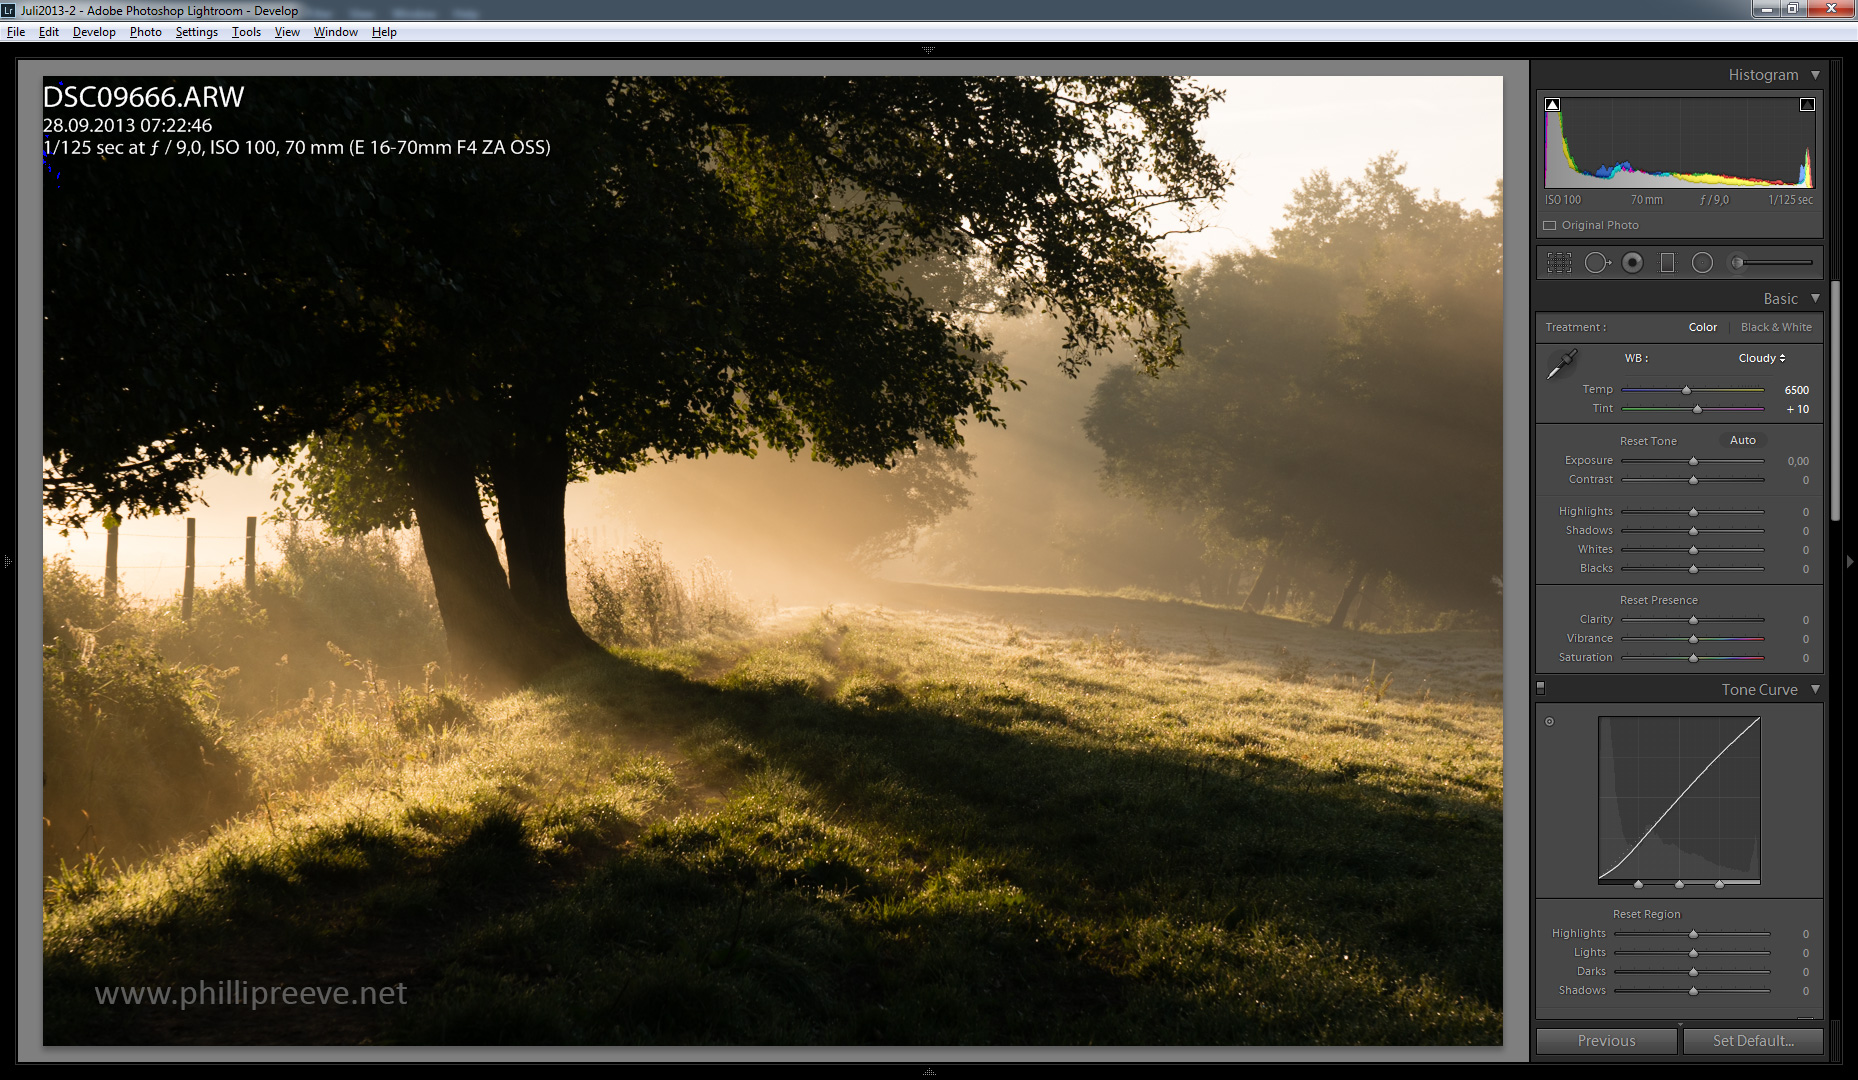
The image was taken only a few moments after sunrise and my default daylight white balance doesn’t do this justice, so I select a warmer white balance. Cloudy is often a good starting point. The image has a much warmer feeling to it now which suits the scene well.
Shadows

I raised the shadows to high on purpose to show you how what not to do. The darker parts of the image are lifted too much and they don’t look natural to me.
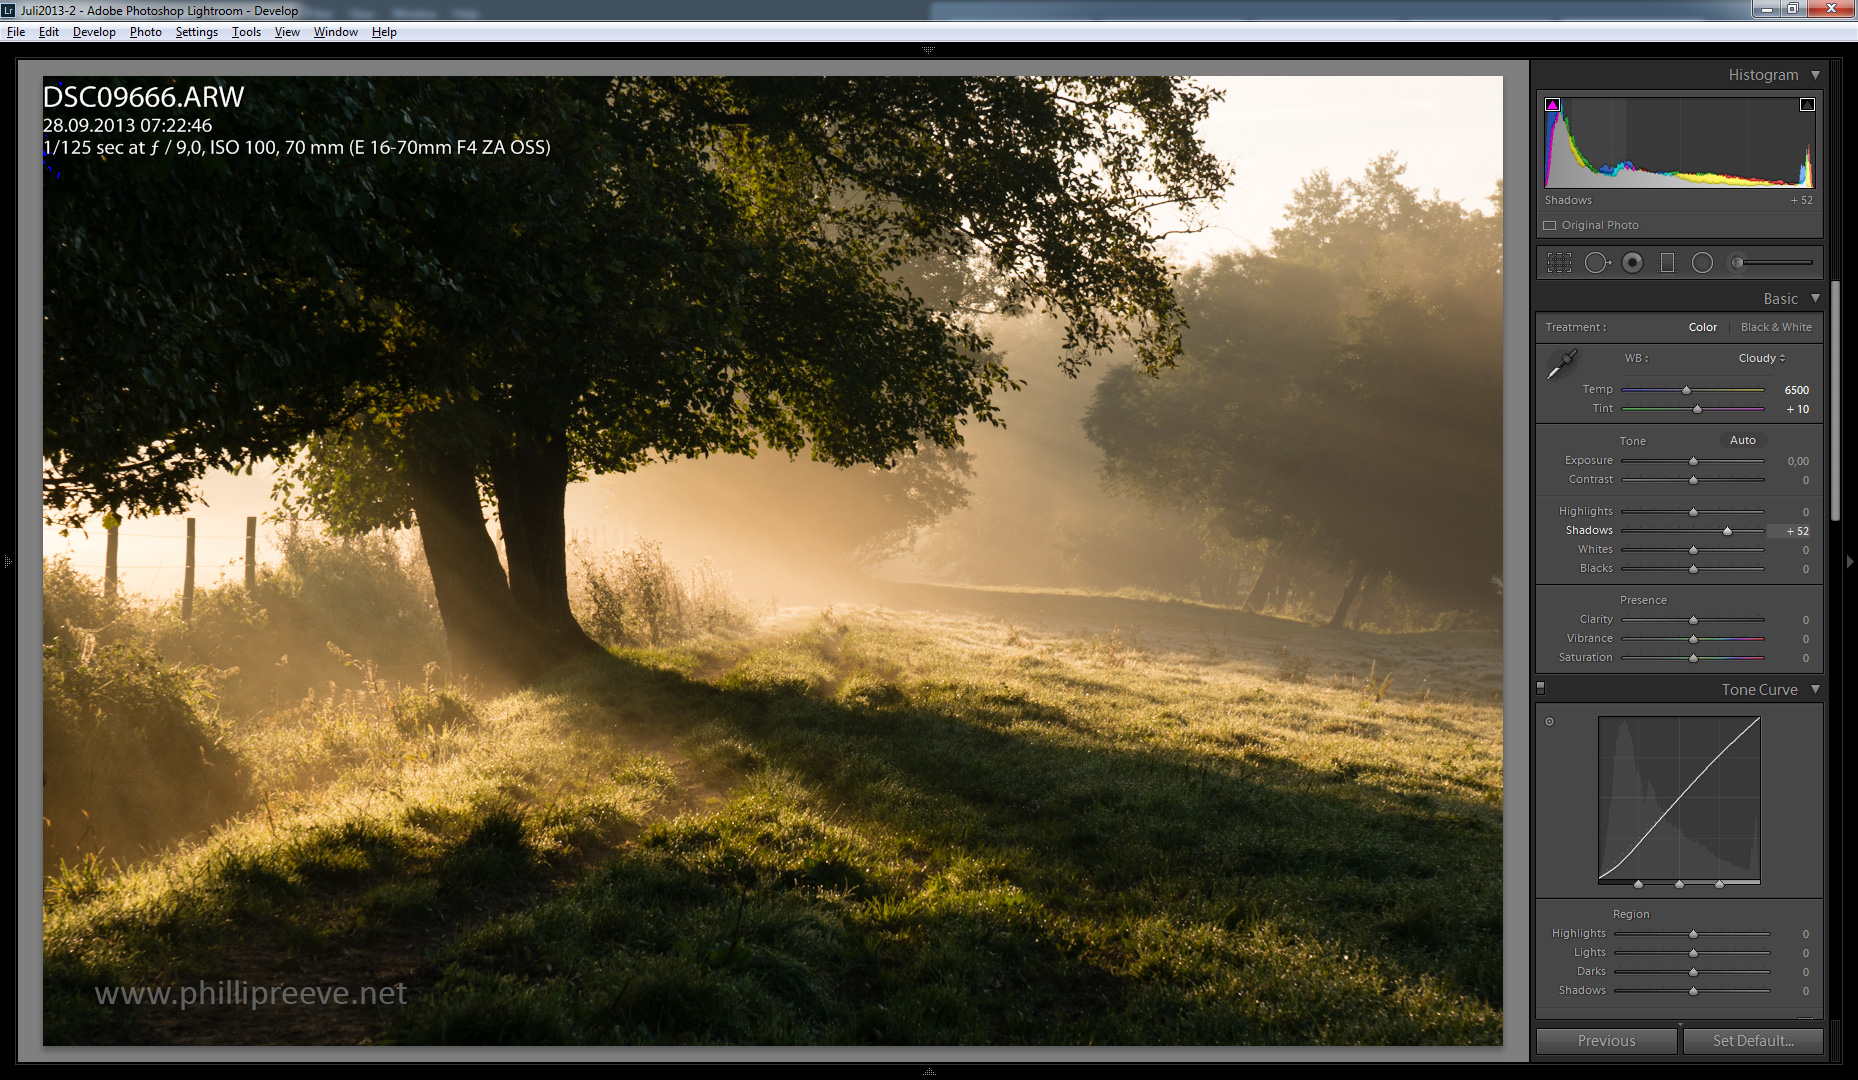
So I reduced the slider to +52 which brings some detail into the shadows, but they are still dark
White
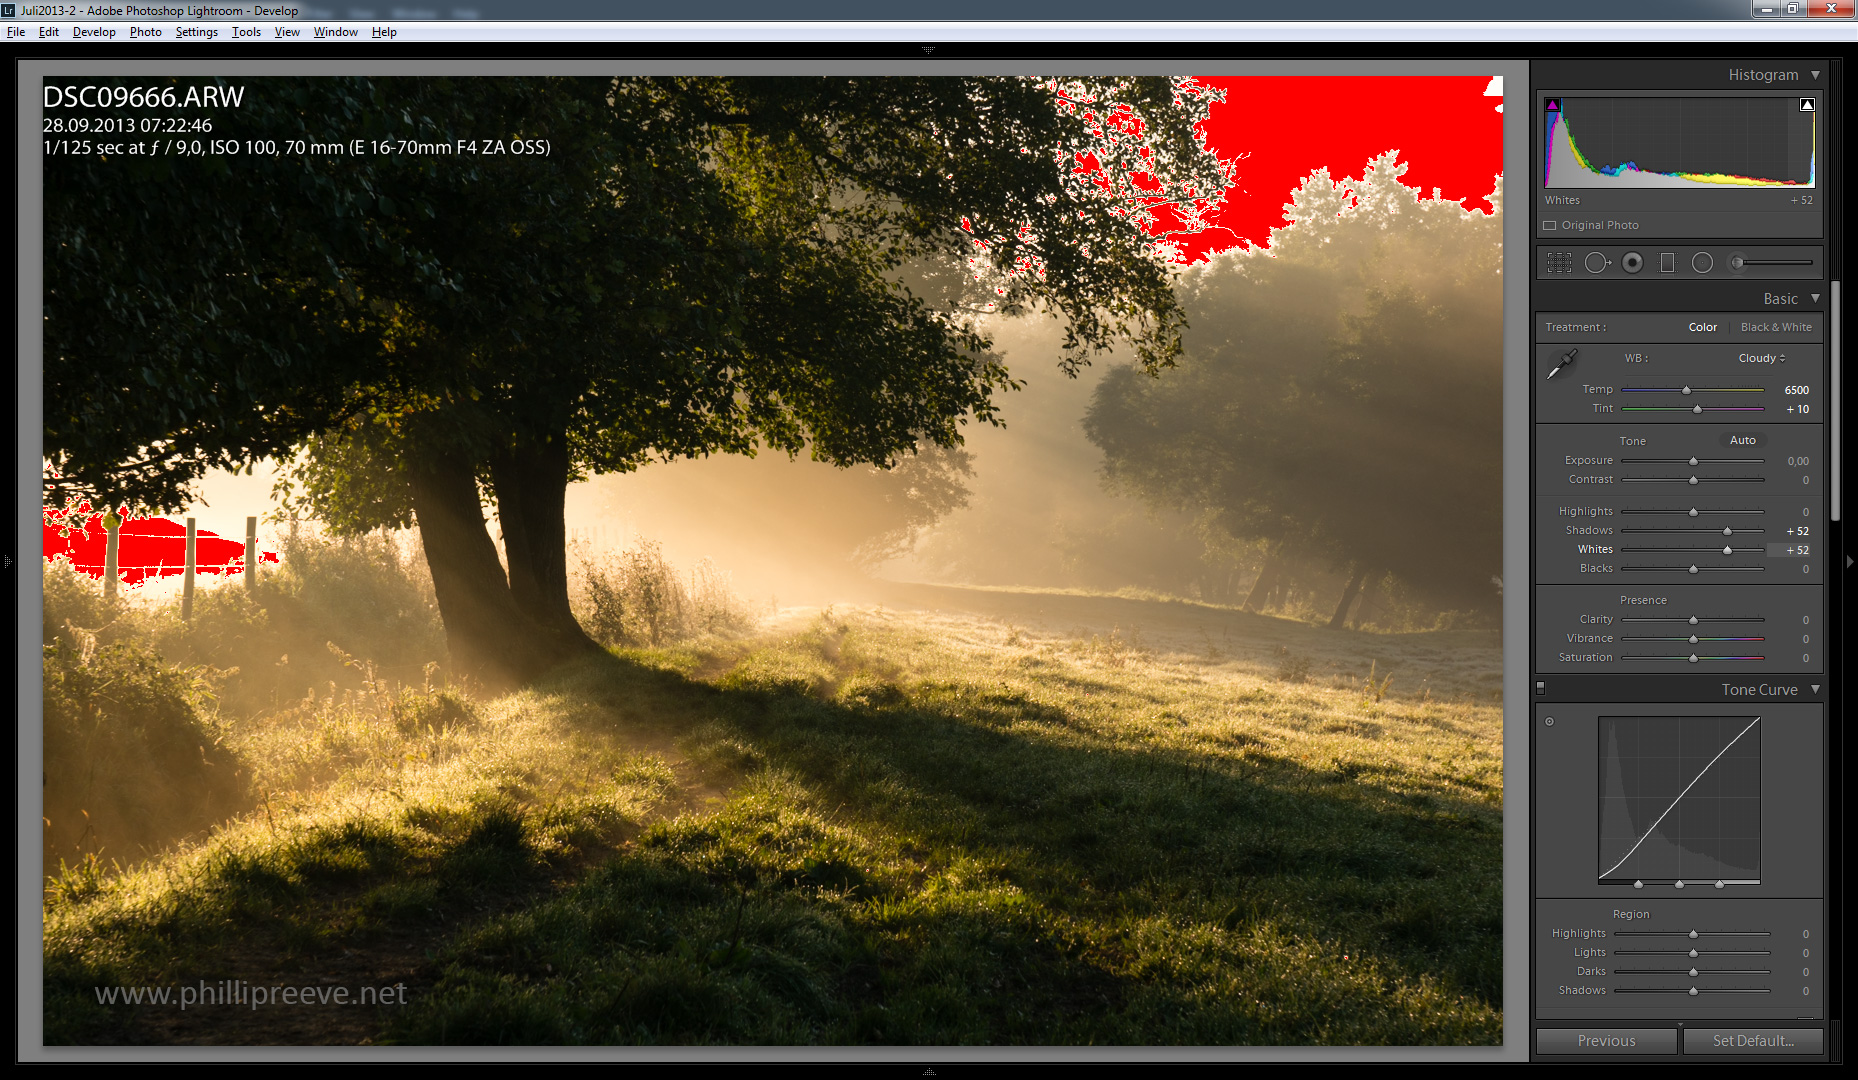
Now I make a Mistake: I shouldn’t have used the Whites slider, because it brightens the sky too much.
Highlights
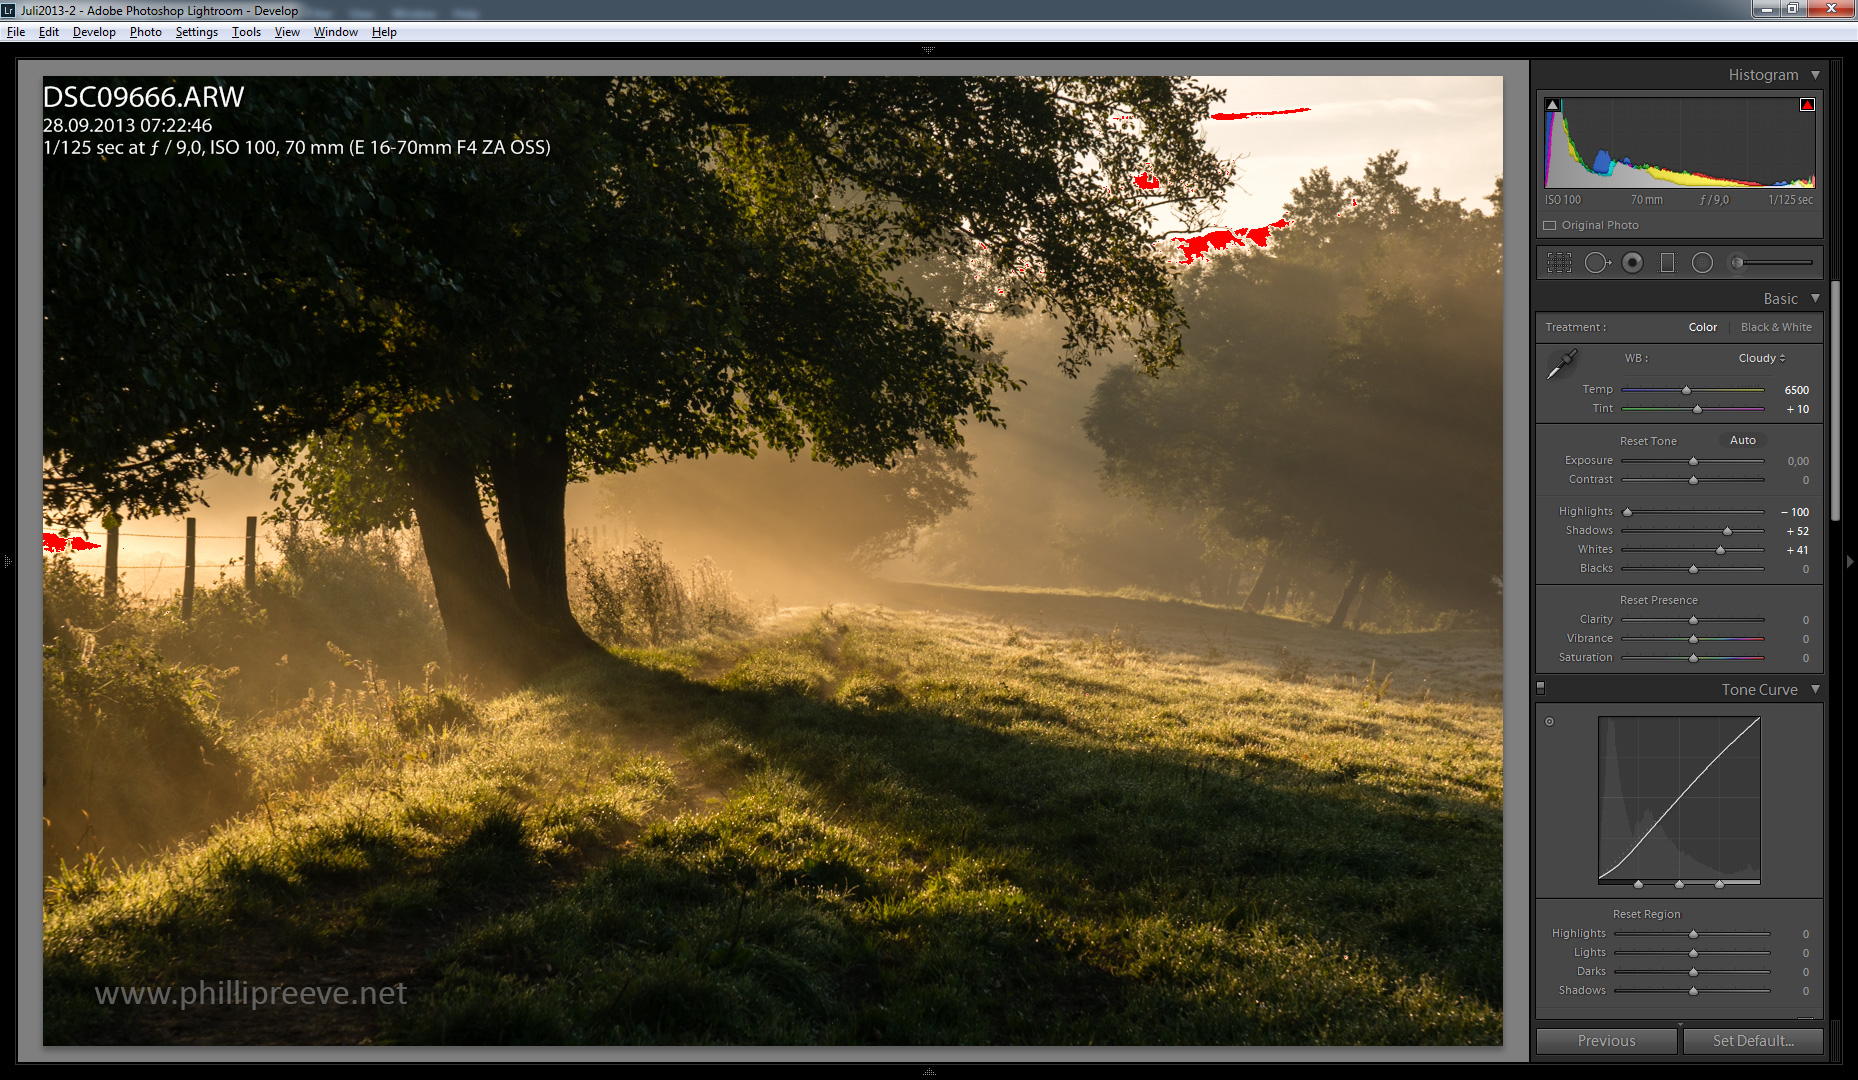
Because I used the Whites slider to excessively I try to recover my highlight detail with a very high highlights setting, but I have to dial back the Whites slider a little bit as well to recovery nearly the full highlight detail.
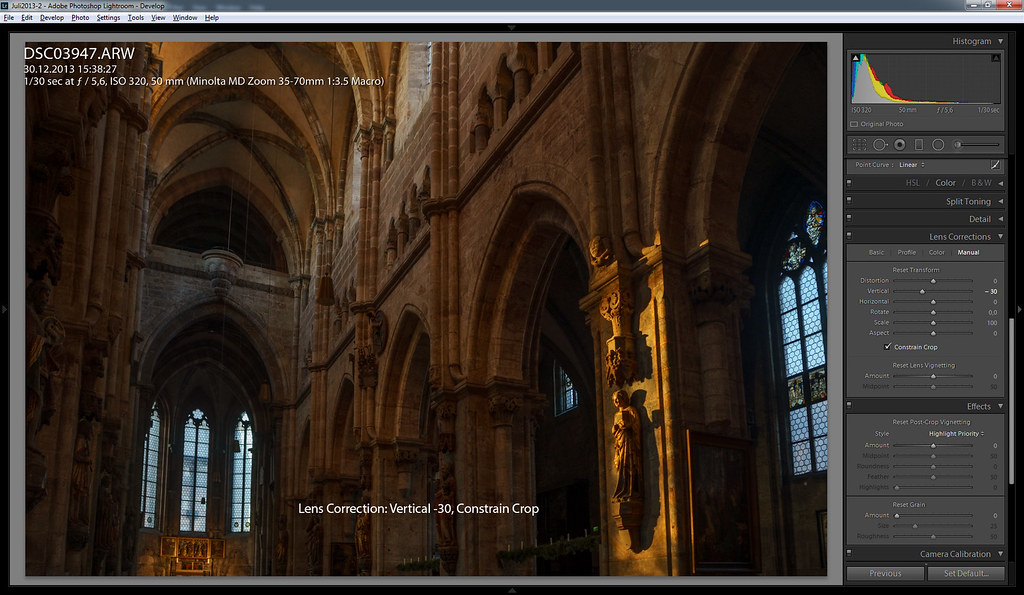
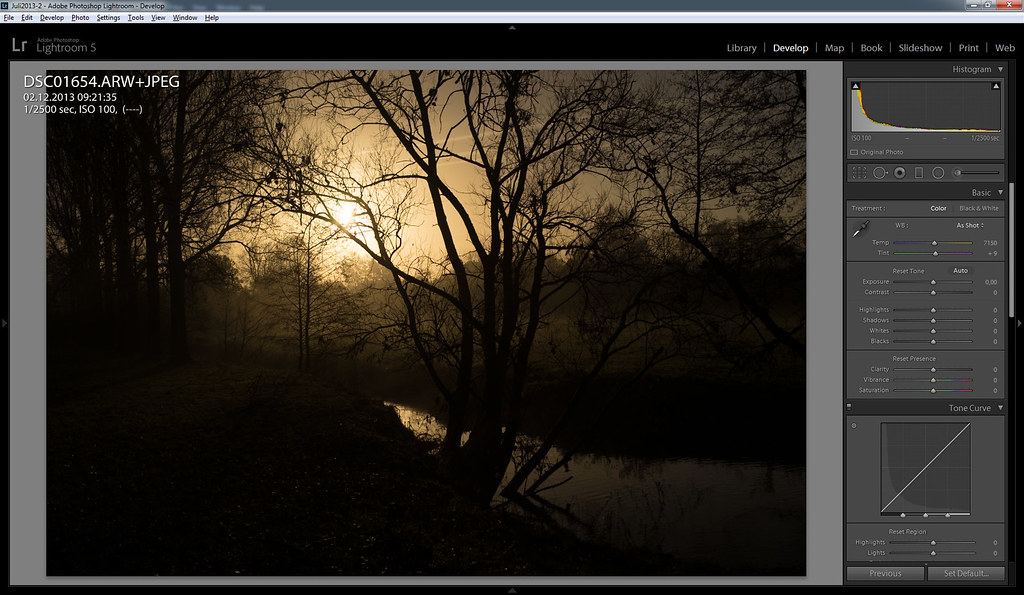
Cropping

If I have the feeling that a part of the image doesn’t add to it I will crop it out.
I think the cropped image is better balanced.
Post-Crop-Vignetting
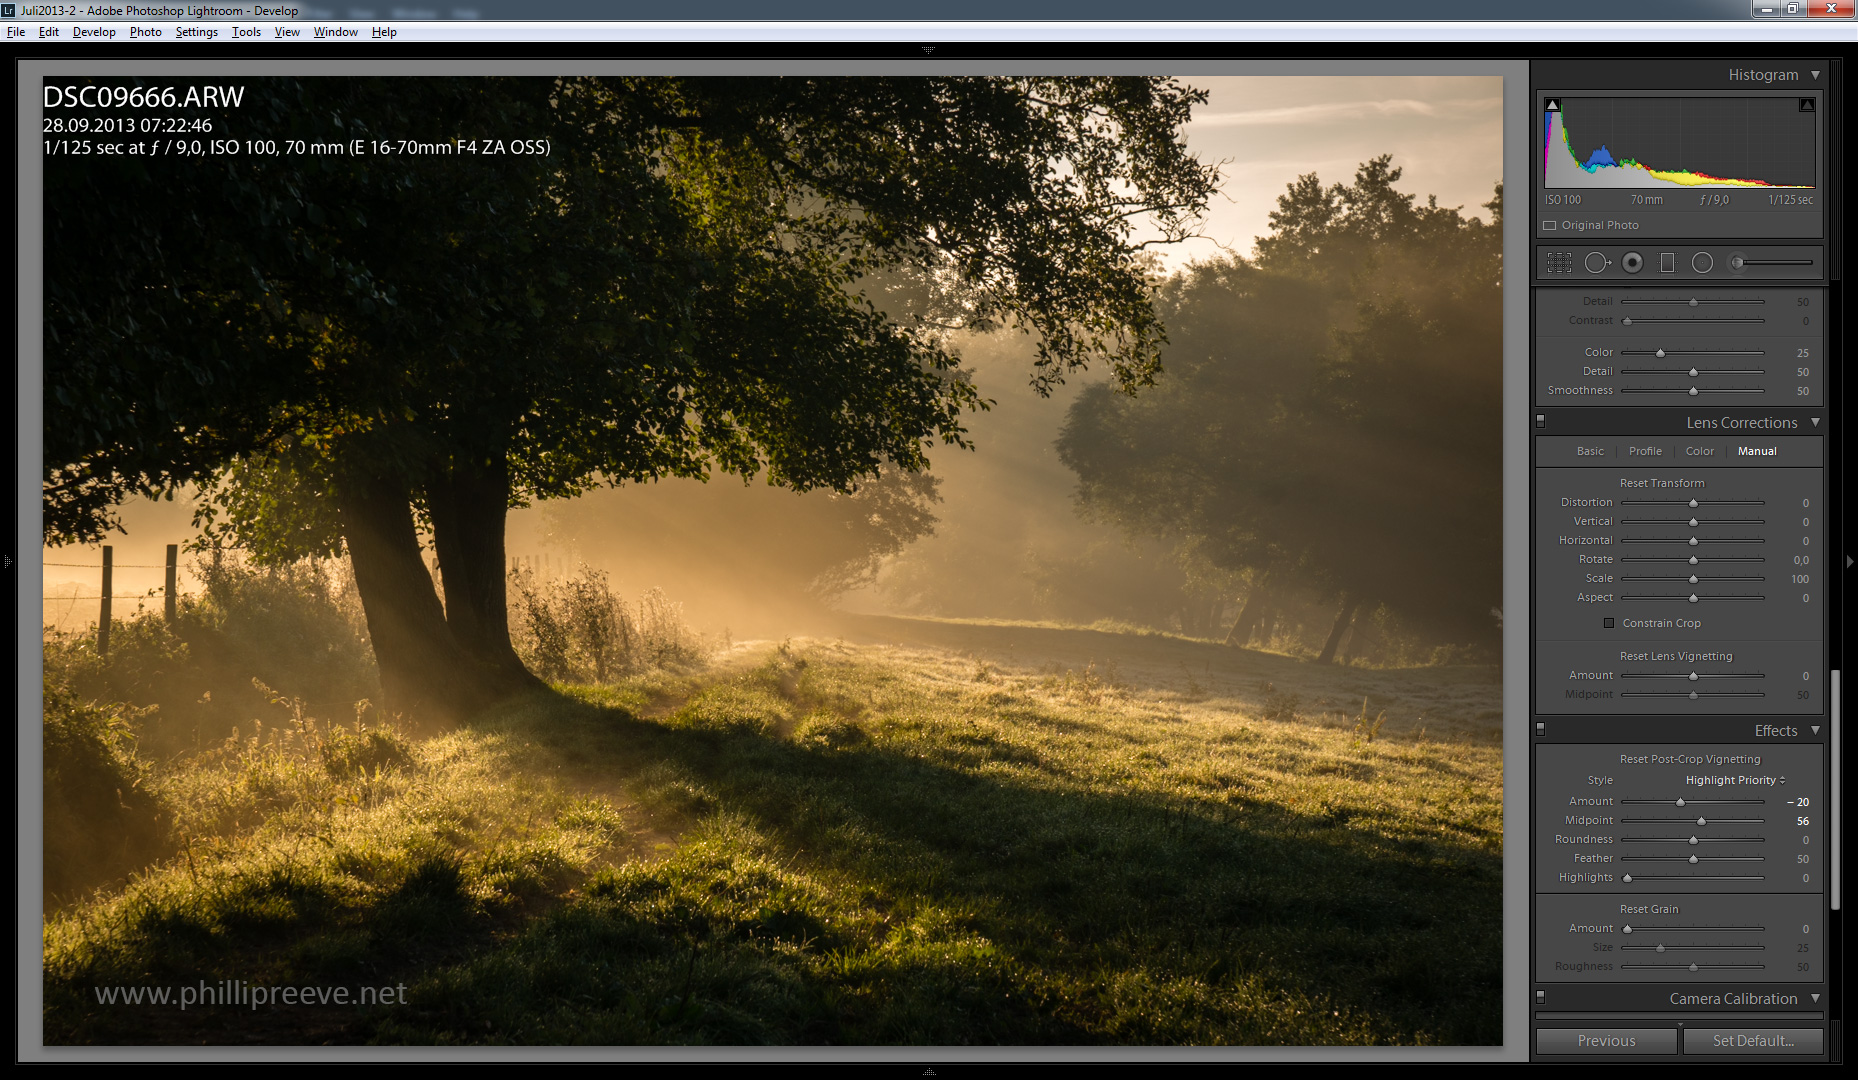
The normal Vignetting slider would result in unevenly lit corners because I cropped the image, so I use the Post-Crop-Vignetting setting which factors in my cropping.
Highlights II

I have used the highlights slider too excessively and lost the light mood because of it, so I change it to a much lower value. This results in a better overall mood and a upper right corner which is too bright in my eyes.
Adjustment Brush
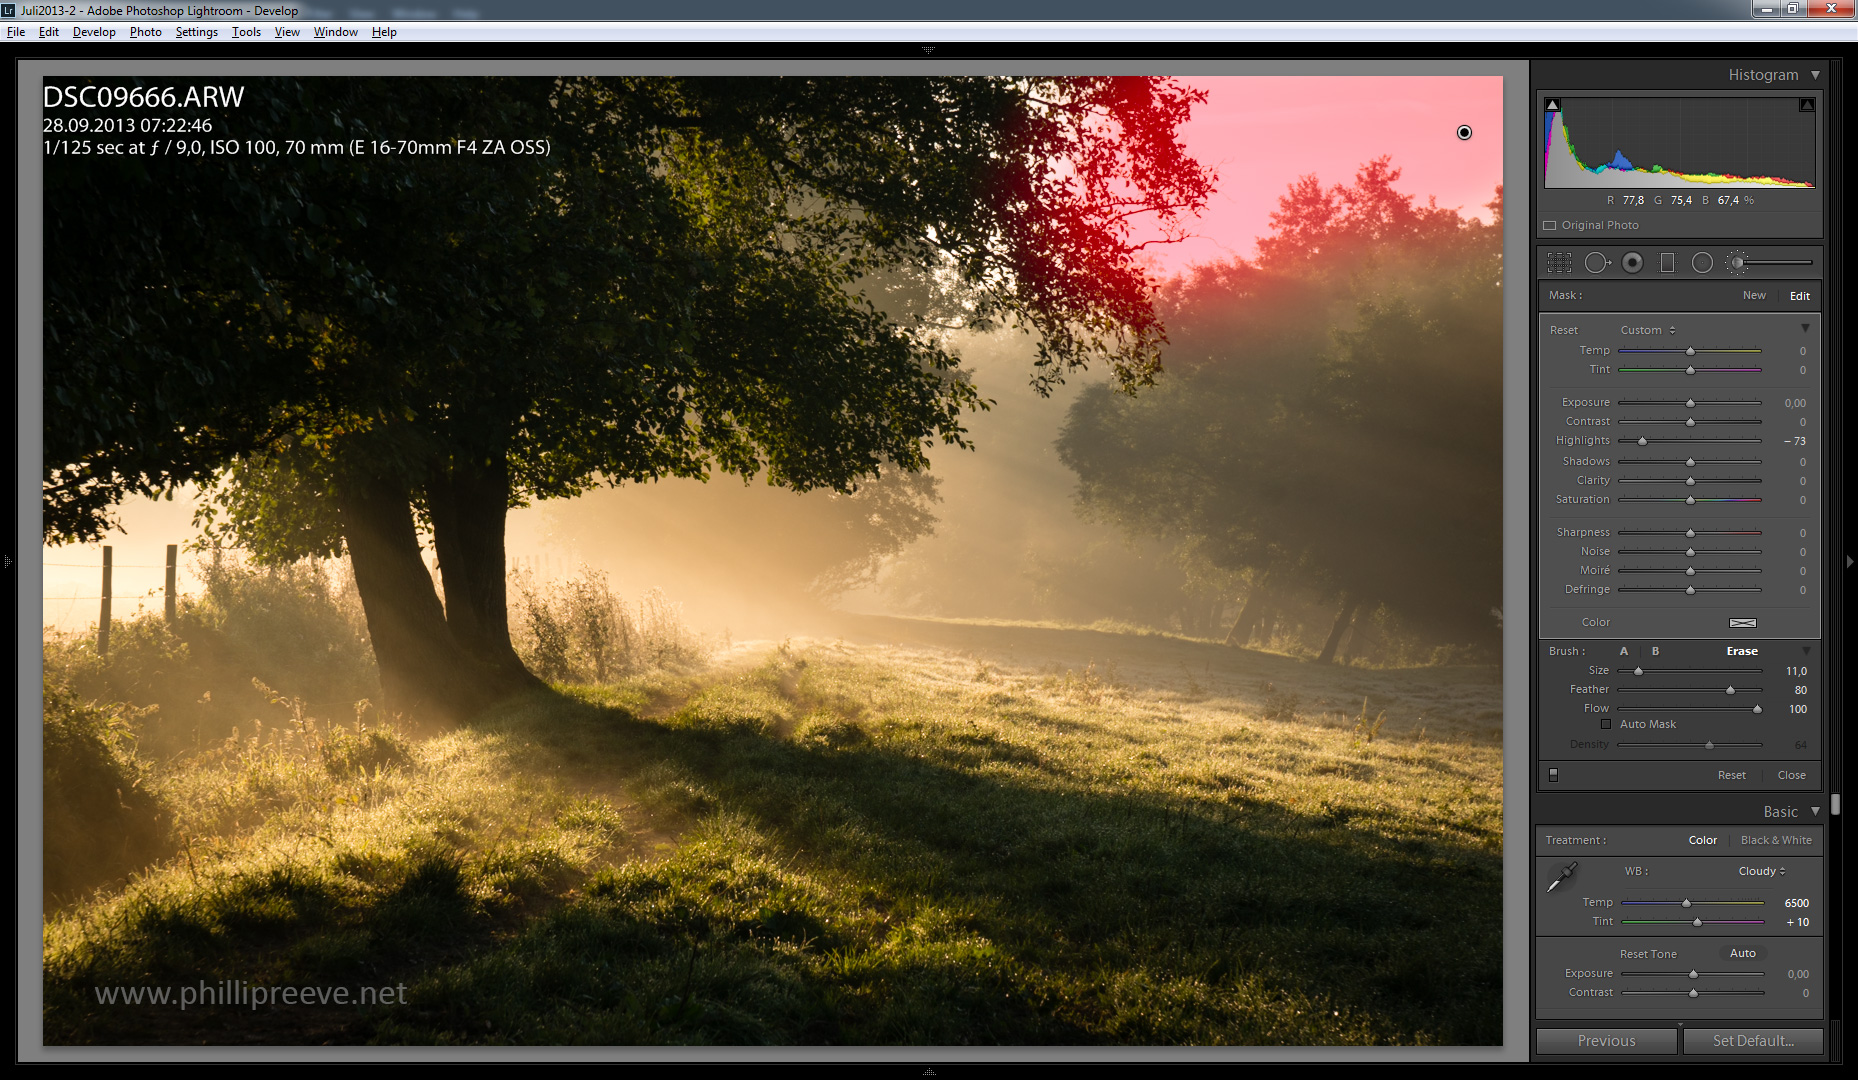
The adjustment brush is handy for local adjustments which affect only a part of the image. I will use it to fix my upper right corner now.
Several more before/after samples

This site contains affiliate links. If you make a purchase using any of the links marked as affiliate links, I may receive a small commission at no additional cost to you. This helps support the creation of future content.
Latest posts by Phillip Reeve (see all)
- Review: Samyang AF 75/1.8 FE - April 12, 2021
- The FE-List now has 113 lenses on it - March 25, 2021
- 2020 – Year’s end review - December 28, 2020
Hi. Thanks for this informative series. I particularly liked this one. What is the difference between using just using the contrast slider compared to using the setting in the tone curve section like you did? ta
I honestly don’t know. But it is easy to test 😉
The effect on the image is the same if you just want to add contrast. The difference is that using the contrast slider won’t affect your curves setting which can be either useful or not, depending on what you want to achieve.
Obviously, using the LR tonal adjustment sliders will manipulate the underlying tone curve used for rendering just as the direct curves adjustment does.
Philip – good article again. I am most interested in automating the down sampling/sharpening routine (plugin?) you mention.
I offer one alternative way to review, select/reject. I used to use a similar technique as you but I found I was keeping way too many images that I just never used. So, about a year ago, I changed my approach and only ‘picked’ (using the ‘P’ key) those images I felt were really winners. I would then go back to the images not selected and give them one more look. At the end, I know I probably picked a few more winners than I should have but I have rejected (by not selecting) far more images than I would have using my old technique. The end result (for me) is a much more focused portfolio and I can save a lot of disk space by deleting far more images than I used to. This has been my workflow now for the past year and a half and I really like it.
Thanks again for some fine offerings on this blog.
Bob Israel aka ‘rji2goleez’
thanks for the suggestion, I will try it tomorrow 🙂
Part 4 will take some more time because I am busy with the SEL2470 and I also want to write about the ZA 1.8/135 , G70400 and ZA 2/24.
best,
Phillip
Great post!!! Thanks.
Thank you for that elaboration.
You wrote: “LR 4 it offers superior control over highlights and shadows, you won’t get this level of control over your image with Photoshop.”
May I indicate, that the ACR (Adobe Camera Raw) module coming with Photoshop provides nearly identical controls before it is transferred to Photoshop?
oops, thanks for pointing it out
If you are talking about CC then this is correct. However the non-CC version of PS/Camera Raw does not have some of the new features in CC (Adobe’s way of forcing upgrade if you need these features)
Did you every compare LR with Capture One? My workflow with this tool is almost the same.
By the Way: Our landscapes are great – light in Bielefeld seems to be much better than in Berlin.
I have enjoyed this series~ I always like seeing how photographers I admire process their work. I’m really curious to see the sharpening and resizing action you mentioned…coming soon? 😉
I am working on it 😉
Phillip, this is fantastic! I’ve admired your images for a few months now and love what you do with light. Thanks for letting us peek into the “kitchen” a little.
you are welcome 😉
Hi Phillip,
This is very useful and educational, thanks for putting it together. Just curious, what do you use for color profiles in lightroom?Standard adobe, custom xrite or others?
Keep up the great work….
Bruce
Hi Bruce,
I use the standard profiles, mostly the Default one from adobe and camera neutral for scenes with some red in them.
Phillip
Hi Phillip,
What kind of sharpening do you do in LR or PhotoShop, besides downsize sharpening? I have the downsizing routines pretty well worked out, but am trying to figure out capture sharpening for fine detail & also microcontrast. I have seen techniques such as USM with extremely fine radius and high percentages (like radius=0.1 & amount=200%), and also with very big radius and low percentage for microcontrast (radius=30 & amount=50%). I am considering whether LR would be good enough, or whether I need to go to PS, and what are the best settings. I prefer to stay in LR if possible, except for using scripts.
I use Photoshop for resizing because I couldn’t get good enough results out of LR.
Hi Phillip, I enjoyed my first reading of your article – I will look a little more closely at the settings for some of your examples.
I use very similar moves in LR5, but I learned something new here – that the Black slider can be used to stretch tonal range at the very bottom of the tone range. I already appreciated this at the top end (i.e. pulling back Highlights then stretch high tone range with the White slider). I will put it to work immediately.
I do use Photoshop in conjunction with LR to better manage noise reduction (NOISEWARE) and sharpening. I also do all critical colour adjustment (e.g. flesh tones) in P/Shop.
I am interested in your LR export modes – do you explain those anywhere on your website?
Many thanks.
Hi Philip,
Having admired your work on FM I really enjoyed now reading through Parts 1-3 of your work-flow.
I’m happy to find that my process is quite similar with regards to the Highlights, Whites, Shadows, Saturation, Clarity and Vibrance sliders, though it seems I use the Black slider a little more and Vignetting a little less .. and I don’t find the light in my shots as good as yours, I’ll have to get up earlier than I do now ! I also use Topaz’s DeNoise 5 when better noise reduction than LR’s is required.
You mentioned the EXIF/Border tool to use on export, developed by a German guy, which works as a plug-in, could you please give a link or the name of the tool ?
Thank you, I have certainly learned some things from your tutorial to help me during my PP and I will continue to follow your blog and admire your work !
Cheers, Kevin (Frogfish on FM).
Thanks so much for writing this up! Really enjoyed parts 1-3!!
love your site.our ideas are similar about photography- sony a7r and a7ii,doug
Did you compare whether you can do the same editing with the open source software called: “darktable” ?
With Lightroom moving to the cloud and monthly fees, I rather prefer a solution where I have complete ‘control’.
Never used Darktable but I would be surprised if it came close to LR. I have very little sympathy for Adobe but I think they have the best product.
Did you ever try DXO Optics Pro 10 ?
In my opinion it is superior to LR in several aspects :
– The way optics are more precisely modeled, that enables better corrections of optical shotcomings with recent lenses
– Better noise handling with the “Prime” mode
– Better contrast management with microcontrast / fine contrast / contrast
– “ClearView” which is great whenever you are shooting far landscapes (mountains, wide landscapes)
– More control of color rendering – especially if you use also use DXO FilmPack
– Volume distortion correction for wide angle lens shootings with faces in foreground – of course this does not apply to landscape photography
Of course LR has very strong points compared to DXO, for instance the fact that it is faster and more stable (less bugs).
I tried it a couple of years ago. The thing is that once you are used to LR have all your presets and your catalogue in it you would need a very strong incentive to change. And since I am still quite happy with my LR output I see little reason to give another program a try. But I think it is great that there is still at least one other alternative to LR.
I’m still drawn to try Capture One 9, as it gives smoother skies, especially in B&W, for my infrared images.
I tried DxO Optics 6 (or7?) a few years ago and hated the “lag” between moving the tools and seeing the effect on the photo. It was horrible, as you couldn’t assess in real time, what you were doing.
Also, their claims about making “soft” photos sharp, just wasn’t true.
Stefan,
I haven’t used light room to compare,but I can tell you that darktable is one of the best open source programs I’ve used. It definitely has all of the operations shown in this article.
Hi Phillip, just wanted to thank you for this blog, which is very useful. I recently purchased a new Sony A7 and am keen to explore its potential for landscape photography. You have some very nice photos on flickr! I am looking around for a 24mm to get me started with the A7 (I have no E-mount lenses although I do have the Sony LAEA3 adapter for a couple of my A-mount lenses). I will probably start off with the Canon FD 24mm 2.8.
Thanks again, Simon.
I have the Fuji X-T10. I have labored long and hard at manual focus. But no matter how long I work on focusing an image, no matter what mode of focusing I use, the image is never as sharp as another image taken with the autofucus mode. The camera always focuses more accurately than I can.
Haven’t tried Sony. But I am reluctant to buy a camera for the purpose of using manual lenses when I can not get tack-sharp manual focus with this excellent Fuji EV.
What do you think. I there something about the Sony that will allow me to manually focus with the accuracy of autofocus?
Thanks
Jim
personally I still get more consistent results focusing manually. I have never used a Fuji so I don’t know about their focusing aids and how well they work
Fantastic tips Phillip. I now realise I have a bad habit of increasing the shadows too much! Your images are beautiful and look much more natural!
Hi Phillip,
Have you tried Adobe DNG Converter?
If you download this (it’s free!) you may be able to
convert most modern RAW files to the standard DNG.
I know there are several DNG standards, the software allows
you to convert to Camera Raw versions 2.4 to 7.1, and may be higher?
Works well on older Photoshop versions.
I had no reason to 😉
Hey, I know this post is kinda old but I had a question and I dont know about if you already talked about this.
I have been a Sony Camera user for years now, just got a A7 and Im in love, and reading your beginner’s guide I got a Minolta 1.4 from ebay and the adaptor you recommended from amazon (havent arrived yet, neither of them)
So my question is, how is the deal with the MP and Raw with this lenses, I ask because I use to have a Sony 50mm for the Nex-5N but is for smallers sensor so in my A7 doesn’t work complete and I have to crop the image. So, how does the MP work with these manual lenses.
Just wanted to add that you open a world for me, using legacy lens.
Thanks.
MP= Megapixel? With fullframe manual lenses (like the Minolta) you will have 24 Mp. Was that your question? I am not sure 🙂
Hi Philip Thanks to this site I’m currently researching A7 for use with Oly OM 28,35,50mm lenses;-). In the above images I noticed sensor dust in the sky. How long did it take for this to occur and how do you deal with removing it from the sensor. I currently run Oly m4/3 E-M1 and never suffer from dust. Is it worth spending extra money to buy the A7mkii which has the moving sensor that may avoid dust problems?
I regularly have to clean my sensor with a blower and every few months I clean it a bit more careful with sensor swab. The amount of dust depends a lot on the conditions and how much you clean your gear. Under bad circumstances you can get that amount of dust within a day.
I noticed no reduction in sensor dust when I moved to the a7ii.
Hello,
Thank you for all the amazing work on describing and testing out both editing and old lenses for the a7. It made my buy an a7ii which I love! You wrote in this part 3 that there would be a part 4. Do you have a link to this part 4? Would be great to know more about exporting with 1280px as you started to write a bit about here. Having trouble getting the right settings exporting for posting online for example on flickr, facebook and instagram. Thanks once more and keep up the amazing work!
If I remember correctly there was never a part 4 😉
Hi Phillip,
There is another part relative to this topic but neither named as part 4 nor about exporting. You can find the link by simply clicking on the menu “TAKING PICTURES” and scrolling down a little bit, it is right below the 3 links of “HOW I CREATE IMAGES”. I’d rather to regard it as Part 1.1 :).
And may I let you know that there is a incorrect link on the “Part 2” within that page which is actually leading us to Part 3?
How about lens correction for manual lenses in lightroom? I presume there isn’t any presets, what would you do for say canon nfd lenses? Thanks for the excellent website, very useful for those thinking of going manual.
There are Adobe presets for quite a few manual lenses in Lightroom, but it’s always possible to make your own profiles with Adobes profile building software which you can download from them.
Thank you for this very interesting feedback on your work.
I don’t always like the subject of your photo but I really love the atmosphere and the lights of every of your pictures that give a recognizable style of your work!
Even if I think that your use of MF is an important part of the sharpness of your photos, I’m interested by the “Part 4” of this article serie about exporting and how optimize sharpness according to resizing : )
Hi Phillip
Been looking at your LR process & came across this comment – I am not a fan of LR’s sharpening, it works okay on most images but it isn’t good at preserving small details, so I use a technique called step sharpening to resize my images to a width of 1280px. I will talk about resizing in depth in part 4 of this series.
I don’t really like the sharpening in LR either – but I can’t find any Part 4 / step sharpening information
I’d be interested in reading about it
Thanks
Colby
never finished that one, sorry 😉
Hello. I was glad to come across your series here about work flow. I have been trying to establish a workflow and process for organization, I think yours is a model I can stick to and work from.
I am wondering if you have changed anything since you wrote this series back in 2014? Certainly most people have an evolution to some degree in their process, and there have been new software changes as well. I am reluctant to leave LR6 due to the subscription fees. Curious if you have made any modifications to your general routine for work flow. Thanks!
Not many changes. I use Lightrooms new color profiles at times but apart from that my worksflow is still pretty similar.
A lovely read thank you have learnt some useful tips ☺️ Sam in Cornwall, UK
🙂
Hi Phillip,
Thank you for the tips on Lightroom. I enjoy it but I find I do not have enough time to work on all the photos I want to.
Will you be reviewing Luminar 4? Their advertised faster workflow is attractive but a practical review would help know if it is worth buying. The automated portrait enhancer and sky replacement looked particularly interesting. But some do say the software is slow and the YouTube videos are of photos with Canon and Nikon gear, presumably RAW files.
Luminar and many other editors pay very big commissions of 50% and more of the purchaseprice to their affiliates. So very favorable reviews are to be expected.
I am mostly happy with Lightroom and changung systems would be a big headache so I won’t review any other editors since I review stuff I actually use.
Thank you for the quick reply.
50% is a lot. The other sites were focused on positives only, and were not really reviews.
i often love the natural retouching done on the images presented on the blog. So i’m quite interested in the RAW-processing routines.
Sometimes good images need very little processing, but often enough i’ve spend hours on one single image with a good composition but with complicated lighting etc.
Maybe you want to share on one of your more recent images?
Another point i’d like to add is:
Do you use hardware calibrated monitors (very expensive) or colorimeters? If i look at the output on different displays side by side (phone, laptop, etc) it looks very different sometimes. If i spend time retouching images, i’d like colors to be as close to what i’ve intended as possbile. Any advice?
i really liked the feel this one from a more recent review
https://www.flickr.com/photos/96189377@N08/49374834558/sizes/l/
and wondered how you achived the look. Im pretty sure the exposure of the sky has been adjusted and theres probably some split toning.
Hi Pillip,
Thank you for your great site!
In Lightroom Classic CC (desktop) I’m about to start publishing my photos to family and friends. Based on a few reviews I would choose SmugMug over Flickr, which you use. Any comment?
Cheers,
Paul
Hi Paul,
I have no experience with SmugMug and I use flickr because I am used to it. For sharing private pictures with family and friends I actually use OneDrive.
Best,
Phillip
Hey, have some questions and post the first one here. What picture profile do you use? Maybe its Adobe Color, but maybe you use something else? I have a Sony A7R and I am curious. Have you upgraded? And if you did, how do you like a newer version of the system? . I have become somehow found of my old one, and not sure if I should upgrade. Afraid that it will get a more digital feel somehow. By the way, after trial and error I use this in Camera Calibration:
Sh + 12
Red -3,0
Green +12, -10
Blue -10,-8
It removes the greenish skin tones Sony is usually criticized for. At least for me. Thx Christian (@christian.azu)
Thanks for your generous sharing! Could you please update the affiliate link for Lightroom?
Seems it is not available through amazon.com anymore.
I see… Thanks for the great content!
Thank you for such a wonderful yet simple approach to editing Sony files. Just tried your method and it works so wonderful.