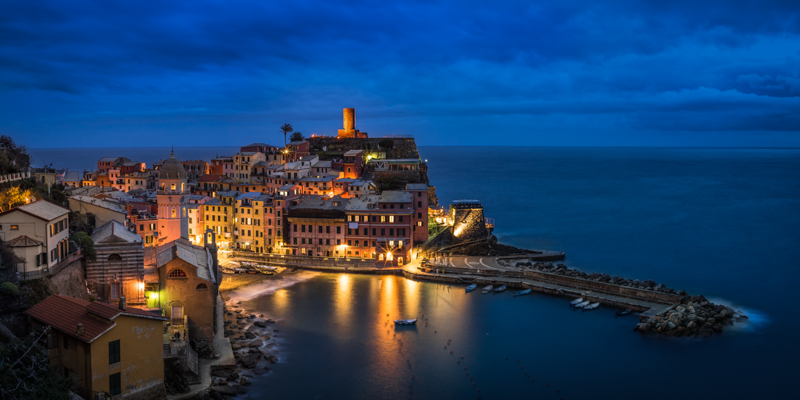
On the Easter weekend 2016 I was rather spontaneously visiting famous Cinque Terre in Italy. The weather forecast was quite alright, but as I was only on a two night stay, I had very limited time (and blue hours) so I had to make the best of it…
In the Bag
As usual when on a trip I was using my Mindshiftgear rotation 180 panorama* backpack. In the belt comparment I was carrying my A7s, Nikon AF-S 20mm 1.8G, review sample of the Zeiss Loxia 35mm 2.0, Voigtlander Nokton 50mm 1.5 and the Leica Summicron 90mm 2.0. In the upper compartmend I also carried a Nikon Ai-s 180mm 2.8 ED which I didn’t use once on the trip (therefore sold now). I also carried a small Gitzo traveler tripod, a mini tripod and a few filters. With the small lenses the backpack still has some space left for water and food. Now even more, as I won’t carry a longer tele anymore…
A german version of this article can be found here.
Before the shot
Before the trip I checked the blue hour times online. As the early blue hour was very early (~6 am) I knew the late blue hour (~9 pm) was way better to shoot cityscapes as very early in the morning many lights are off (as restaurants and shops are still closed).
Also when going to places I haven’t been before I try to get some inspiration by looking the name of the place up on flickr and Google image search. I found this picture and it was going in the right direction of what I was looking for, so I looked up how to get to that spot.
I went to check that spot out very early (way before the blue hour) just in case. Well, being there this is what I have seen:
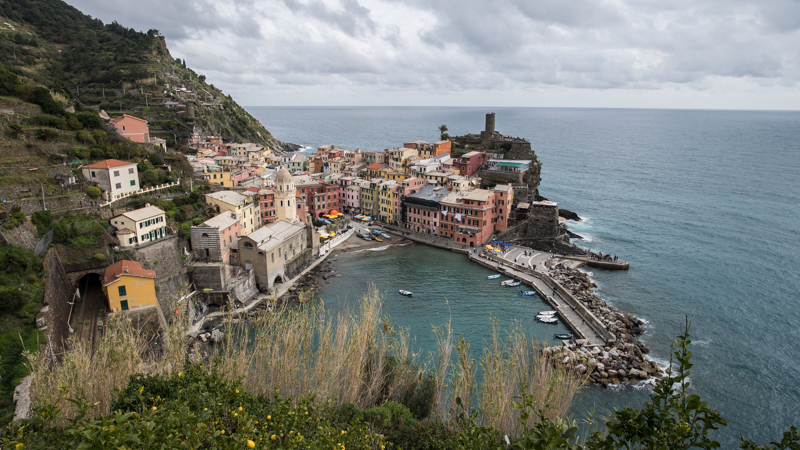
With all the grass in the foreground this spot was an absolute no go for me. A shot with blurred grass (wind + long exposure) in the foreground won’t be hanging on my wall and rather go straight into the digital bin.
I then rememberd on the way to that spot it presented myself this view:
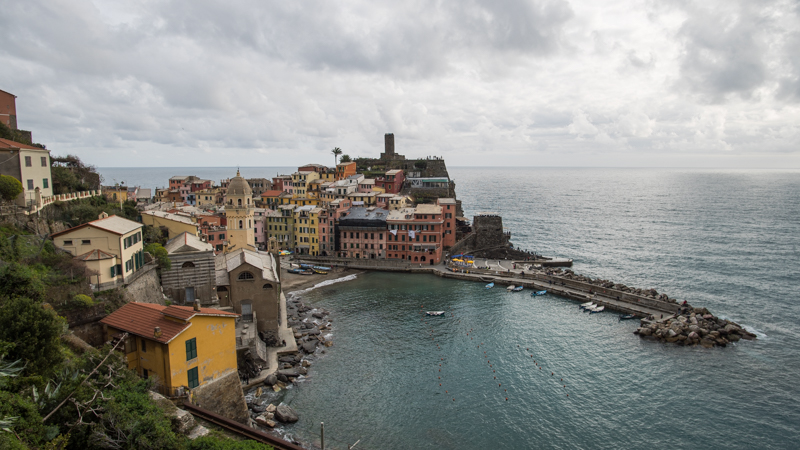
Not as many colorful buildings but also somewhat more natural and still interesting perspective. And: no grass in the foreground. So I decided to go for that spot.
I was also hoping for a nice sunset but it was really nothing to write home about that day:

Taking the shot
When going out with only prime lenses from time to time you might not have the “ideal” focal length in the bag. For this shot a 24mm lens would have probably been the best choice, but I had only the Nikon 20mm 1.8G and the Zeiss Loxia 35mm 2.0 in the bag. Of course I could have cropped a 20mm shot, but the sunstars the Nikon 20mm produces are not nearly as nice as the Loxia’s (this is why I am using the Loxia 21mm 2.8 instead of the Nikon 20mm 1.8G now) so I decided to take a panorama with the Loxia 35mm. Taking panoramas vastly improves the image quality, edge acuity improves considerably, noise is less likely visible in the final image and you get more pixels to work with.
I took 5 shots in portrait orientation, of course all with the same settings: f/11 for depth of field and nice sunstars, ISO100 for best image quality and 15s.
The dynamic range of scenes like these is huge, so I exposed for the highlights to not blow them out. If only a very small circle of a light is blown out on e.g. street lamps this is not a problem, but everything else should still show some tonal differences. For high dynamic range scenes this is my usual approach as on the modern sensors you can easily lift the shadows a few stops withoug running into problems.
These are the 5 single unedited shots in Lightroom:

After the shot
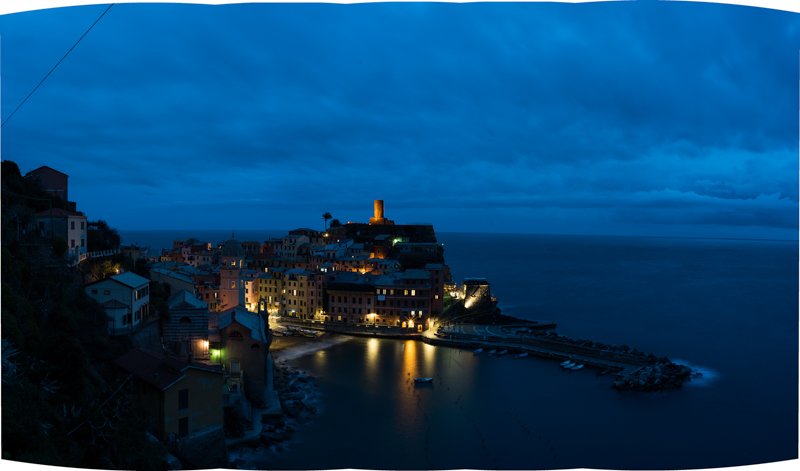
Nowadays it is possible to create panoramas directly in Lightroom, this offers a few benefits as you don’t have to adjust white balance to match each of the shots before combining them and you won’t loose any information which often happens when using external software. This is the still unedited panorama:
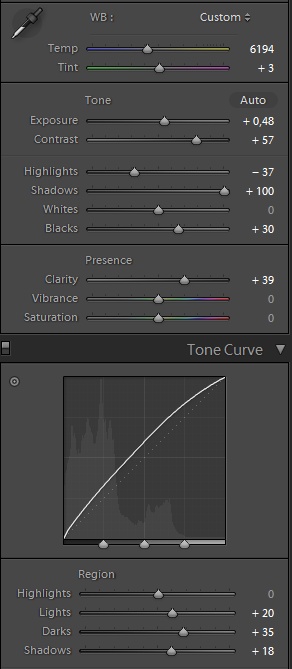
These are my global settings for this shot:
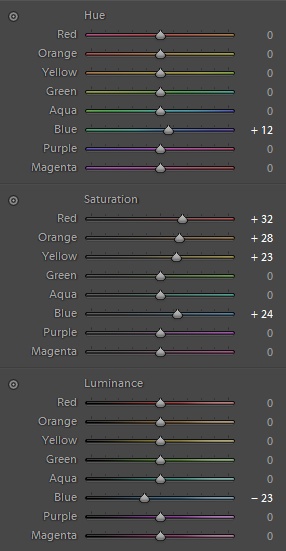
I also did some alterations to the colors, especially blue (I am rarely happy with blue “as shot”):
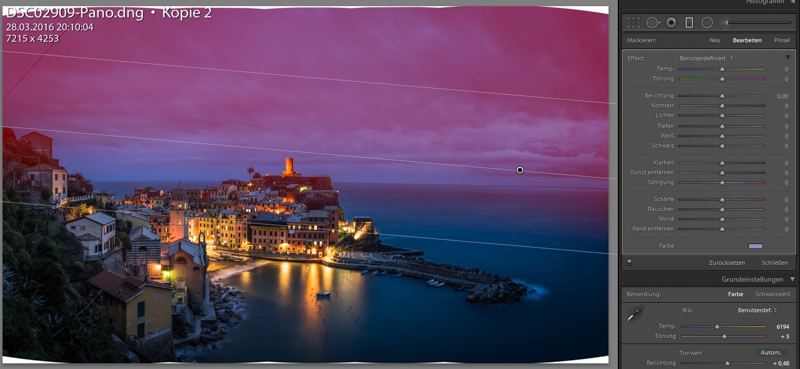
I liked the color of the water then, but still not the color of the sky, so I used a gradient for the sky:
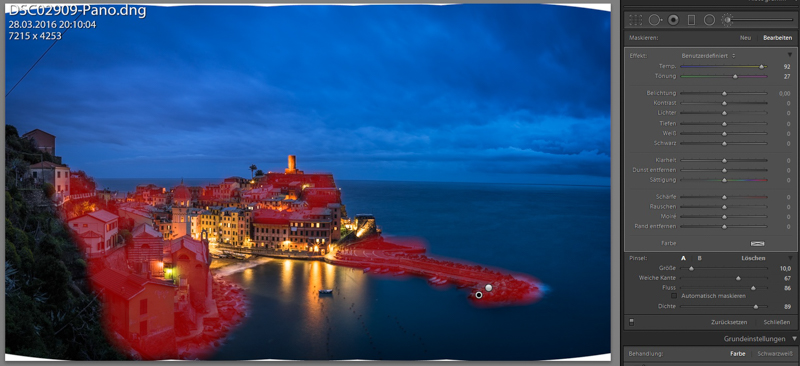
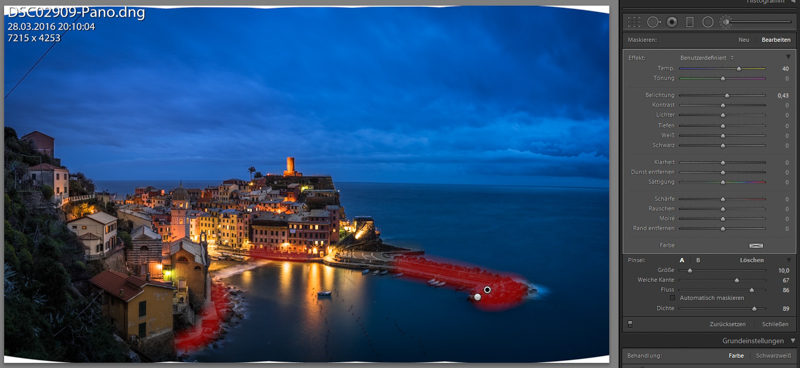
The illumination of the scene was not very even to say the least. This has also huge influence on the color temperatue: the houses appear very warm while the areas not directly lit appear very cold. So I used the local adjustment brush to increase the color temperature in these areas:
A few areas needed some additional “warming” and also a little more exposure:
For the bend horizon I was using Photoshop’s adaptive wide angle filter.
Final image

This is the final image I uploaded to flickr which also became on of my most liked photos there. I still really like the clarity, contrast and sunstars and it is one of the reasons I ended up buying the Loxia 35mm 2.0.
Other Articles
- Manual photographers: 0.2 BastianK
- Affordable manual lenses for the Sony Alpha 7,7r,7ii,7rii and 7s
- User-Guide to ultra-wide-angle lenses for Sony a7 a7II a7rII
Support Us
Did you find this article useful or just liked reading it? Treat us to a coffee!
![]()
![]()
![]() via Paypal
via Paypal
This site contains affiliate links. If you make a purchase using any of the links marked as affiliate links, I may receive a small commission at no additional cost to you. This helps support the creation of future content.
Latest posts by BastianK (see all)
- Review: Songraw 50mm 1.2 Moonlit - February 14, 2026
- Review: Nikon AF-S 14-24mm 2.8G – Way ahead of its time - February 11, 2026
- Analogue Adventures – Part 49: Fujifilm Neopan Acros 100 II - February 4, 2026
This is excellent information, and I, for one, would welcome more post-processing articles. Brushing in temperature adjustment to balance out the street lighting is a clever trick that I’ll have to remember. I’m surprised you used such a high clarity, but it worked well for this image. Gorgeous work!
Thank you!
Thanks for the post processing insight and the planning behind the image. Well done and beautiful image! I would like to see more of these types of articles in the future.
For taking the pano, were you using a pano kit? You were in manual mode, right?
Dear Alfredo,
for taking panoramas I am either in manual mode or I just use the auto exposure lock (AEL).
When it comes to nodal rails there are two types: dinky and bulky.
I own one of the latter type but I rarely carry it with me and didn’t here either.
But as there weren’t any objects close to the camera in the frame stitching was no problem.
Parallax error is more of a problem with objects close to the camera.
Same question as Alfredo 🙂 I don’t usually found parallax problems with panos except for very first plane objects. However, I use a standard ballhead and I have some problems with leveling. Are you using a leveler or any other accessory?
PS: The “making of series” are VERY useful, thanks for posting!
Ah, for leveling I just use the built in level of the A7 series. It is not perfect but good enough.
For the rotation of the camera I use the rotator that came with my ballhead (the kit of rotator and ballhead ist called “Sunwayfoto FB28i-DDH”).
It is the smallest ballhead kit with rotator on top I know of (the ones with the rotating plate between ballhead and tripod are rather useless in my opinion).
You can read more about it in my article “Tripods for mirroless cameras”.
Very interesting post. I think it’s a good idea to replace the plate of my ballhead and put something similar to the rotator you mention. One question: there are heads with a ‘click’ each time you move a certain number of degrees, for fast switching. Do yo miss not having it? it is a cool feature, but they are a bit big…
I already tried one of these, but I wasn’t overly happy with it as for every focal length you need a different setting and you end up only fiddling around with it.
And honestly, I think it is not needed: I just use the framelines on the screen for ~30% overlap.
Resolution change when using ultra wide lenses for creating pano with LR
Hello Bastian, nice review and you seem to share the same love for the Voigt 10mm even if you didn’t use him here. It’s a great lens to use for landscapes with dramatic skies.
But when I use pictures, made with the Voigt 10mm or the 16-35mm at 16mm, I’m confronted with a change in resolution when I use Lightroom or photoshop to create the pano.
The images taken with an A7r2 + wide angle are around 5300 pixels high (for horizontal images).
When I combine them the resulting pano is only around 3500 pixels high, even when I combine only 2 or 3 horizontal images.
Hugin or Autopano Pro seems to do it in the right way.
On the other hand when I combine pictures taken with “normal” to “tele” lenses the resolution doesn’t change that much.
Prefer the Lightroom version because of the resulting dng file and the easy workflow.
Don’t have to convert to tiff and retain the original DR like you mentioned.
Or is there a setting I’ve to change or is this the way LR and PS works ?
Thanks for any suggestions.
Dear Edward,
that is a very interesting find!
I did not yet notice that behaviour, but since I have the 10mm 5.6 it seems I am taking less panoramas, so that may be the reason.
I believe I know exactly where you were standing when you took the shot with the grass in the foreground! A little overlook off to the side of the trail from Monterosso? Shaded by a gnarled tree? I was there a few weeks ago, and I had the exact same problem. I moved on down the trail and found a wall that I could stand on for a nice view, but with my Canon FD 2.0/35mm I couldn’t capture the full town and breakwater — and somehow it didn’t occur to me to do what you did.
That is an amazing shot, and your detailed post-processing writeup is helpful to understand how you got there. Keep doing what you’re doing!
Hi Bastian,
I see that you use the panorama Mindshift. I am considering to get one. My gear consists of a Sony A7II, with all 4 Loxia’s. Will I be able to have the camera with one lens mounted and two other Loxia’s in the belt compartment? The 85 can be stored in the “upper” department.
Regards!
Toon
Dear Toon,
this will be no problem.
I usually carry A7rII + L-bracket + 4 lenses (e.g. Loxia 21 / Loxia 85 / ZM 35mm 1.4 / VM 10mm 5.6) in the belt compartment.
But this is a rather tight fit and I am not using the hoods, so with hoods you might only get 3 in.
Thx!
Hi Bastian. Awesome review as always. I’m actually looking forward to a “making-of series” involving ultra-wide angle such as the VM 10mm as I know they are notoriously hard to look for setting up locations and compose. Thank you!
Thank you!
I haven’t yet decided which one to cover next, so I will think about one taken with the 10mm!
Hello,
I have tried to repeat your technique, shooting vertical and assembling, in several occasions. Using objectives up to 35mm i was always successful. Nevertheless using 21mm it was never good. Have you tried successfully? If yo, anything to take specifically into account?
Regards
Hey,
this panorama I took with the Loxia 21mm 2.8.
With 21mm (and wider) it only works if there is nothing in the foreground.
Otherwise you have to use a nodal rail to rotate around the nodal point of your lens.
I am currently testing a panorama adapter (small, lightweight and affordable) which I specifically bought to use with the Loxia 21mm 2.8.
Hello,
thanks for your answer and for the explanation. Interesting and not evident. Let me know about your experiences with the panorama adapter.
Regards and thank you again
Hi Bastian,
thanks for this fantastic article!
I’m pretty new to this and I’d love to experiment, but first I wanted to ask one thing: is it really worth to do a panorama stitch vs taking a single shot with a wide lens if you’re not going the print route? Do the extra pixels really matter?
I’d love to read an article showing the upsides of using techniques such as panorama stitching vs taking a single shot with a wide angle lens such as the Loxia 21mm.
That question no one can answer for you. For many people the pictures they get from their phones are good enough.
In this and this article there are examples of panorama vs single shot.
Thanks for the reply!
I’ve read both articles and both sounded really interesting to me. I have an a7 with a Miranda 24mm f/2.8, Pentax Super Takumar 35mm f/3.5 and a Nikkor H•C Auto 50mm f/2 (and soon a Minolta MD 50mm f/2 thanks to Phillip’s article 😉 ). This might come in handy in some situations, although I find the wide view and detail I get from my 24mm more than satisfactory – 24Mp is a lot, even when I look at my pictures at 1:1. Still, I’m really curious to see how much detail and clarity I can get using, for example, my Pentax 35mm and stitching!
Definitely some good food for thought!
You are welcome!
Hi Bastian,
as you took the photos in portrait orientation, did you use a L bracket and Van you recommend one dir the A7II? You said, you used the Sunway rotator. Is the more affordable Mengs rotator a sensible alternative, if you take panorama shots only occasionally?
Trank you in advance
Mathias
I am using Sunwayfoto L brackets and a cheap Mengs rotator is good enough.
Thanks a lot, Bastian!
I love this serie and your reviews on loxia. Just had my only new zoom Sony 24-105 returned and filled my bag with Loxia primes. Glad to find a Loxia fan here!
Recently i have changed from Canon apsc to Sony a7m3. I was using zooms on Canon, that’s why i ordered 24-105. Then i found i cannot afford holding heavy zooms on full frames….
Planning a ski trip and will definitely bring my loxia, a7m3 and computer. Thank you for your articles!